

 ホーム
ホーム ブログ
ブログ アクセス
アクセス3Dプリントアトリエ
| << Sink cabinet #3 洗面台DIY作成 2021-02-08 | Natural wood desk 簡単なデスク作り >> 2021-02-15 |
2階と1階をつなぐ階段にはドアがありません。このままだと冷房しても暖房してもあまり意味がないですね。ただし、普通のドアを付ける場所はないのでスライド式ドアをDIYで作りましょう。。。
The stairs connecting the first and second floors of the house don't have a door at either end, so heating the living room in winter or cooling it in summer is currently pretty much impossible. Since I can't really add a normal hinged door there, I decided to make my own sliding barn door.
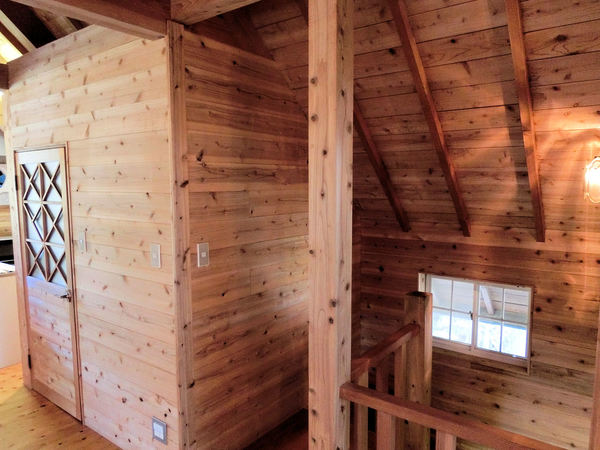
▲ これは2階のリビングの部屋です。写真の真ん中にある柱の右側に手すりがありますのでそこはアクリル板を張ります。ネットでアクリル板屋さんから注文しました。手すりの上に1枚と手すりの下にまた1枚を図って、ネット店にカットもお願いしました。
This is the stairwell in the corner of the 2nd floor living room. The space to the right of that upright column has a nice wooden handrail, so I ordered some 3mm acrylic sheet to fit above and below it.
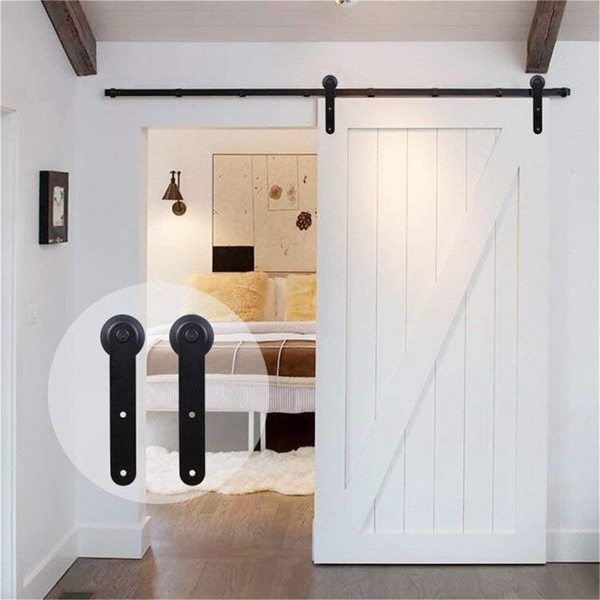
▲ アマゾンでスライド式ドアキットを注文しました。キット内容は180cm(6フィート)のレール、ドアに付けるローラー2個とネジ部品などでした。7,590円で買いました。
For the door I ordered this black iron sliding door kit on Amazon Japan for $75, which contains a 6ft/180cm rail and 2 rollers which would affix to the door.
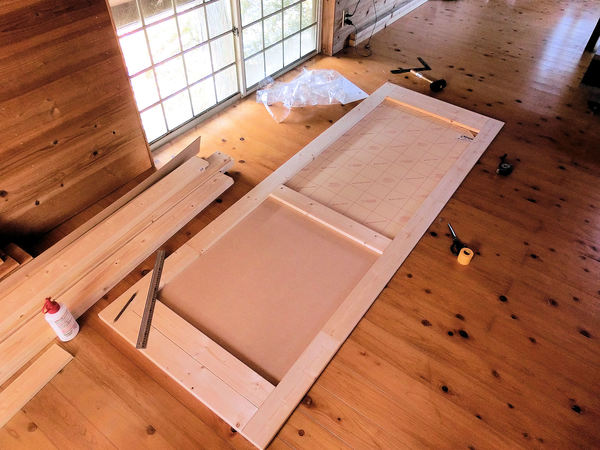
▲ まずはDIY店から5mmのMDF板と1x4パイン板を買いました。ドアの正面の裏面にもパインを張りますので、その間にMDF板を入れます。ドアに窓も付けますので、窓の形をMDFから切って4mm厚みのアクリル板をあそこに挟まった。木材ボンドは両面にも使ったんですが、ネジは裏面だけに使いました。
To fit this rather tall space I needed to construct my own door, so I started with a sheet of 5mm MDF board cut to the dimensions of the door. I also wanted to include a large window to keep the stairwell as light as possible, so the space for a 4mm acrylic sheet was then cut out of the MDF. I then used wood glue and the occasional screw to attach 1x4 pine planks to each side of the door.
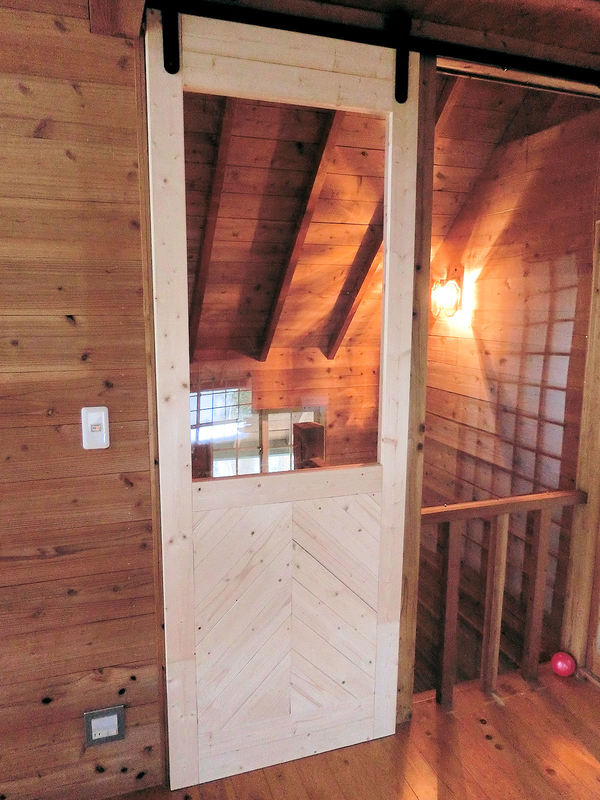
▲ 正面にキットのローラー2個を付けるとテストで載せました。成功だ!やった!
ドアに下のほうに斜めのパイン板を入れました。ちょうどいい長さに切るのがちょっと大変だったけど、雰囲気が好きだった。あとは色ステインしました。
これで使えるようになったんだけどその窓はイマイチでした。ということで数週間後に偽ステンドグラスを作ってみました。
After attaching the 2 rollers to the top of the door, I was able to check it fitted and rolled properly.
Then I added more pine planking to the lower half of the door, in a herringbone pattern, and darkened the wood with woodstain.
At this point I had a fully functioning door, but I wanted to brighten up the window area.
▲ その前にアンティーク屋さんでステンドグラスを探してみたんですが、なかなかサイズとデザインが合わないんですね。
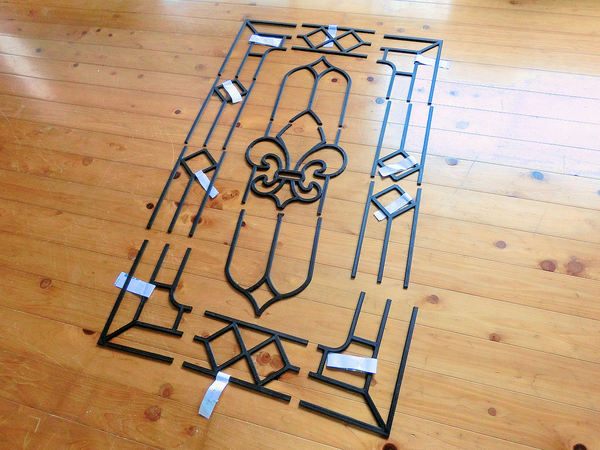
その代わりに3Dプリンターでオリジナルデザインで作りました。サイズ的に30cmずつでプリントしましたが、接着剤でつなぎました。
I'd previously looked in local antique shops for suitable stained glass, but hadn't found any the right size or in a design I liked.
So instead I turned to my trusty 3D printer, and drew up this custom design to fit the window. The size of each printed piece was limited to 30cm by the size of the printer itself, but it's easy enough to glue the pieces together to make a bigger design.
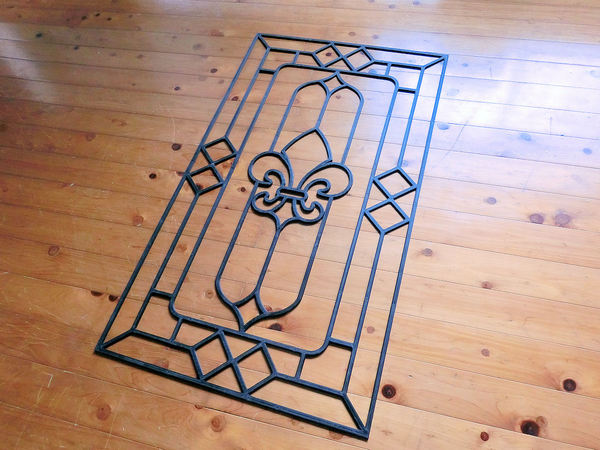
▲ 正面の偽ステンドグラスのデザインはこんな感じでした。プラスチック製ですので、重さが300gほどかなぁ?
両面テープでドアの窓に張りました。
One big advantage that a 3D-printed design has over a real stained glass window is the weight. This probably only weighs maybe 300g, so I stuck it to the window with double sided tape. It cost only about $5 to print.
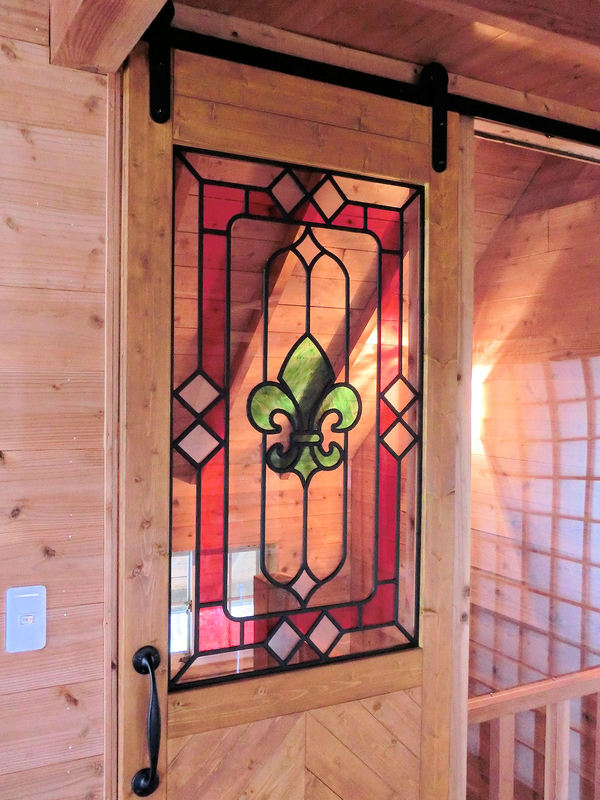
▲ 張った後に裏面を塗りました。TAMIYAのクリアペイントの赤と緑(各500円)で2回塗りました。最後にダイヤモンド形の部分には半透明のクリアファイルを切って、両面テープでつけました。
After attaching it to the window, I used a couple of pots of Tamiya Clear Paint (red and green) to paint the back of the window a couple of times. For the smoky white diamond shapes, I just used some spare plastic sheets I found in the local 100yen shop, carefully cut to size and taped on.
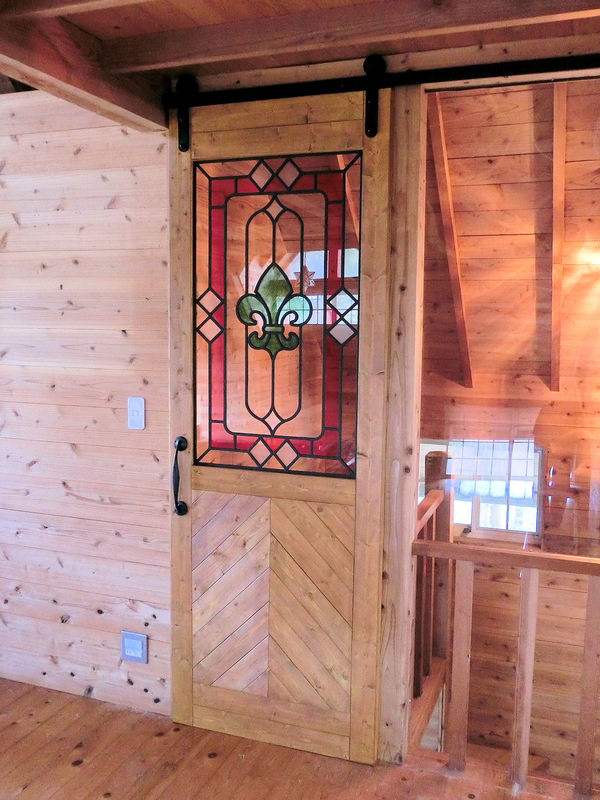
▲ ハンドルはDIY店のHANDSMANで買いました。裏面にはふすま用の埋め込みタイプのハンドルが必要でした。
The wrought-iron door handle was found in a local DIY shop, and matched the look pretty nicely.
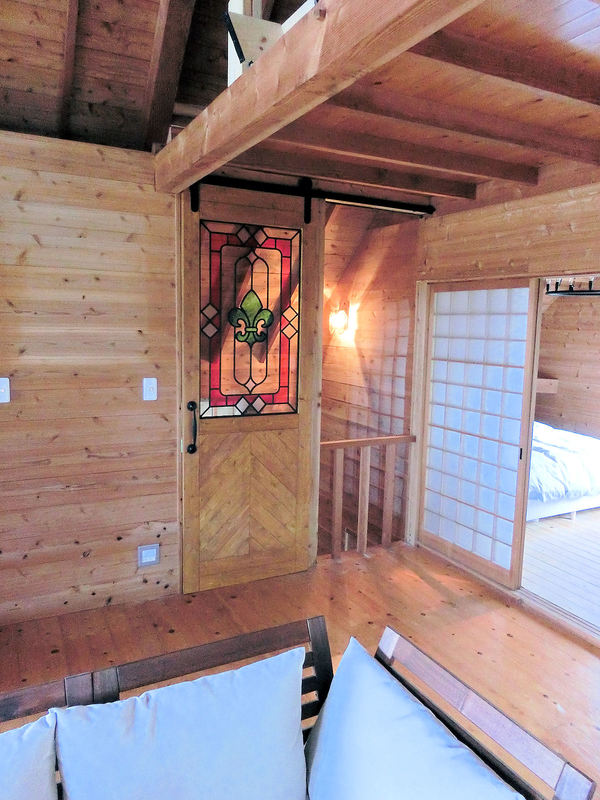
▲ どうでしょうか?ウッドの部屋にはちょっとだけのカラーがいいと思います。
So here's the finished door! In a room predominantly decorated in basic wood colours, I think it definitely helps to have a splash of bright colours too.
| << Sink cabinet #3 洗面台DIY作成 2021-02-08 | Natural wood desk 簡単なデスク作り >> 2021-02-15 |
〒869-2226 熊本県阿蘇市乙姫2070-48
営業時間:13:00~17:00*
営業日:毎週金曜日・土曜日
(* ご来店前にお電話をお勧めします 090-1349-4029)


")
阿蘇山の3D地図テーブルを作ってみた! I made a 3D MAP table!
3D阿蘇カルデラはいかがですか? 3D Maps added to the shop
Painted models available 塗装済の模型発売中!
Making garage doors ガレージの扉DIY作成
New side-project... a hobbit house! ホビットの家
Shops added to the shop ショップにお店
Repainting a (mini) car ミニカーのリペイント
Buying land in Otohime 乙姫で土地探し
Scale model of the Inaba Residence 稲葉家下屋敷の模型
Customer request - Pokemon Ball! ポケモンボール
Garage construction ガレージ工事 PART 6
Secret Aso-volcano pool 阿蘇山の隠れプール
Garage construction ガレージ工事 PART 5
Garage construction ガレージ工事 PART 4
Garage construction ガレージ工事 PART 3
Garage construction ガレージ工事 PART 2
Garage construction ガレージ工事 PART 1
Making a capiz shell wall light カピス貝殻壁掛けライト
Making a rustic antique-style wall light アンティークなライト作成
Making a capiz shell chandelier カピス貝殻シャンデリア
Online store opening sale グランドオープンの割引
Opening a webstore 通信販売サイトを開店します!
A lucky escape with the typhoon! 台風がヤバいけどラッキー!
E-bike conversion DIYで電動自転車を作った!
$200 Underfloor heating 2万円でDIY床暖房
3D-printed OPEN/ CLOSED sign アトリエ看板作成


 神社
神社 寺
寺 茶屋
茶屋 城
城 店
店 家
家 農場
農場 建物その他
建物その他 壁・柵
壁・柵 橋
橋 池
池 LEDライト