

 ホーム
ホーム ブログ
ブログ アクセス
アクセス3Dプリントアトリエ
| << Finishing the deck 人工木材デッキ #2 2021-04-10 | Making a deck table デッキ用テーブル作成 #1 >> 2021-04-25 |
1階のホールにはまだ家具があまりない。ベンチ形のソファ2台作りましたが、今回テーブルを作成します!
相変わらず安いパインの2x4で作ります。大体2時間かかりました。
The big hall room downstairs is still lacking some furniture, so it's time to make some cheap and easy tables to go with the bench sofas. As usual I've gone with the simplest and cheapest option of using pine wood 2x4s to knock these together, in a couple of hours each.
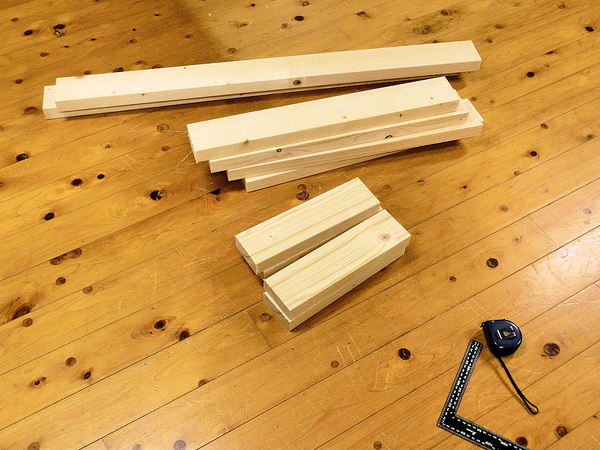
▲ テーブルの脚とトップを別々に作成します。理由はちゃんとありますが、後で説明しますね。まずは2x4の4本を写真のようにカットしました。
The leg section and the tabletop section will be constructed separately, so here's what I cut from four 2x4s to make the leg section for one table.
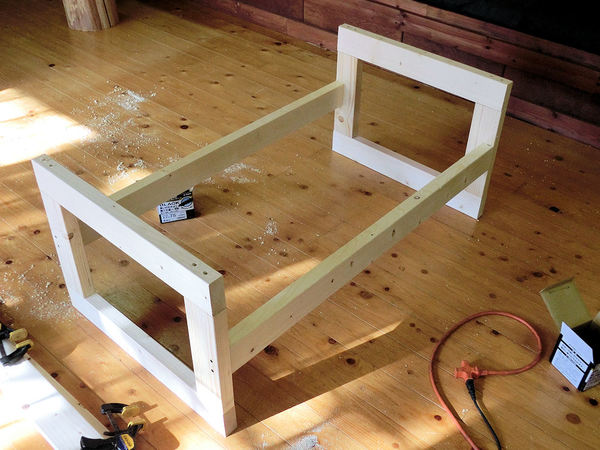
▲ 長い75mmネジで組み立てました。この形はそんなに強くないんですが、多目的テーブルとなります。写真のようで使えばローテーブルになります。しかし、90度回転すると机ぐらいの高さになります。
It was a pretty simple process to screw these 2x4s together into a simple box shape. You'll notice that the rectangle frame at each end is not quite square in shape. That's deliberate, so that you can use the table as a low table when you want to .... or you can rotate the leg section 90 degrees to make a higher table.

▲ トップは18mmのブロックボードです。120cmx90cmにカットして、周りに1x4で囲まりました。この部分も多目的でもなりますですね - 写真のようにも使えますし。。。
I used a 120cm x 90cm cut of blockboard (two sheets of thin veneer with light wood in between) as the tabletop, with some 1x4 planks carefully cut to size and screwed to the outside. Well, actually this is just the inside tabletop, and not the final tabletop, as you'll see from the next photo...
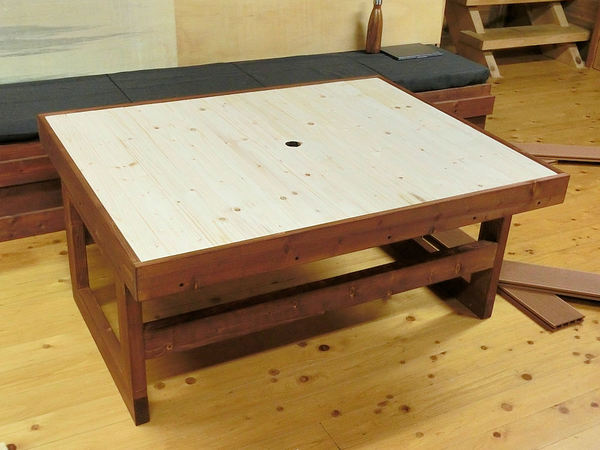
▲ 。。。もう一枚のトップ部分を入れたら、普通のテーブルとなります。これは1x4で作成しました。
I also made this second, higher tabletop surface from 1x4 planks, which can be slotted into the surrounding frame to make the table into a regular, normal table.
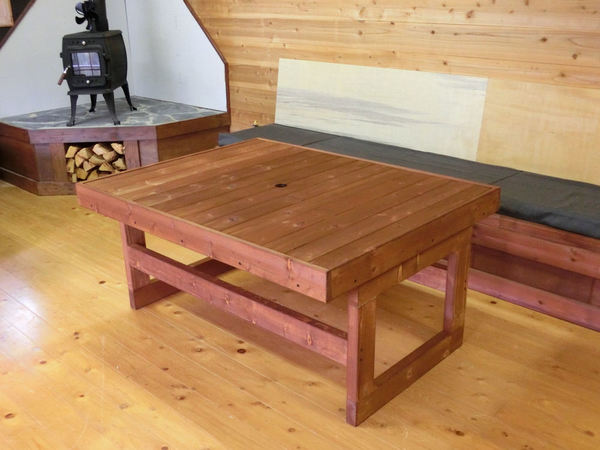
▲ 普通のローテーブルの形です。このトップを取るには指を入れるところが必要でしたので、真ん中に4cm穴をあけました。花瓶で隠すつもりです。
Here's the completed table in its low version, after it was woodstained with a slightly reddish walnut colour. The thing about having a removable top for the table is that you also need some way of lifting it out, so I cut a 4cm hole right in the middle, for me to put my fingers into to lift it out.
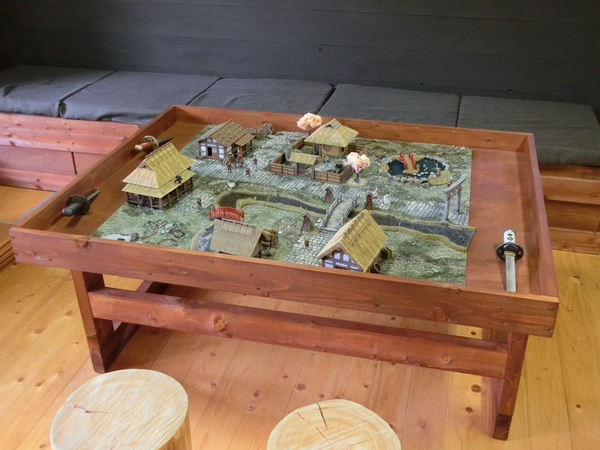
▲ ゲーム用のローテーブルの形です。ボードゲームなどをするときにダイスやフィギュアが床に落とさないように周りの壁が便利です。
This is the low version of the table, with the top removed. This is ideal for playing boardgames or miniature wargames (as pictured), as the surrounding frame keeps dice and figures from rolling onto the floor, and is a fairly safe place to put drinks and snacks too.

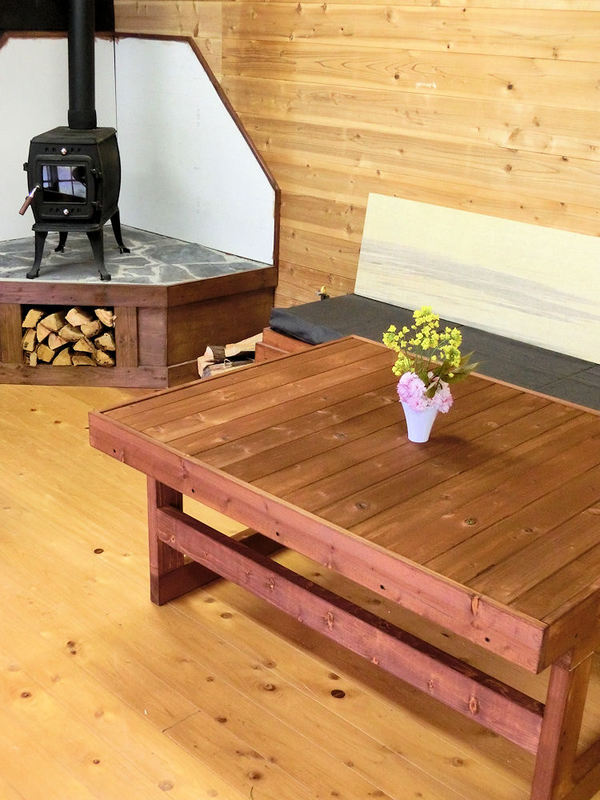
▲ 部屋の雰囲気がこんな感じになりました。こっち側の椅子が大きいヒノキの巻き。
The hall room's looking pretty good now, with two bench sofas against the walls, a woodburning stove in the corner, and two tables. These can also be placed together to make one larger table, of course. The seats on this side are just thick stumps of Japanese cypress, sanded smooth.
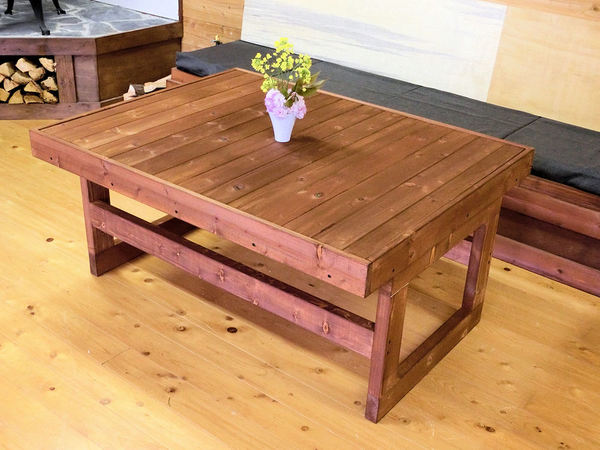
▲ 真ん中の指を入れる穴を隠すために、3Dプリンターでカスタムの花瓶を作りました。花瓶を入れるとカワイイテーブルになったでしょう?
Here's my idea for disguising the hole in the middle of each tabletop. I designed a quick vase shape to fit the hole (and another 6cm down inside), and 3D printed them from white plastic. They look pretty good with some simple wild flowers, I think.
▲ これで1階のホールがとりあえず使えるようになりましたので、今度からデッキ用のBBQテーブルを作成します!
With these tables done, the next job will be to make a large BBQ table for the outside deck! Watch this space...
| << Finishing the deck 人工木材デッキ #2 2021-04-10 | Making a deck table デッキ用テーブル作成 #1 >> 2021-04-25 |
〒869-2226 熊本県阿蘇市乙姫2070-48
営業時間:13:00~17:00*
営業日:毎週金曜日・土曜日
(* ご来店前にお電話をお勧めします 090-1349-4029)


")
阿蘇山の3D地図テーブルを作ってみた! I made a 3D MAP table!
3D阿蘇カルデラはいかがですか? 3D Maps added to the shop
Painted models available 塗装済の模型発売中!
Making garage doors ガレージの扉DIY作成
New side-project... a hobbit house! ホビットの家
Shops added to the shop ショップにお店
Repainting a (mini) car ミニカーのリペイント
Buying land in Otohime 乙姫で土地探し
Scale model of the Inaba Residence 稲葉家下屋敷の模型
Customer request - Pokemon Ball! ポケモンボール
Garage construction ガレージ工事 PART 6
Secret Aso-volcano pool 阿蘇山の隠れプール
Garage construction ガレージ工事 PART 5
Garage construction ガレージ工事 PART 4
Garage construction ガレージ工事 PART 3
Garage construction ガレージ工事 PART 2
Garage construction ガレージ工事 PART 1
Making a capiz shell wall light カピス貝殻壁掛けライト
Making a rustic antique-style wall light アンティークなライト作成
Making a capiz shell chandelier カピス貝殻シャンデリア
Online store opening sale グランドオープンの割引
Opening a webstore 通信販売サイトを開店します!
A lucky escape with the typhoon! 台風がヤバいけどラッキー!
E-bike conversion DIYで電動自転車を作った!
$200 Underfloor heating 2万円でDIY床暖房
3D-printed OPEN/ CLOSED sign アトリエ看板作成


 神社
神社 寺
寺 茶屋
茶屋 城
城 店
店 家
家 農場
農場 建物その他
建物その他 壁・柵
壁・柵 橋
橋 池
池 LEDライト