

 ホーム
ホーム ブログ
ブログ アクセス
アクセス3Dプリントアトリエ
| << $200 Underfloor heating 2万円でDIY床暖房 2022-01-20 | HUGE treehouse! 高森ツリーハウス >> 2022-03-21 |
昔から持っていた自転車がまだまだ使えますが、阿蘇がちょっと広いです!坂道もありますがこの自転車には3ギアしかないんです!カリフォルニア産のビーチクルーザー式です。
自転車はまだ綺麗ですので、まだまだ使いたいですね!電動式自転車への変更キットを調べたら、いろいろなバリエーションがありましたが中国産の古いタイプのモーターキットを選びました。
Aso's a little bit hilly since it's on the slopes of an active volcano (!), and my old beach cruiser only has 3 gears - because it's designed for flat beaches, mostly. So I wanted to look into converting my cruiser into an electrically-powered bike, and came across several ways to do it. The cheapest was to fit an external motor to the rear wheel, using a conversion kit from AliExpress (and some extra bits and pieces), and being the cheapskate I am, I decided to try it the cheapest way possible!
▲ 買ったパーツはいろんなところから集めました:
合計約200ドルですので、22,000円ぐらいですね。
In total it came to about $200, with mostly free shipping. Only the batteries themselves required a $20 shipping charge, I think.
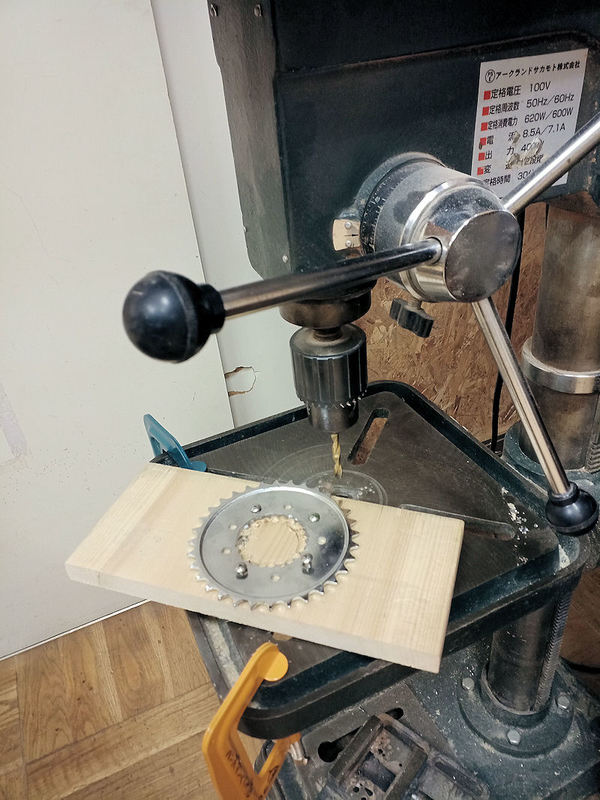
▲ このキットはほとんどどの自転車でも利用できますが、私のビーチクルーザ―だけには問題が発生しました。キットのコグがそのまま使えませんでした。穴が36mmですが、私の自転車には後ろにホイールにクルーザーブレーキが付いていますので、48mmの穴が必要でした。ちょっと悩みました。ネットで48mm穴のコグが見つかりませんでしたので、近くのDIY店「ハンズマン」の作業教室でドリル機械が無料で利用できました。写真のように小さい穴を30回ほど開けて、やっと50mmの穴があけました。成功!
The first job was to fit this big metal cog to the rear wheel of my bicycle, but here I found my first (and only) problem.... it didn't fit! The kit only comes with one cog size, which has a 36mm hole in the centre. This usually fits most bikes, apparently, but sadly it did not fit my beach cruiser, as it has a coaster brake built into the centre of the rear wheel (allowing you to brake while having a surfboard under one arm!), and therefore required a 48mm hole.
After no success online finding a replacement cog with a suitably large hole, and no success drilling a large hole in the cog myself, I took my cog to my local DIY store, and used the drill press they had in their free-to-use customer workshop. So I carefully drilled about 30 small holes in a ring, and poked out the centre. Mission accomplished!
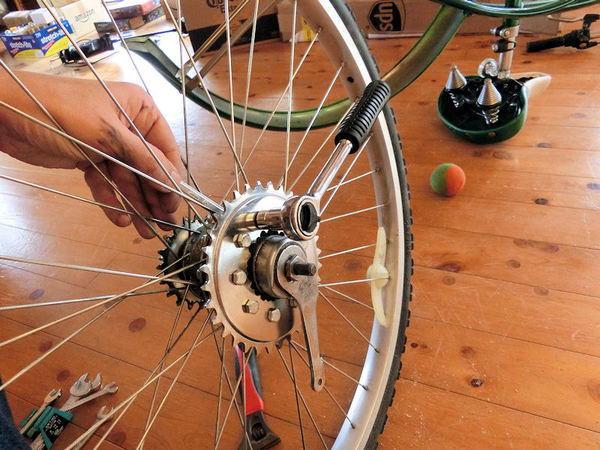
▲ 後ろのホイールを外して、そのコグを写真のように付けました。必要な道具がレンチぐらいだけですね。
Back at the house, I removed the rear wheel from the frame, and fitted the metal cog. It simply bolts to the spokes using thick rubber cushions to hold it tightly in place. Easy!
▲ コグ付きのホイールとモーター用の短いチェーンを自転車に付けました。
Then you fit the wheel back on the frame, and don't forget to put the small motor chain inside too!
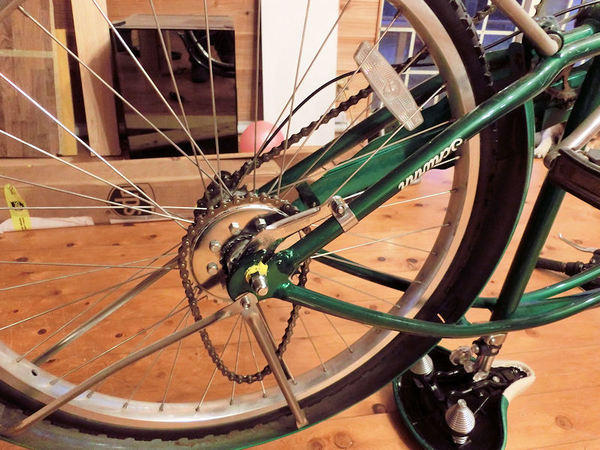
▲ 次はモーターですね。この黒いブラケットがキットのパーツですので、一般の自転車には利用できます。残りの作業がバッテリーとコントローラーですが、結構簡単ですね。バッグに入れて自転車のフレームに付けます。最後にハンドルバーにスロットルを付けて、ケーブルでつなぎます。これで完成でした。
Next you need to fit the motor's bracket to the frame and make sure the motor's cog lines up nicely with the chain to the rear wheel. It takes a while to make sure it's in the right position so the wheel and chain spin smoothly, without slack, but nothing too hard.
Then it's just a matter of placing the batteries in the big bag, the controller in the small bag, and attaching those to your bicycle. The last part to add is the throttle on the handlebar. When you order the kit, you can either choose a twist-grip throttle that replaces the right-hand rubber grip, or a thumb-push throttle lever. I chose the thumb-push lever, and attached it to the left-hand side of my handlebar - because my gears are already on the right. Then connect up the cables, and you're done! Yay!
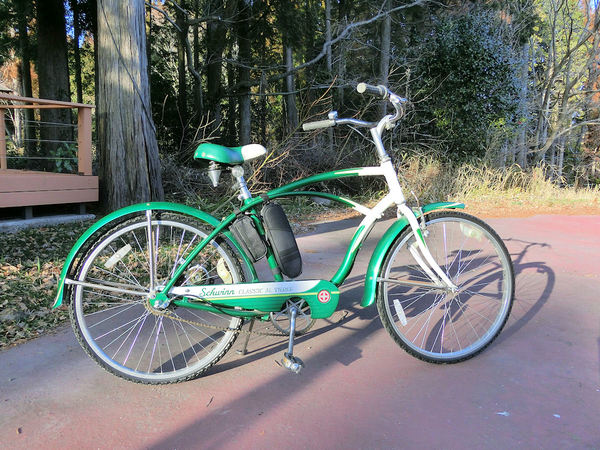
▲ 完成の電動式バイクです!右側が結構綺麗ですね。2個のバッグしか見えませんので普通の自転車みたいです。
Here's the completed e-bike. From this side, you can't really even tell its electric, because all you'd see are the two bags in the middle.
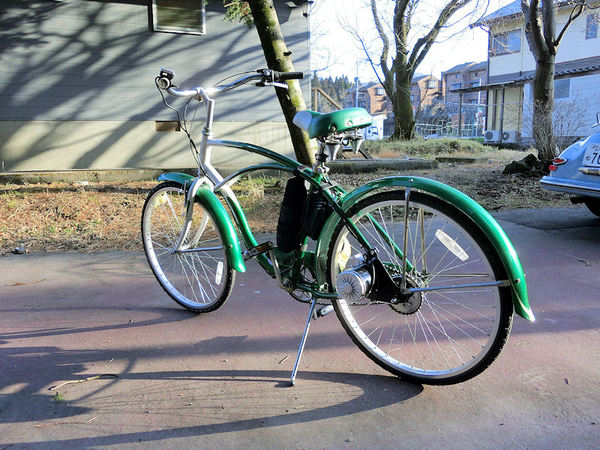
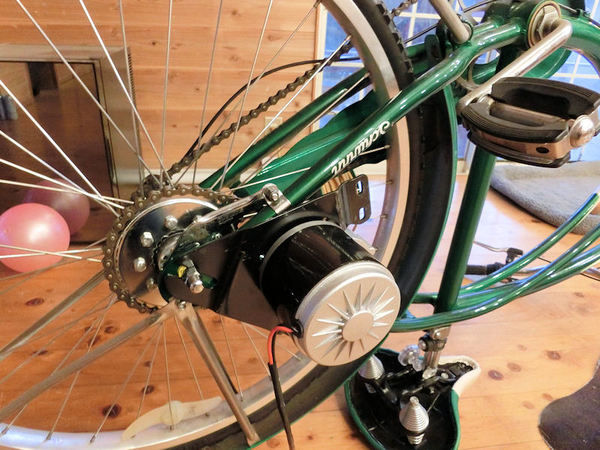
▲ 左側にはモーターが見えます。付けたモーターが古い形の「ブラッシュ」タイプですので最新型の電動式自転車と比べたらちょっと音が出ますが、別に問題ないです。
From the left side you can see the motor clamped to the rear wheel. I chose a brushed-type motor (because it was cheapest!) but it does use older technology and does make a small noise when working, but I'm not too bothered. The latest brushless motors are of course quieter, but a little more expensive.
ビデオのように電動だけでも利用できます。2個のバッテリーで大体1時間のフルパワーで使えそうだと思っております。ということは20~30kmほどです。
Above is a quick video showing my first test ride! The bike picks up power nicely, without any pedal assistance, and those two 36V batteries running in parallel should provide enough power for about 1 hour of motor-only cycling.... which is probably somewhere around 20~30km, I think. That's plenty for me, but I guess I could add a third at some point in the future to extend that range if need be.
An excellent step-by-step video guide I found useful:
| << $200 Underfloor heating 2万円でDIY床暖房 2022-01-20 | HUGE treehouse! 高森ツリーハウス >> 2022-03-21 |
〒869-2226 熊本県阿蘇市乙姫2070-48
営業時間:10:00~17:00*
定 休 日 :毎週日曜日・月曜日
(* ドアが閉まっている場合もあります ー 近くにいます。ちょっとお待ち下さい!)


Scale model of the Inaba Residence 稲葉家下屋敷の模型
Customer request - Pokemon Ball! ポケモンボール
Garage construction ガレージ工事 PART 6
Secret Aso-volcano pool 阿蘇山の隠れプール
Garage construction ガレージ工事 PART 5
Garage construction ガレージ工事 PART 4
Garage construction ガレージ工事 PART 3


 神社
神社 寺
寺 茶屋
茶屋 城
城 家
家 建物その他
建物その他 農場
農場 壁・柵
壁・柵 市場
市場 橋
橋 池
池 LEDライト