

 ホーム
ホーム ブログ
ブログ アクセス
アクセス3Dプリントアトリエ
| << Toilet fixed 便器のDIY取付 2021-01-25 | Kitchen cabinets #2 イケアのカウンターでキャビネット作成 >> 2021-01-28 |
キッチンは不便!天助は斜めですし、小さい壁が3つあります。しかし、一番長い壁には低い窓がありますので、家電は置けないんだ!
窓をカバーして、ゼロからDIYキッチンを作るしかない!システムキッチンはこのスペースには使えませんが、お金はもったいないので予算20万円で頑張っていきたいね。
This slightly unique Japanese house's kitchen is, to be honest, totally terrible. It's tucked away in one small corner of the house, with the entrance next to the rusty metal sink cabinet requiring you to squeeze into a 43cm gap! Who plans these things?!
Once you're in the tiny kitchen, it gets worse! Of the three small walls available to place furniture, one is required for the entrance, and the longest wall has a low window in it, so you can't put anything there either! What a mess!
Kitchens are important. They should be a place you enjoy spending time, not small, pokey and badly laid-out. So the only thing to do here is to cover up that window, maximise wall space, and start completely from scratch! My budget for this kitchen build is about $2000, so keeping costs low with good condition used appliances (e.g. fridge) helps too.
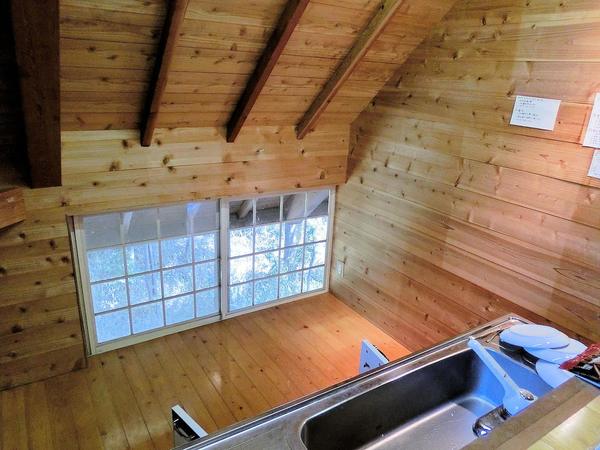
▲ この低い窓が結構かわいいですが、あまり役に立たないんです。物が全然置けないし、あまり明るくはないんです。
This is the low window in the kitchen. It's not very useful under the roof eaves anyway, since it doesn't really let much light in, so I don't really have a problem covering it over.
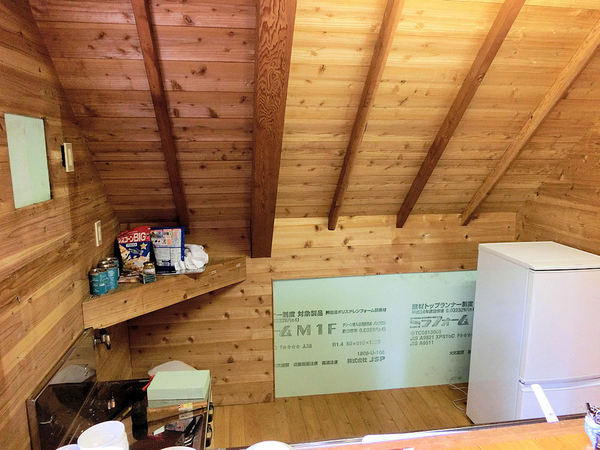
▲ まずは10センチ断熱材フォームで窓をカバーしました。外側から誰も見えないので、別に気にしていない。カバーしたら、やっと冷蔵庫が置けるスペースができました!
First thing to do is cover the window with a 10cm sheet of insulation foam. I'm not going to completely remove the window, as nobody can see it from the woods at the back of the house.
Finally I have somewhere to put the fridge!
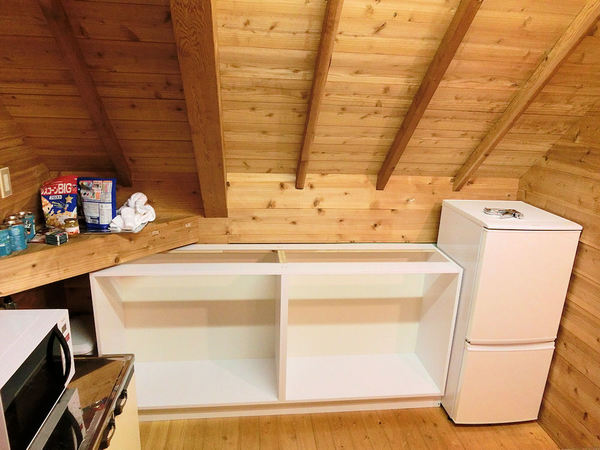
▲ 左側にある▷形の部分は建物強化のために必要ですので、その▷と冷蔵庫の間にキャビネットを入れます。三角の板を外せば、新しいカウンターがちょうどフィットします!
イケアで181cmx45cmのカウンター(KARLBY: 17,900円)を買いました。キャビネットはDIYで作ります!
近くのホームワイドDIY店で白い化粧版40センチ幅(アイリスオーヤマ)を買いました。10センチのベースの上にちょっとずつでキャビネット本体を作りました。作り方は結構簡単ですが、まっすぐ切るのが大変です。
The cabinet would fit in between the triangle frame support (required to hold the house up!) and the fridge. I bought a 181cmx45cm walnut veneer countertop from Ikea for $180, and sketched out a 180cm cabinet to fit. Using 40cm wide white veneer boards from the local DIY store, I first built a 10cm base for the cabinet, and then carefully added sides and supports on top.
The biggest problem is keeping your lines straight if you're cutting boards, so whereever possible I used the veneer boards at their original size without any cuts.
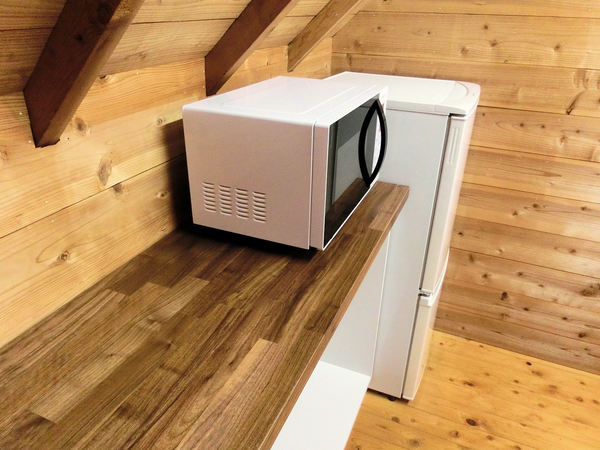
▲ イケアのウールナットカウンターを上に置くととりあえず完成。キャビネットのドアが後から付けます。ドアも60センチの化粧板を使います。
Placing the Ikea counter on top and screwing it in felt really satisfying! For now, this will do. I'll be adding cabinet doors later on, also made from 18mm veneer boards.
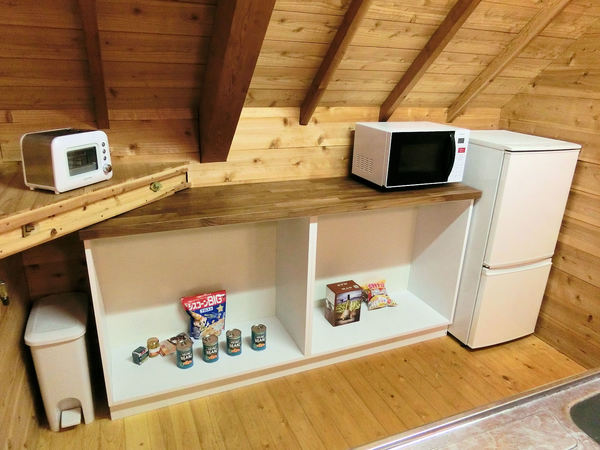
▲ 中の棚も後から付けます。今のままでも満足ですね!
カウンターは2万円、化粧板(棚&ドア含めて)は約3万円使いましたので、合計5万円でDIYキャビネットになっています。どうですか?
Including the doors, hinges and shelves inside (also to be added later), and the $180 for the counter, this cabinet came to probably around $500 in total. A little more than I hoped, but it looks good, is solidly built, and should be indistinguishable from a shop-bought system kitchen when it's finished.
| << Toilet fixed 便器のDIY取付 2021-01-25 | Kitchen cabinets #2 イケアのカウンターでキャビネット作成 >> 2021-01-28 |
〒869-2226 熊本県阿蘇市乙姫2070-48
営業時間:13:00~17:00*
営業日:毎週金曜日・土曜日
(* ご来店前にお電話をお勧めします 090-1349-4029)


")
阿蘇山の3D地図テーブルを作ってみた! I made a 3D MAP table!
3D阿蘇カルデラはいかがですか? 3D Maps added to the shop
Painted models available 塗装済の模型発売中!
Making garage doors ガレージの扉DIY作成
New side-project... a hobbit house! ホビットの家
Shops added to the shop ショップにお店
Repainting a (mini) car ミニカーのリペイント
Buying land in Otohime 乙姫で土地探し
Scale model of the Inaba Residence 稲葉家下屋敷の模型
Customer request - Pokemon Ball! ポケモンボール
Garage construction ガレージ工事 PART 6
Secret Aso-volcano pool 阿蘇山の隠れプール
Garage construction ガレージ工事 PART 5
Garage construction ガレージ工事 PART 4
Garage construction ガレージ工事 PART 3
Garage construction ガレージ工事 PART 2
Garage construction ガレージ工事 PART 1
Making a capiz shell wall light カピス貝殻壁掛けライト
Making a rustic antique-style wall light アンティークなライト作成
Making a capiz shell chandelier カピス貝殻シャンデリア
Online store opening sale グランドオープンの割引
Opening a webstore 通信販売サイトを開店します!
A lucky escape with the typhoon! 台風がヤバいけどラッキー!
E-bike conversion DIYで電動自転車を作った!
$200 Underfloor heating 2万円でDIY床暖房
3D-printed OPEN/ CLOSED sign アトリエ看板作成


 神社
神社 寺
寺 茶屋
茶屋 城
城 店
店 家
家 農場
農場 建物その他
建物その他 壁・柵
壁・柵 橋
橋 池
池 LEDライト