


3D-Print Studio
| << Making a capiz shell wall light カピス貝殻壁掛けライト 2023-07-18 | Garage construction ガレージ工事 PART 2 >> 2023-07-30 |
やっとガレージ工事が始まりました!梅雨にもう入りましたので時間結構かかったが、頑張ったよ!
At looooong last it's time to begin the construction of the garage..... and of course rainy season starts at exactly the same time too. Oh yay. This'll be fun.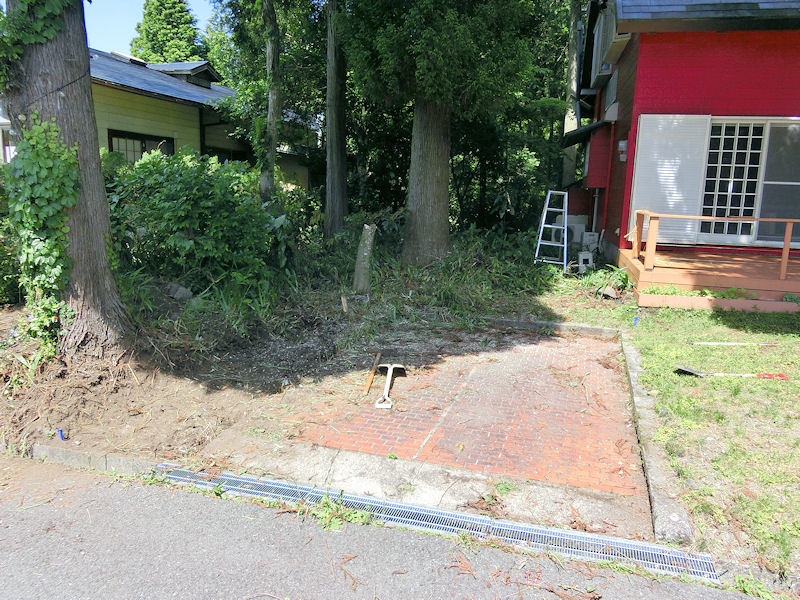
▲ まずは基礎の位置を大体決まりました。しかし、大きい紅葉の木が邪魔でしたので、チェーンソーで切りました。残念ですね!
First job was to start clearing out the area where the garage will be built, and the hardest job was to remove a lovely Japanese maple tree from one corner. It made me so sad to chainsaw it down, but unfortunately it was too big to pull it out and relocate it.
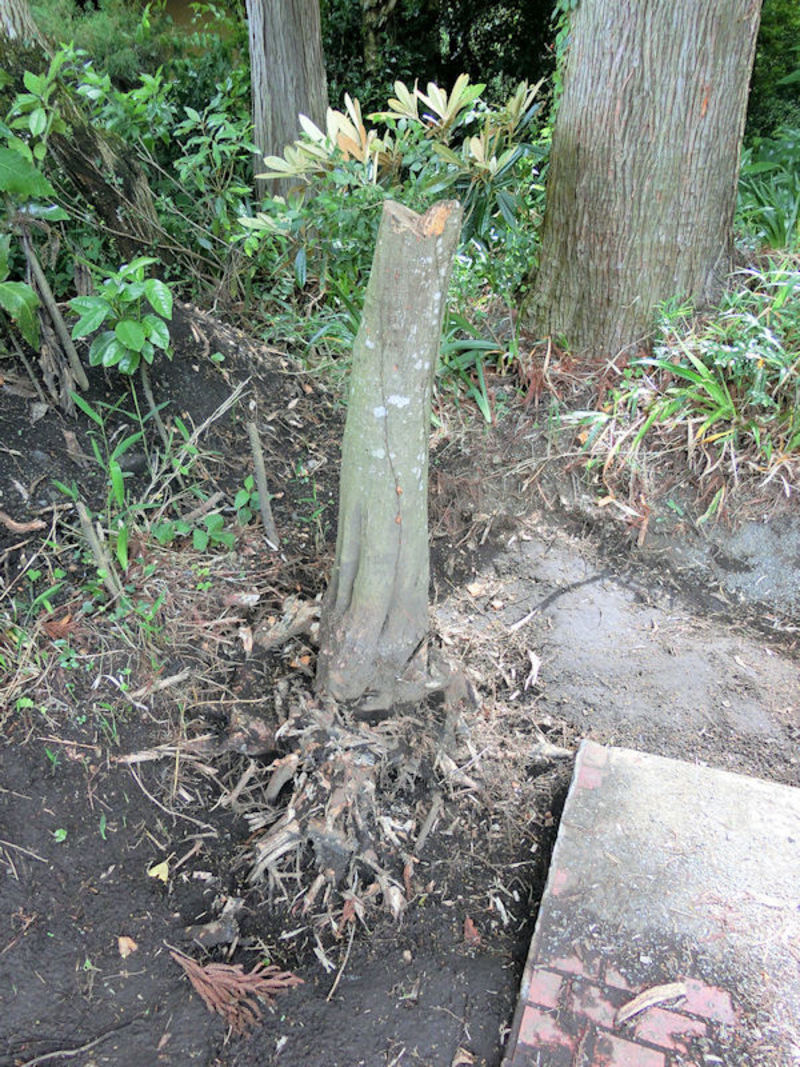
▲ 幹がたた20センチしかなかったので、簡単だと思っていましたがやはり根がすごかったですね!
I was optimistic that it wouldn't be too hard to remove the stump, but the 20cm-wide trunk became ever wider, the further down I dug! Eventually the main root ball was revealed to be about 1 metre across, with THREE 15cm-thick main roots branching off from that. Oh dear.
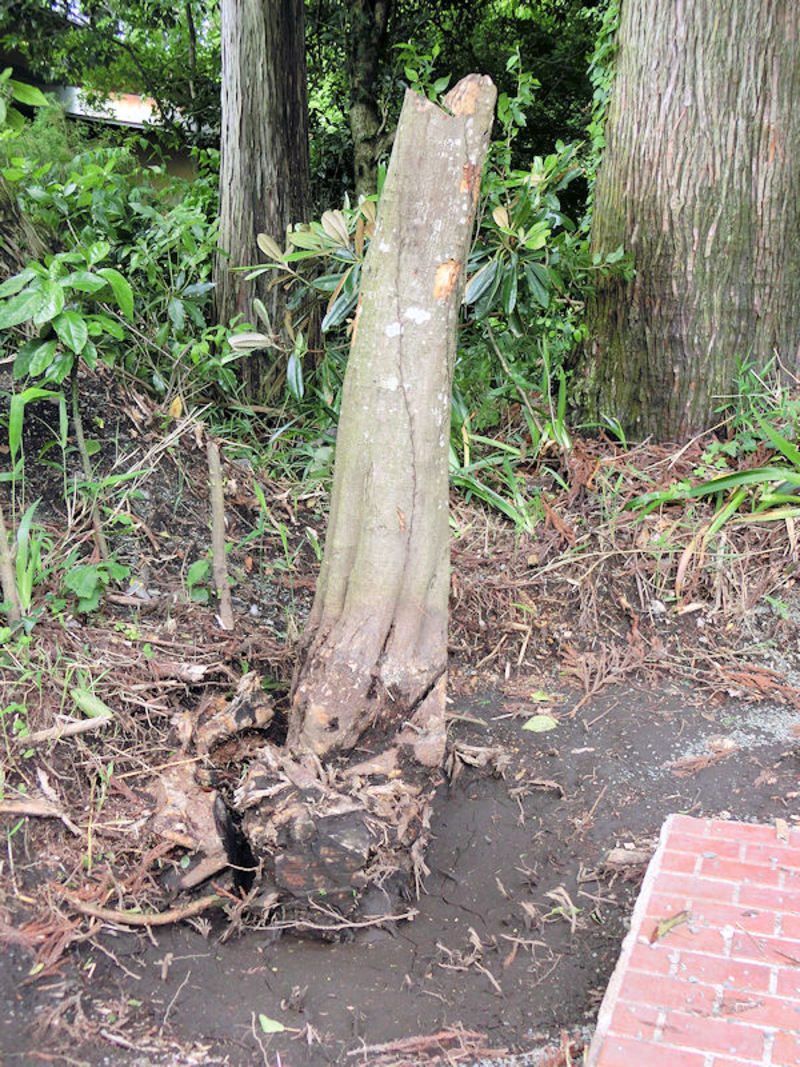
▲ 木の周りに1.5メートルぐらいの穴を掘って、根を一個づつで切るしかないんです。ただし、チェーンソーは土の中で利用できないので、ものすごい時間かかりました。2週間ほどかなぁ?
So I just had to keep digging down and out, until I was right under the tree's rootball. Then I had to cut each root out from the surrounding area with an axe, because I couldn't use the chainsaw there (it kills the blade to use it in soil!). All in all, it took me about 2 weeks of blood sweat and tears to get that tree out!

▲ 前からあった赤いレンガの駐車場ところがそのまま基礎として利用できますので、嬉しかった!左と後ろのほうに約80センチをきれいにしました。
Once the tree had been removed, I was left with a reasonably neat area, which needed to be levelled off flat. Luckily, I found that the existing brick parking space had its own concrete foundations, so I didn't need to remove it. Instead, I'll be able to use that brick area as part of the sub-foundations, and save some time and cost.
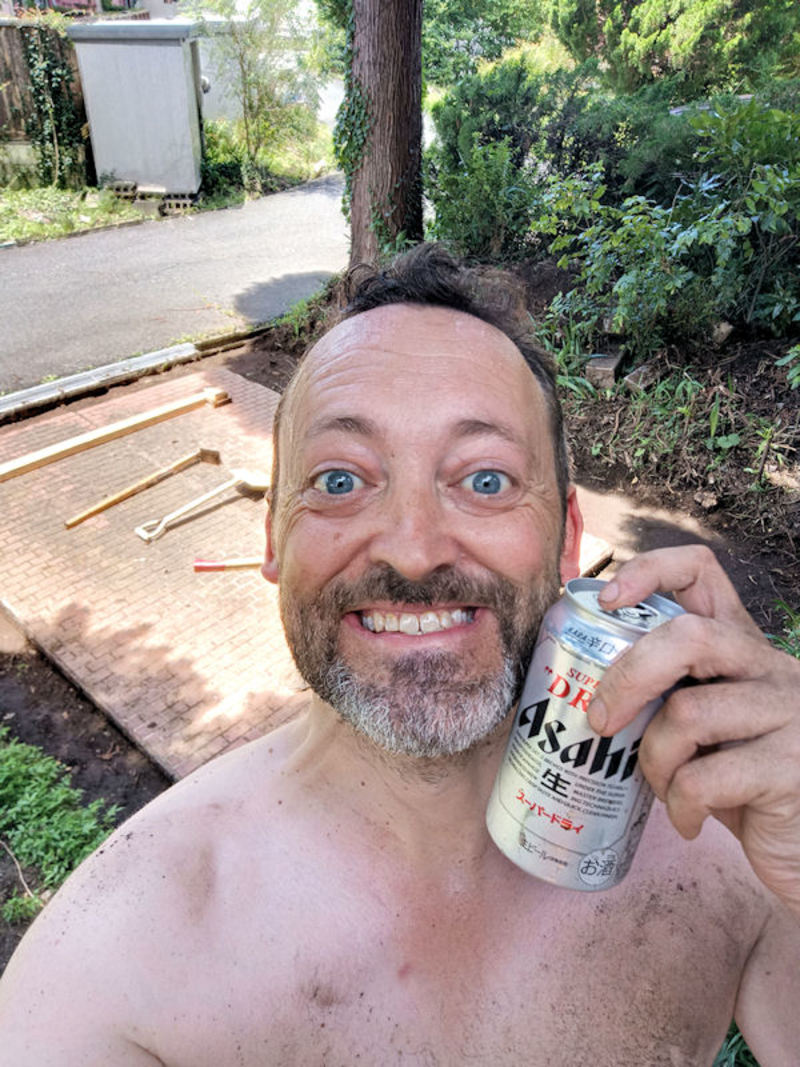
▲ こんな気分ですよ、綺麗にできたら!毎朝1~2時間かかったが、一番大変な作業がやっと終わりました!
After digging away for an hour or two each morning (before the real heat and humidity of the day hit), I was able to complete the tidy up in and around rainy season's unpredictable weather. That deserved a beer and a commemorative selfie, I thought! Please excuse the sweat and dirt!
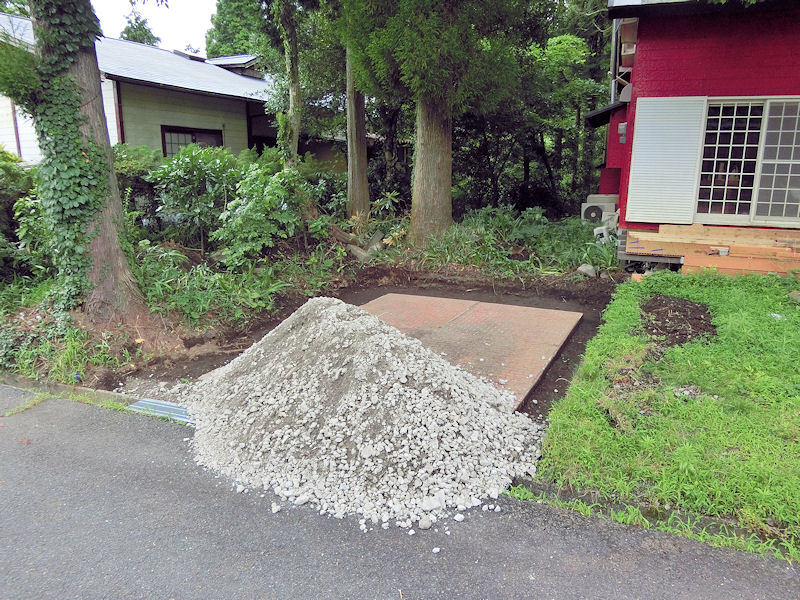
▲ そして、新しいガレージの工事がこれから始まりますよ!最初に赤煉瓦の高さまで砕石を入れますので、近くにある「春山商会」から1立米の砕石を注文しました。トラックでの配送込みで6600円でした。その赤煉瓦の部分がない場合だったら約2万円ほどの砕石が必要だったので、ちょっと節約できました。
Time to start the build! The first thing I needed to do was to build up the sub-foundations to the height of that brick area, to give a flat and stable base to pour concrete on top of. My lovely neighbour Teru suggested I visit a nearby company called Haruyama Shokai (in Aso city), who kindly delivered a cubic metre of stone gravel for 6600 yen. The cost would have been closer to 20,000 yen if I hadn't been able to reuse the brick area, so that saved me some money!
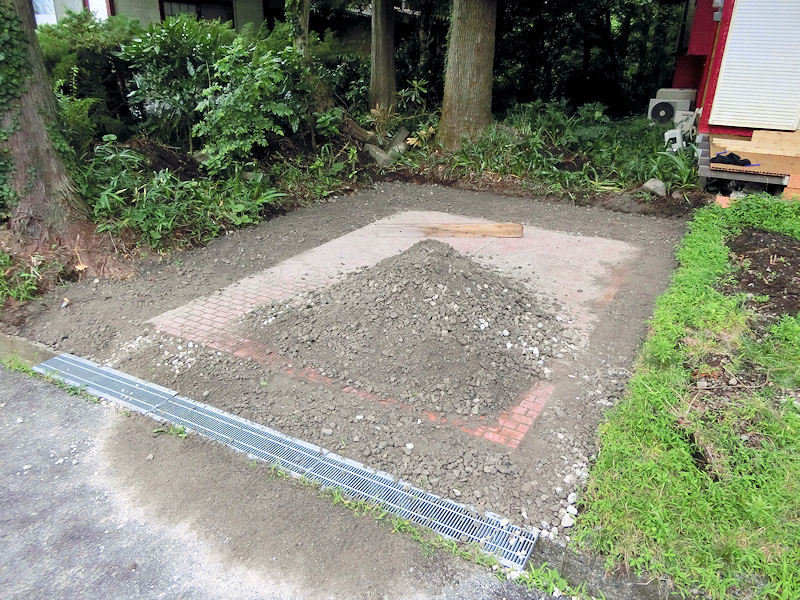
▲ 砕石の基礎には固めるのが大事です。スペースが広かったら「前後進バイブロコンパクター」を借りるのはおすすめですが、今回砕石の所が狭かったので、その代わりに重い木材で何回も叩いてしました。
Pushing that gravel down tight is very important for a garage foundation, to prevent the concrete moving or cracking later on. Normally, this would involve renting a petrol-powered gravel compactor to bounce up and down on top, but this didn't seem worth it for the narrow strips of gravel I was using. So instead, like a scene out of a Rocky movie, I borrowed a spare heavy wooden beam from my neighbour, and slammed that up and down over and over. This process is called tamping, by the way, and was pretty good exercise!
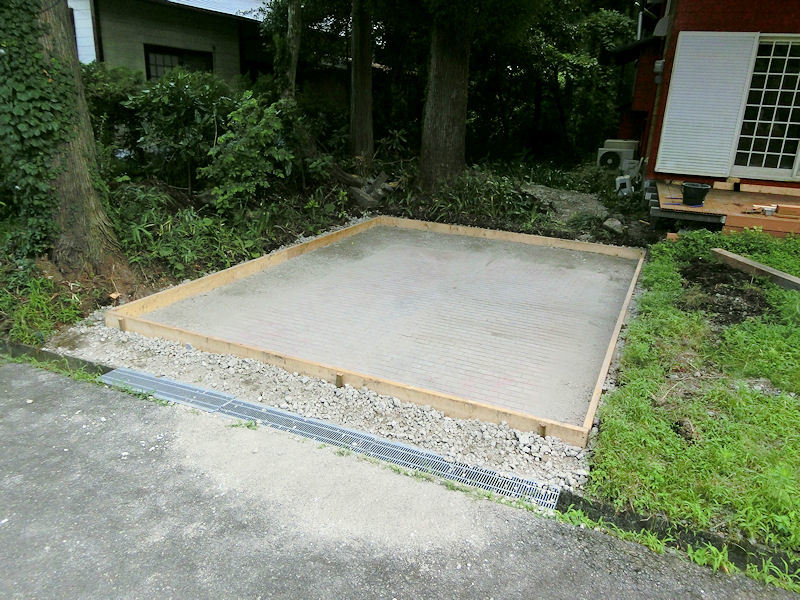
▲ 砕石と煉瓦の上に10センチ厚みのコンクリートを注ぎますので、コンクリート型を作成しないといけないんです。2x6材で型を作りました。現在、ツバイフォー材が高いんですので、予算オーバーになりましたが、ガレージの木材フレームの時にまたリサイクルできるかもしれない?
In order to pour concrete on top of the gravel, I needed to make a strong wooden frame. I was originally planning to build a cheap wooden frame and then throw it away afterwards, but instead I decided to spend more on some thick 2x6 beams. This did blow my budget a little for this part of the build, but I'm optimistic that I'll be able to clean up those beams later, and re-use them for the wall frames!
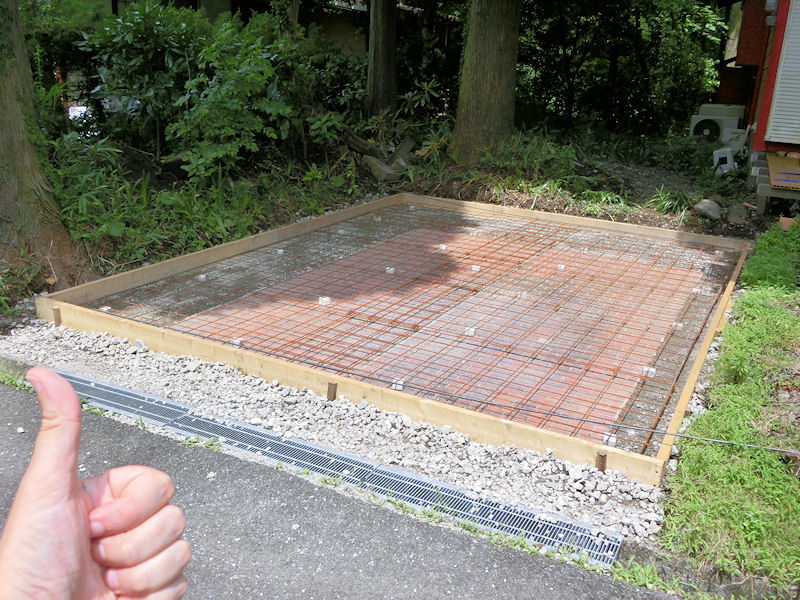
▲ 最後に金属メッシュを用意しました。この金属メッシュでコンクリートが強くなりますので、お勧めですね!
次が生コンクリートの配達ですね!楽しみにしています。
The last job of preparation was to lay down panels of thick wire mesh, tied together and reinforced with rebar, which will sit inside the concrete once it's been poured. This strengthens the concrete foundation, and hopefully prevents it from cracking or shifting.
So it's off to a local concrete company, to try and arrange for some concrete delivery later this week!
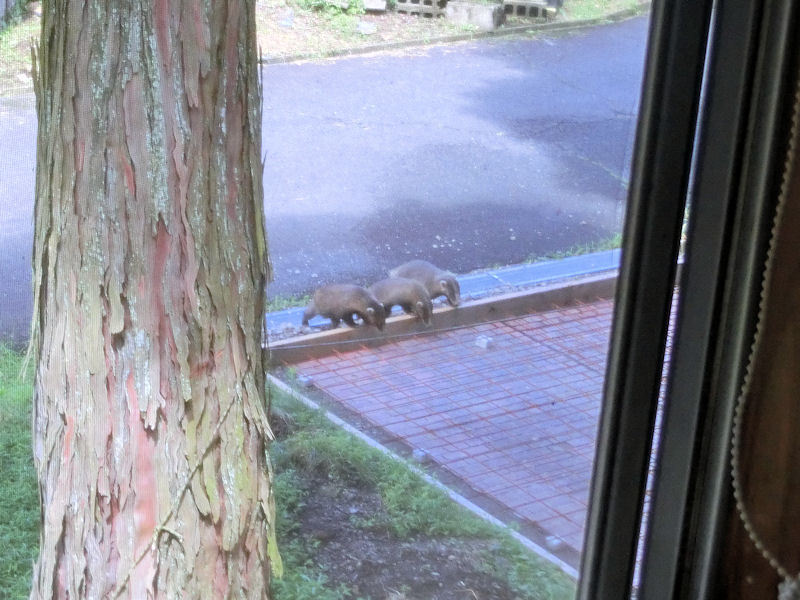
▲ 今朝、窓から見るとこの3匹の動物が見学をするに来ました!可愛い!
だが、生コンクリートが入れた後にこないでほしいですね。
I have to share this adorable pic with you. Just as I was looking out of the window this morning, I noticed these three cuties strolling past the house. I think they are Japanese badgers, and they kindly came by to take a look at what I've been working on. Thanks, little guys!
(I just hope they don't come back when the concrete's freshly poured!)
| << Making a capiz shell wall light カピス貝殻壁掛けライト 2023-07-18 | Garage construction ガレージ工事 PART 2 >> 2023-07-30 |
〒869-2226 熊本県阿蘇市乙姫2070-48
Aso City, Otohime 2070-48
Open from 13:00~17:00*
Fridays & Saturdays
(* best to call beforehand 090-1349-4029!)


")
阿蘇山の3D地図テーブルを作ってみた! I made a 3D MAP table!
3D阿蘇カルデラはいかがですか? 3D Maps added to the shop
Painted models available 塗装済の模型発売中!
Making garage doors ガレージの扉DIY作成
New side-project... a hobbit house! ホビットの家
Shops added to the shop ショップにお店
Repainting a (mini) car ミニカーのリペイント
Buying land in Otohime 乙姫で土地探し
Scale model of the Inaba Residence 稲葉家下屋敷の模型
Customer request - Pokemon Ball! ポケモンボール
Garage construction ガレージ工事 PART 6
Secret Aso-volcano pool 阿蘇山の隠れプール
Garage construction ガレージ工事 PART 5
Garage construction ガレージ工事 PART 4
Garage construction ガレージ工事 PART 3
Garage construction ガレージ工事 PART 2
Garage construction ガレージ工事 PART 1
Making a capiz shell wall light カピス貝殻壁掛けライト
Making a rustic antique-style wall light アンティークなライト作成
Making a capiz shell chandelier カピス貝殻シャンデリア
Online store opening sale グランドオープンの割引
Opening a webstore 通信販売サイトを開店します!
A lucky escape with the typhoon! 台風がヤバいけどラッキー!
E-bike conversion DIYで電動自転車を作った!
$200 Underfloor heating 2万円でDIY床暖房
3D-printed OPEN/ CLOSED sign アトリエ看板作成


 Shrine
 Temple
 Teahouse
 Castle
 Shops
Shops Houses
 Farm
Farm Other Buildings
 Walls & Fences
 Bridges
 Ponds
Ponds LED Lights