


3D-Print Studio
| << Secret Aso-volcano pool 阿蘇山の隠れプール 2023-09-16 | Happy Halloween 2023!! >> 2023-10-31 |
外壁と屋根の時間です!やっと!
夏の天気から秋っぽくなりましたので、作業がちょっとだけ楽になりました!
It's finally time to add the exterior walls and finish the roof. Fiiiiiinally!!
The summer weather has started to cool now, which has helped to make the work on the garage a little easier. So let's get started....
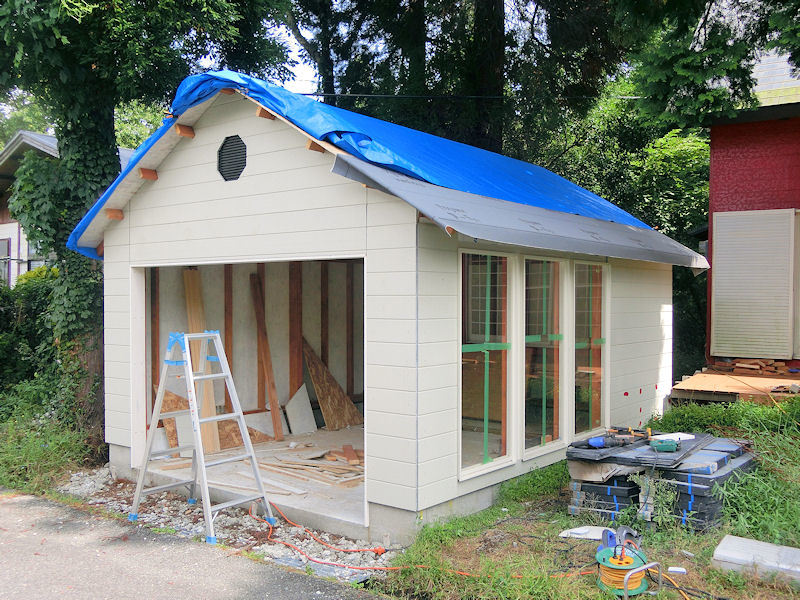
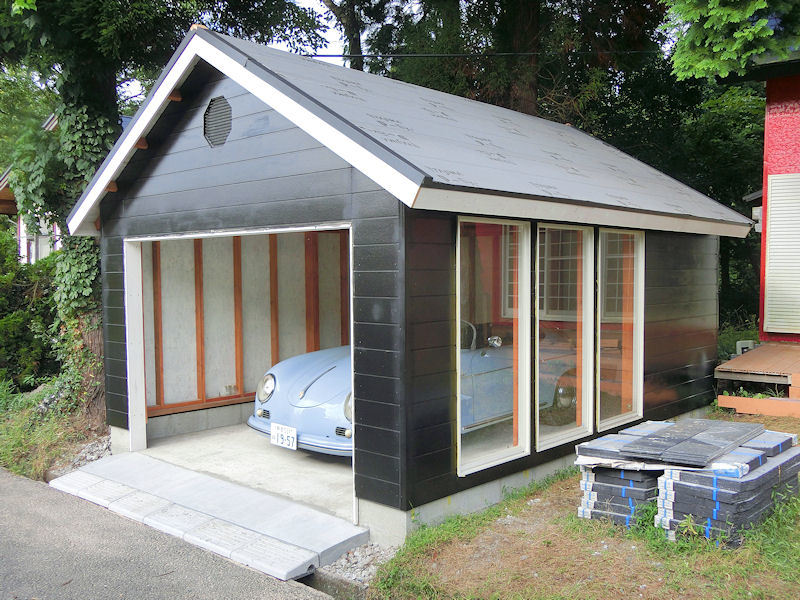
▲ まずは外壁のサイディング張りから始めます。正面に空気入れの穴を八角の形にカットしました。そして、角を守る「通し出隅」を付けてから隙間を防水用のシリコンでコーキングしました。この作業は2日間ぐらいかかりましたが、これでほぼ防水な形になったんです。
It took about 2 days of cutting and hammering to cover all the walls with these heavy siding boards, and I finished the front off with a vent hole cut into an octagonal shape. Then it was just a case of quickly adding some metal strips to each of the four corners, and then sealing the join gaps between boards with waterproof silicon caulking. And with that, the building was mostly waterproof!
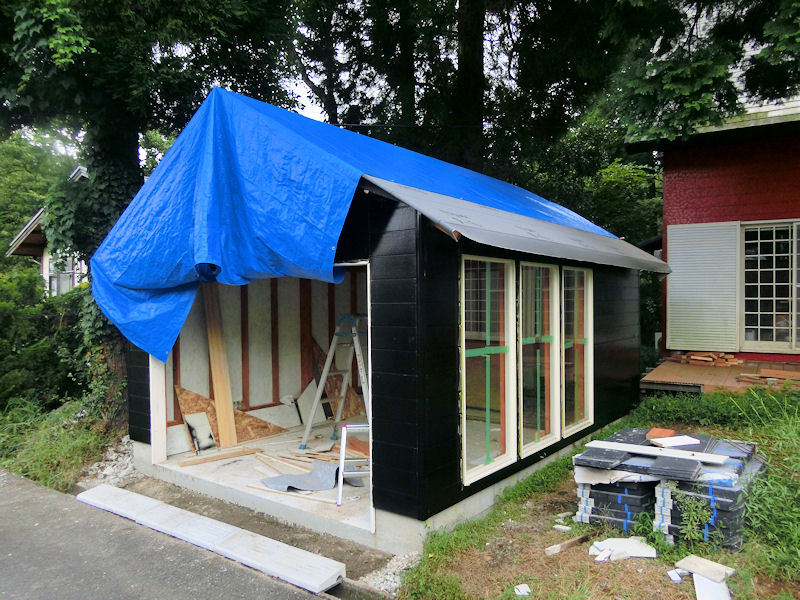
▲ そして、楽しみにしていた作業になった!ペイントの時間です!ツヤありの黒に3回塗りました。「1回塗り」のペイントを買いましたが、やはりなかなか綺麗にペイントできなかったので、3階も塗りました。そのペイントの選択がちょっと失敗。
Then it was the job I'd been looking forward to for ages - painting time! I decided to paint the exterior in glossy black, to contrast nicely with the still-to-be-added white doorframe woodwork. It said on the paint tin that it only needed one coat of black, but in fact it took 3 coats to neatly cover the walls properly. Grrrrrrr
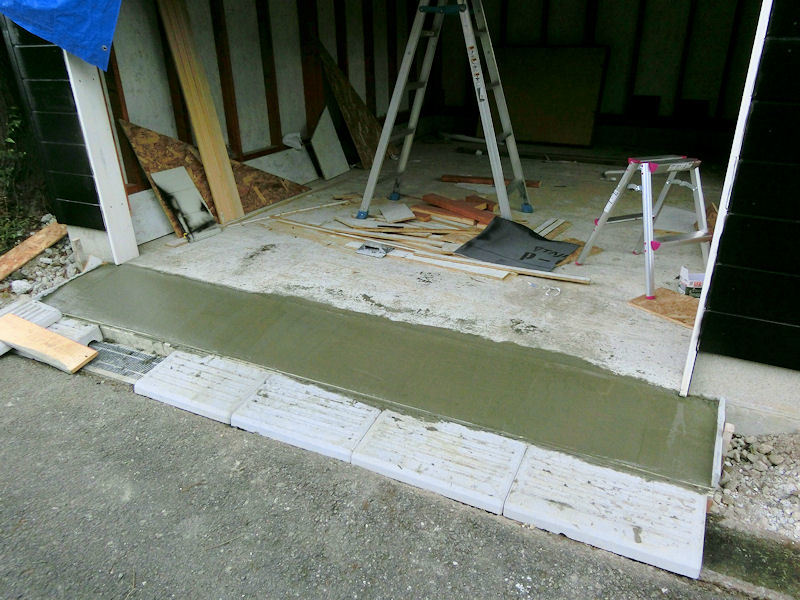
▲ 次は入口前の坂作りでした。DIY店から買ったドライコンクリート袋15個を隣のTeruさんから借りたハンドミクサーで混ぜました。300kgも必要だったのでちょっと時間かかりましたが、友達の手伝いで綺麗に出来上がりました。
Once the walls were dry, it was time to add some concrete to the entranceway, so I could actually drive a car inside! My lovely neighbour loaned me an electric hand-mixer, which sped up the process of mixing 15 bags of concrete considerably (300kg in total), but it still took quite a while to smooth it off!
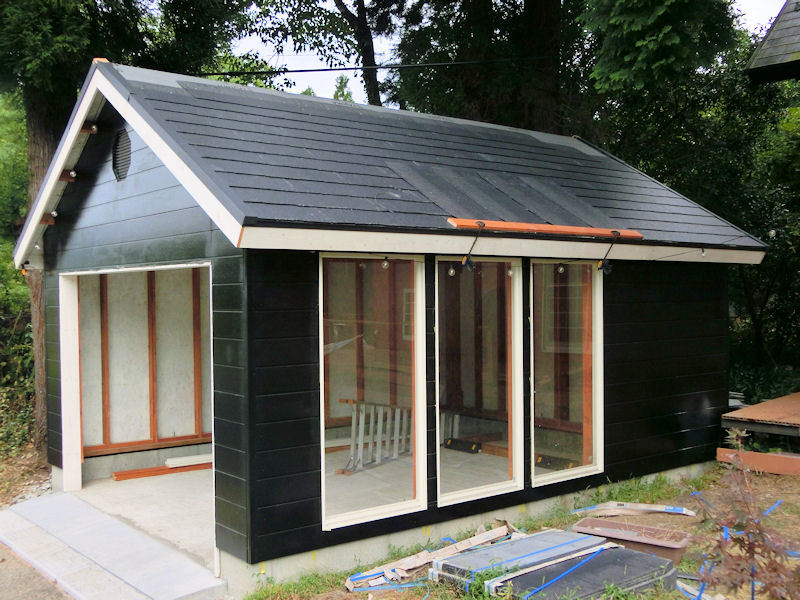
▲ 残っている大きい作業が一つだけですね ー 屋根だ!ブルーシートをやっと外しましたので、その代わりに防水用のルーフィングシートをホチキスで付けました。
The last big job was to finish the roof. I removed the big, blue tarpaulin which had kept it safe for a few weeks, and quickly stapled down a few strips of waterproof roofing felt.
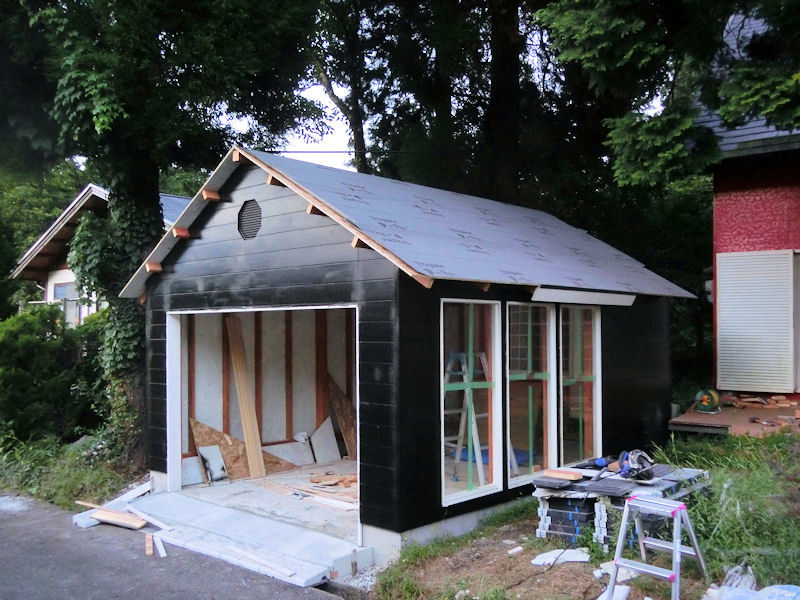
▲ 屋根の周りに白く塗った1x6木材を付けました。
The eaves were carefully cut from 1x6s and screwed into place around the edges of the roof, and painted with two coats of white paint. On top of those were nailed some metal strips to further protect the roof subsurface.
▲ よし、始まるぞ。屋根の90cmスレートを144枚も張りました。この作業も大体二日間かかりましたので、雨降っていない日にしたんです。
Time to get this done! It took a couple of cloudy-but-dry days to nail down all 144 roof slates, and finish the top ridgeline of the roof with a metal cover. These were heavy artificial slates, but look really lovely and should last years! They probably weigh about 500kg in total, though, so I didn't park the car inside yet... just in case!
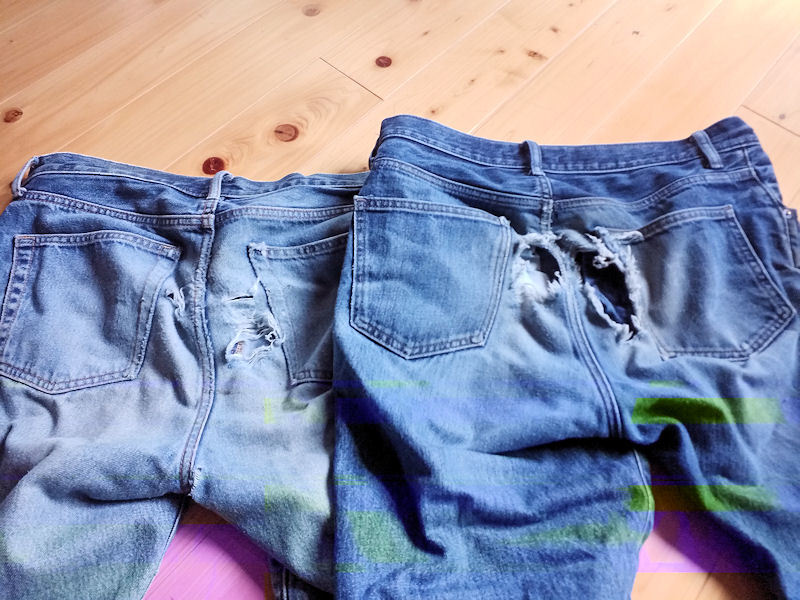
▲ その二日間の間、屋根の上に座った形で作業をしていましたので2つのジーンズは全然ダメになったんです!そのスレートの素材がサンドペーパーぐらいの凸凹が付いていますので、ご注意ください!haha
Look what happened to my jeans! Yikes!!
I spent most of those two days on the roof sitting and sliding across on my arse, and the surface of those slates is pretty much like sandpaper! So I destroyed the arse-cheeks of TWO old pairs of jeans. I guess professional roofers do everything standing up (?), but I found it much easier and safer doing everything sitting down.
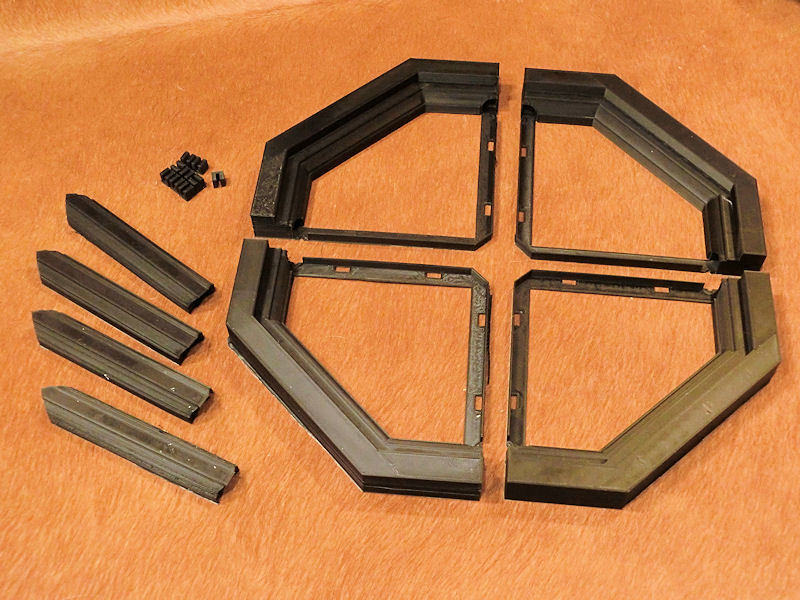
▲ 最後に正面のアクセントですね。空気入れ穴の八角の周りにフレームを作りたかったですが、木材作りではなくプラスチックで3Dプリントしました!
このフレームのデザインを利用したい場合であれば、こちらに載せました:
https://www.thingiverse.com/thing:6266117
One last thing I wanted to add to the front of the building was a decorative vent cover for that octagonal hole. I couldn't find anything suitable (i.e. cheap!) on the internet, and I decided not to try making it out of wood. Instead, I decided to try designing a frame and 3D printing it! Who'd have thought that would be possible?!
The 3D-printable design for the 40cm octagonal vent is available here for anybody that wants it:
https://www.thingiverse.com/thing:6266117
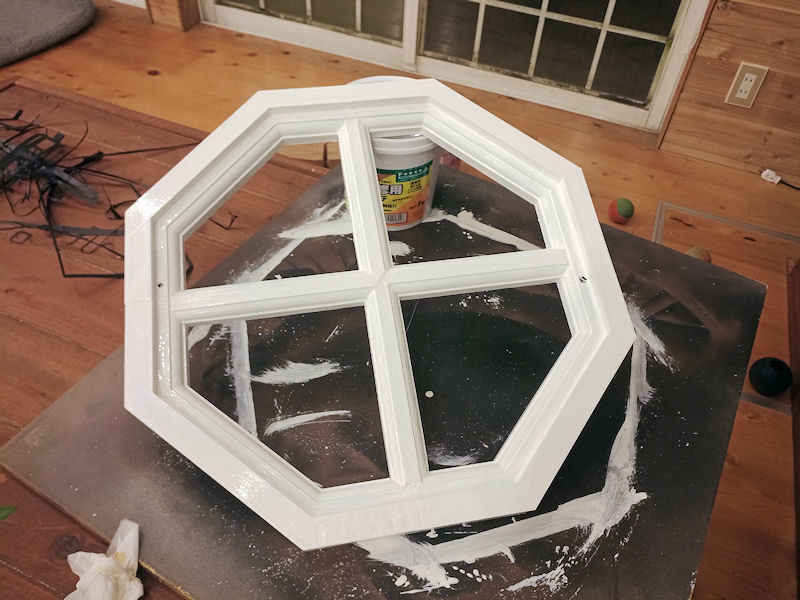
▲ 何回も白く塗りましたので、木材作りと変わらない形になりました。
After some putty to cover the joins and several thick coats of white paint, it looks indistinguishable from a wooden frame - but has the extra benefits of being lightweight and waterproof!

▲ 今日はそのフレームを正面に張りました。いかがでしょうか?アクセントは大事ですよね?
I attached it to the vent hole on the front this afternoon, and then sealed the gaps around it with silicon caulking. Very happy with that!
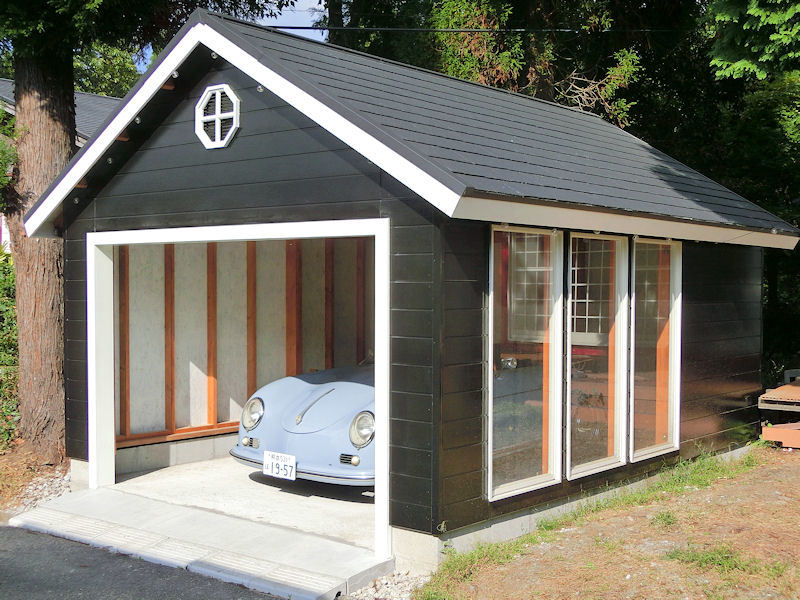
▲ ドアはまだ作っていないんですが、この状態で使えるガレージになりました。
And so, the garage is at last a real garage. I haven't fitted any doors yet, but it's finally able to keep my little baby safe and protected from the elements.
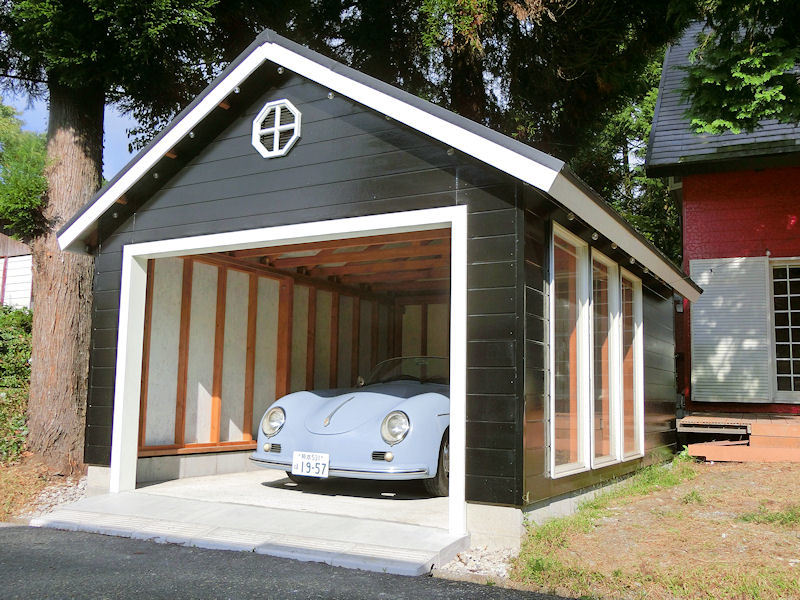
▲ 黒と白のデザインはやはり正解でした!そして、インテリアの白と赤い木材も好き。
ドアも付けたくないぐらい可愛いガレージになりました。
I think that choosing black and white for the exterior worked pretty well against the bright red of the house. The simple white and red wood interior also looks pretty good, no?
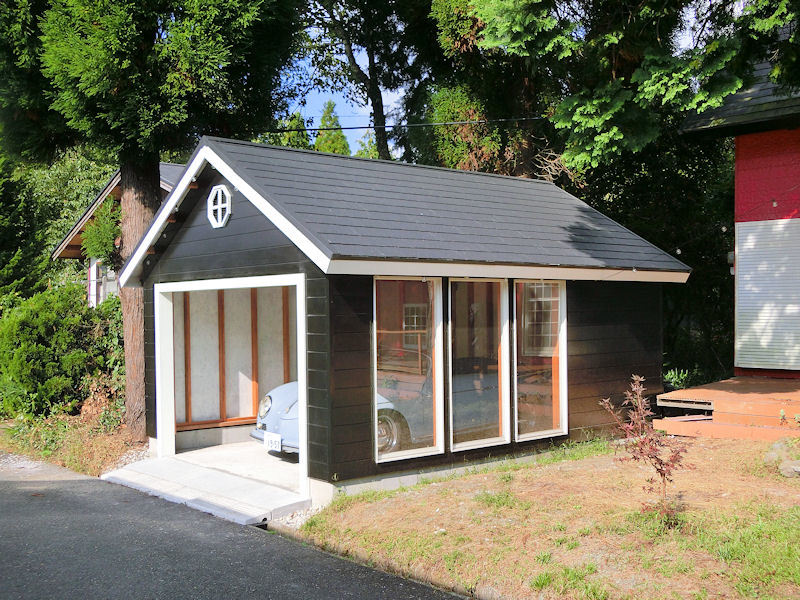
▲ ドアは間もなく作る予定ですが、とりあえずこれで「完成」ですかね?嬉しい。
I'll add some doors at some point in the near future, but for now I'm calling this DIY garage build 'finished'. Yay!
OSBボード 16枚 : 31,680円
サイディング 25枚 : 46,800円
窓サッシ 3個 : 55,010円
通し出隅 4本 : 4,600円
コーキング・ペイントなど : 13,270円
壁 : 151,360円
このDIYガレージの予算は約65万円でしたが、どうなったでしょう?。。。
DIYガレージの価格:
基礎 : 87,349円
ブロック壁 : 27,443円
壁の木材フレーム : 105,035円
屋根(フレーム&スレート) : 169,983円
壁 : 151,360円
ガレージ合計 : 541,170円
何か55万円は嬉しいですね。「注文するキット+基礎+屋根」なら150万円ぐらいかかるので、やはり最初からDIYにしたら大変ですが結構節約できますね。あまるお金が電気や可愛いドアのために使うつもりです。
Alright, let's see how much these walls cost.....
16 sheets of OSB chipboard : 31,680yen
25 sheets of exterior siding : 46,800yen
3 windows : 55,010yen
4 corner strips : 4,600yen
Silicon caulking, paint etc. : 13,270yen
Walls : 151,360yen
Great, that's not too bad! Now let's crunch some numbers, and work out how much the garage cost in total, compared to the estimated budget of 650,000yen ($5000usd-ish)....
12ft x 16ft DIY garage:
Foundations : 87,349yen
Block wall : 27,443yen
Wall frames : 105,035yen
Roof (frame and slates) : 169,983yen
Walls : 151,360yen
Total cost for garage : 541,170yen
Yay, that came in considerably under budget, mostly thanks to being able to reuse some of the expensive lumber from the foundations later on in the build, and other small savings here and there. Certainly compared to the "DIY kits" I'd originally looked at online, it's a heck of a saving - those kits don't usually include foundations, exterior siding or roofing materials, so the total cost would probably come in somewhere around the 1,500,000yen mark ($13,000usd). So the extra money saved from my budget can go on some nice door fittings and lighting, perhaps?
| << Secret Aso-volcano pool 阿蘇山の隠れプール 2023-09-16 | Happy Halloween 2023!! >> 2023-10-31 |
〒869-2226 熊本県阿蘇市乙姫2070-48
Aso City, Otohime 2070-48
Open from 13:00~17:00*
Fridays & Saturdays
(* best to call beforehand 090-1349-4029!)


")
阿蘇山の3D地図テーブルを作ってみた! I made a 3D MAP table!
3D阿蘇カルデラはいかがですか? 3D Maps added to the shop
Painted models available 塗装済の模型発売中!
Making garage doors ガレージの扉DIY作成
New side-project... a hobbit house! ホビットの家
Shops added to the shop ショップにお店
Repainting a (mini) car ミニカーのリペイント
Buying land in Otohime 乙姫で土地探し
Scale model of the Inaba Residence 稲葉家下屋敷の模型
Customer request - Pokemon Ball! ポケモンボール
Garage construction ガレージ工事 PART 6
Secret Aso-volcano pool 阿蘇山の隠れプール
Garage construction ガレージ工事 PART 5
Garage construction ガレージ工事 PART 4
Garage construction ガレージ工事 PART 3
Garage construction ガレージ工事 PART 2
Garage construction ガレージ工事 PART 1
Making a capiz shell wall light カピス貝殻壁掛けライト
Making a rustic antique-style wall light アンティークなライト作成
Making a capiz shell chandelier カピス貝殻シャンデリア
Online store opening sale グランドオープンの割引
Opening a webstore 通信販売サイトを開店します!
A lucky escape with the typhoon! 台風がヤバいけどラッキー!
E-bike conversion DIYで電動自転車を作った!
$200 Underfloor heating 2万円でDIY床暖房
3D-printed OPEN/ CLOSED sign アトリエ看板作成


 Shrine
 Temple
 Teahouse
 Castle
 Shops
Shops Houses
 Farm
Farm Other Buildings
 Walls & Fences
 Bridges
 Ponds
Ponds LED Lights