

 ホーム
ホーム ブログ
ブログ アクセス
アクセス3Dプリントアトリエ
今回2Fリビングの壁掛けライトを交換しようとしています。春に作ったカピスのシャンデリアが大変お満足していますので、壁掛けライトにもカピスを利用したいですね。ただし、丸い形の貝殻ではなく、四角の貝殻を注文しました。
Finally it's time to change out the last 3 lights in the house for something new, and I decided to try making some more capiz shell lights again, to match the giant capiz shell chandelier in the living room upstairs. These wall lights are much, much smaller than the 3m-tall chandelier, and I wanted to try square shells instead of round ones this time.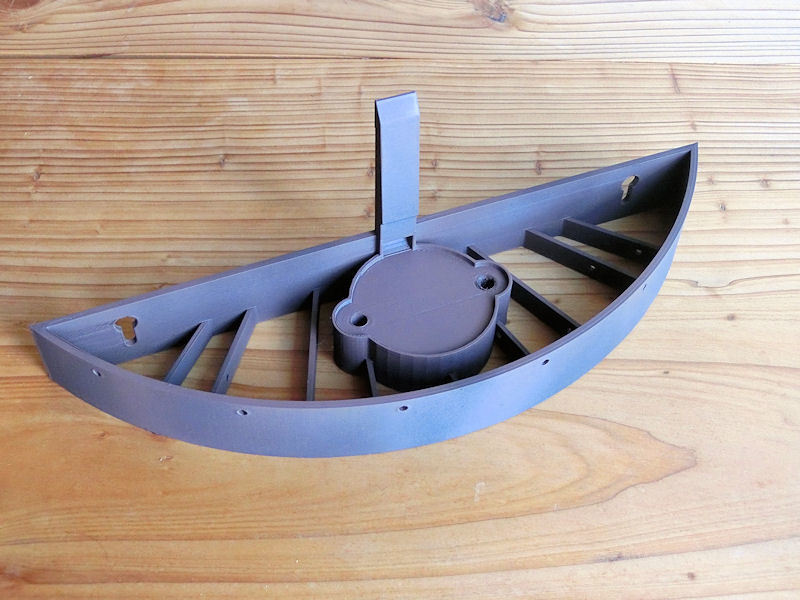
▲ この形の壁掛けライトを3Dプリントのソフトでデザインしました。ファイルをこちらに載せました。
I came up with this semi-circular wall light design, and managed to 3D print it in one piece. The print files are on Thingiverse for anybody who wants to try making their own!
▲ アンティーク風のゴールドに塗りました。黒のスプレーの上に磨き塗り(Drybrush)でペイントしました。
I painted the lights in a dark antique gold effect, to match the little metal rings I'd bought. This was a simple job of black spray undercoat, and then careful drybrushing and gentle stippling with gold acrylic paint.
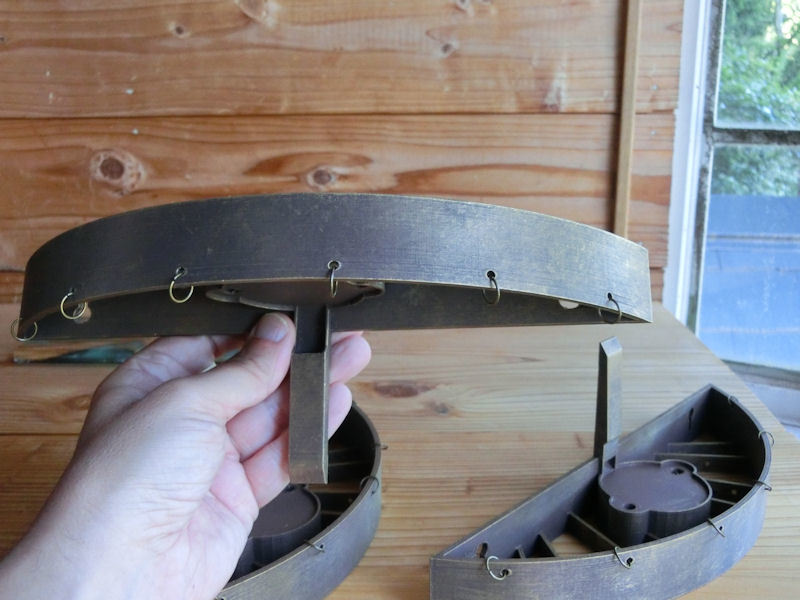
▲ そして、正面に10mmのリングを付けました。100個でたった300円でした。
I bought 100 of these small 10mm gold rings online, for about $3.
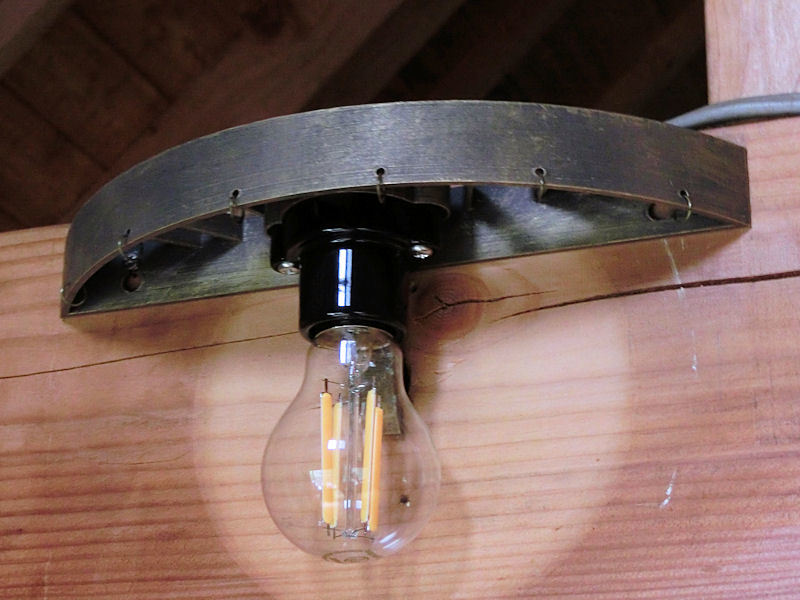
▲ このE27サイズのソケットをボルトで付けて、電気配線を見えない穴に入れました。
I also bought 3 of these basic lightbulb sockets from Amazon Japan, for E27 LED bulbs which I had spare in the cupboard. The wiring is hidden in a narrow cable channel in the back.
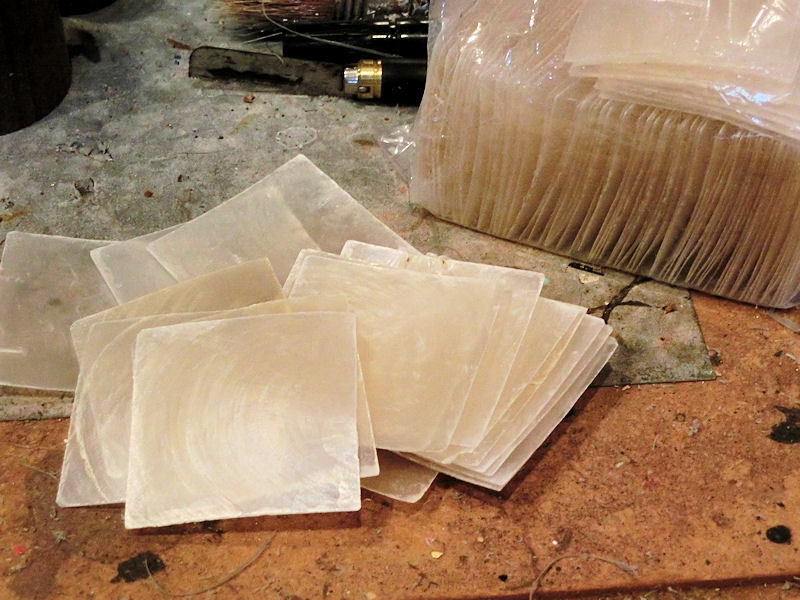
▲ 残りはカピスの貝殻ですね。Ebayのほうから100枚の四角貝殻を注文しましたが、届くまでは1か月ほどかかりました。しかし、丸い形が届いた!残念。Ebayにクレームをして、返金できたんです。そして、2回目も同じ店から注文しました。送料込みで8000円ほどでした。今回四角貝殻届きましたが、穴は空いていなかった!ガッカリ
The only expensive part of these lights was buying the capiz shells, as square ones are harder to find than round ones, and therefore cost more. I ordered a hundred of these 50mm square capiz shells from Ebay, for about $60 including shipping. Unfortunately, after waiting a whole month for them to arrive, I received a package of 100 ROUND ones! Oh dear.
Happily, Ebay refunded my money and I quickly placed another order from the same shop - and finally I received my square shells! (....but they did forget to drill the holes out.... grrrrr)
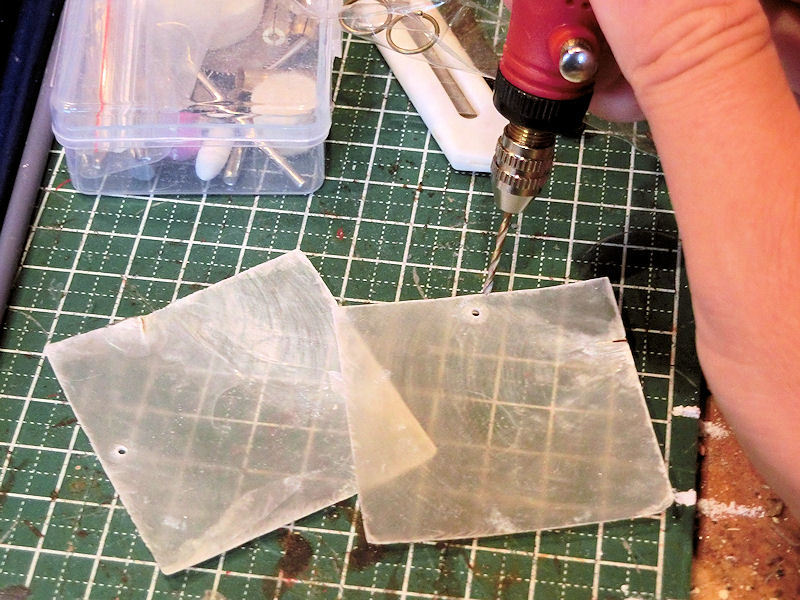
▲ ミニドリルで2ミリの穴を開けました。
I used a mini drill to drill 2mm holes in each one - and didn't break a single one! Yay
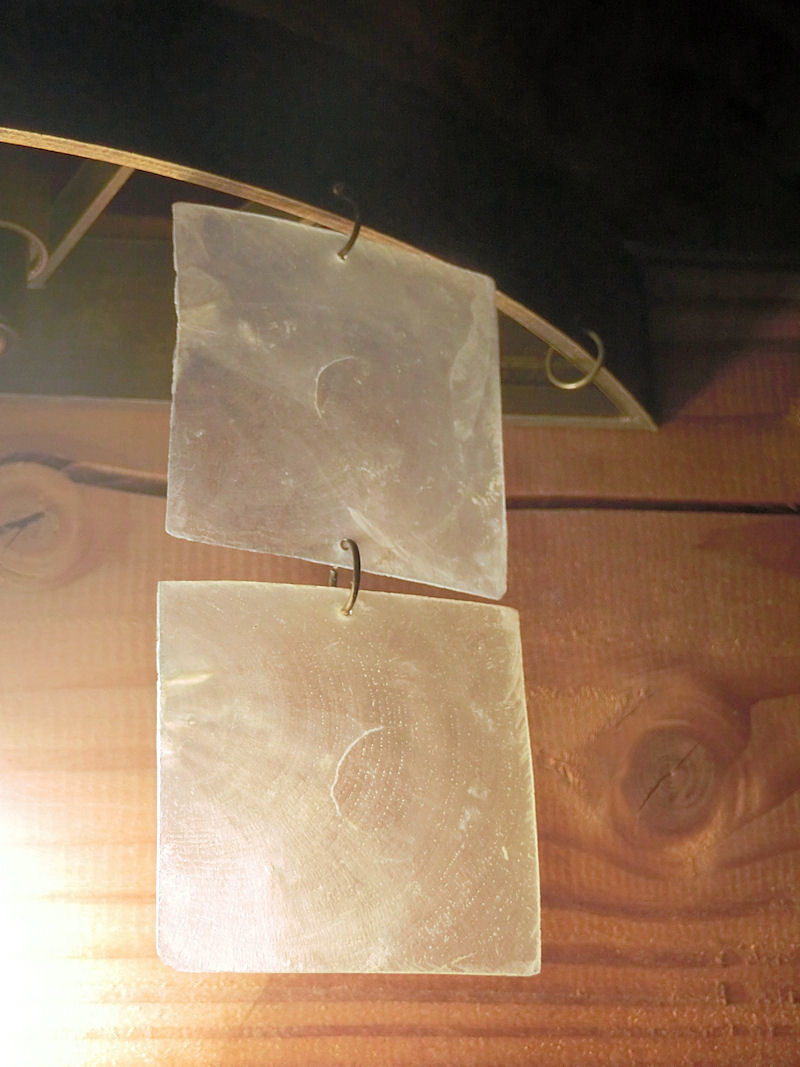
▲ リングでつながって、1行と2行の貝殻がこんな感じになりました。
This is how it looked when I test-fitted two shells. Good so far!
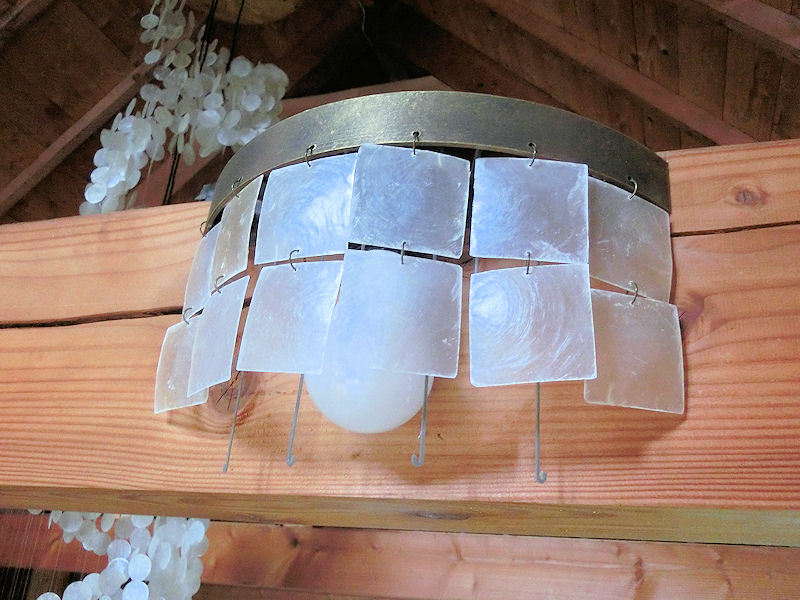
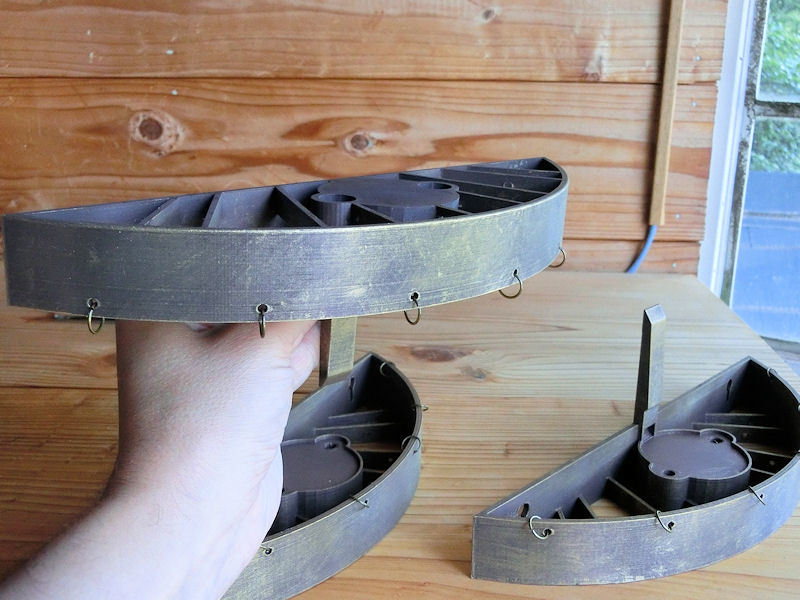
▲ 3行目の貝殻には透明の糸でつながろうとしましたが、やはり大変でした。貝殻が回って回ってしていました!
その代わりにハンガーをプリントしました。それが簡単でしたので、貝殻が前向きにちゃんと並べました。
I originally planned to hang the 3rd and 4th rows of shells with clear thread, but this proved very fiddly to tie in knots, and the shells kept spinning around - so I decided to print some simple hanging hooks instead. This were much easier to fit, and prevented the shells from spinning around.
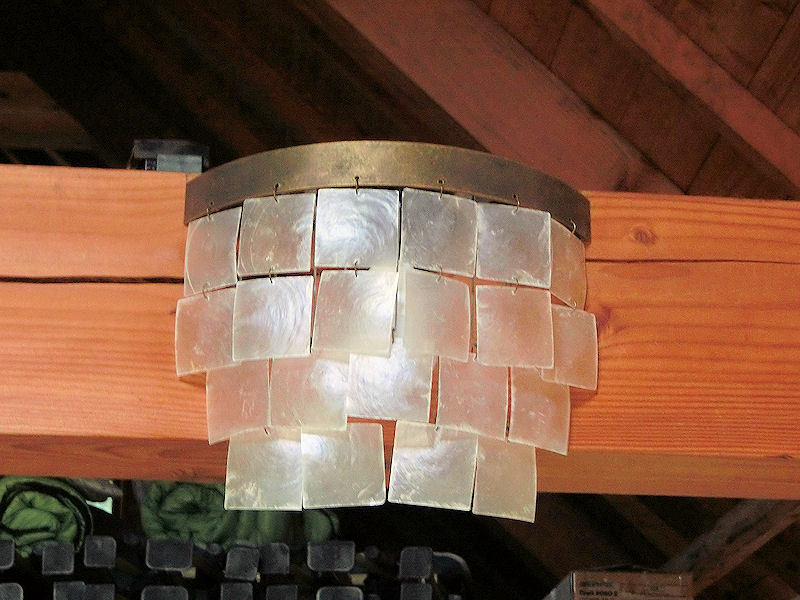
▲ 3行と4行をハンガーに下がると完成になりました!隙間があっちこっちにありますが、これでOKですね。
Hanging the 3rd and 4th rows of shells was easy enough, and I was happy with the end result!
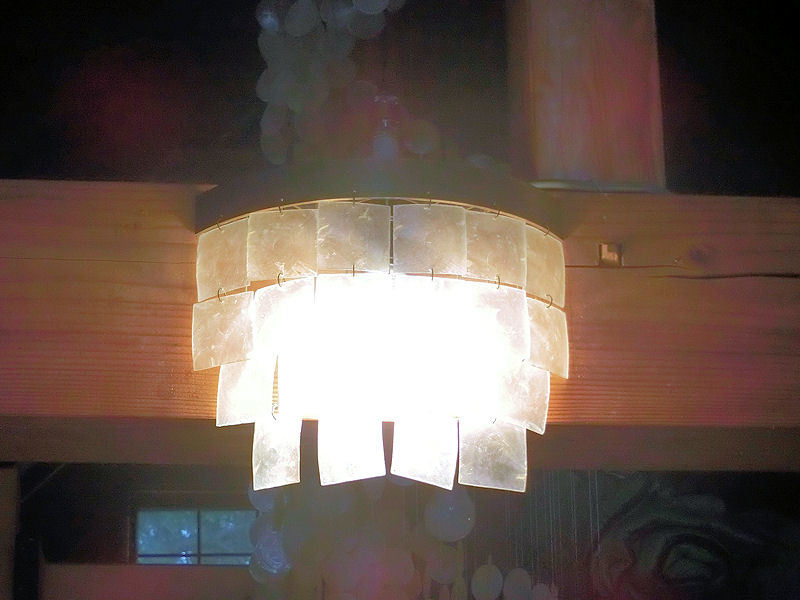
▲ ライトをつけるとこんな感じです!どうですか?
With the bulb turned on, it diffuses the light enough to look pretty good, I think. Do you like it?
ずっと前から車のナンバーを変えたかったので、やっとできました!「北九州」ナンバーから「熊本」ナンバーに変更するのがせっかくですので、好きな番号の「1957」も選べました。
I'd been wanting to change the number plates on the car for a while now, and since I finally had all the documents ready to change it from the Kitakyushu plates to shiny new Kumamoto plates, I also splashed out an extra $30 to get a personalised number. (It was a right pain in the arse, though - with two mornings wasted in tedious paperwork at the prefectural motor vehicle department!)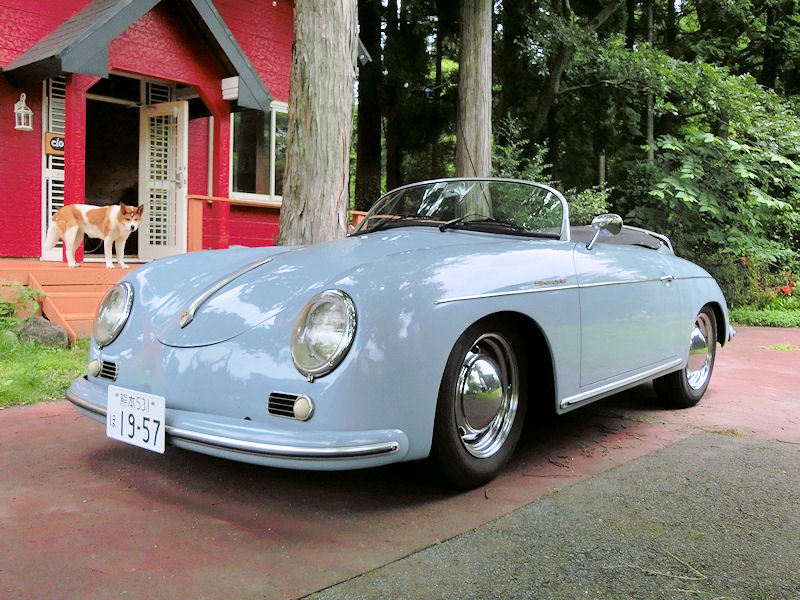
▲ このレプリカの年式が若干違うんですが、元のデザインは1957年でした。似合うでしょう?
Doesn't that look better?! Although this replica actually uses a 1968 chassis, I opted for these '1957' plates, which is the year of the original design of the Porsche 356. Looks lovely, I think. :)
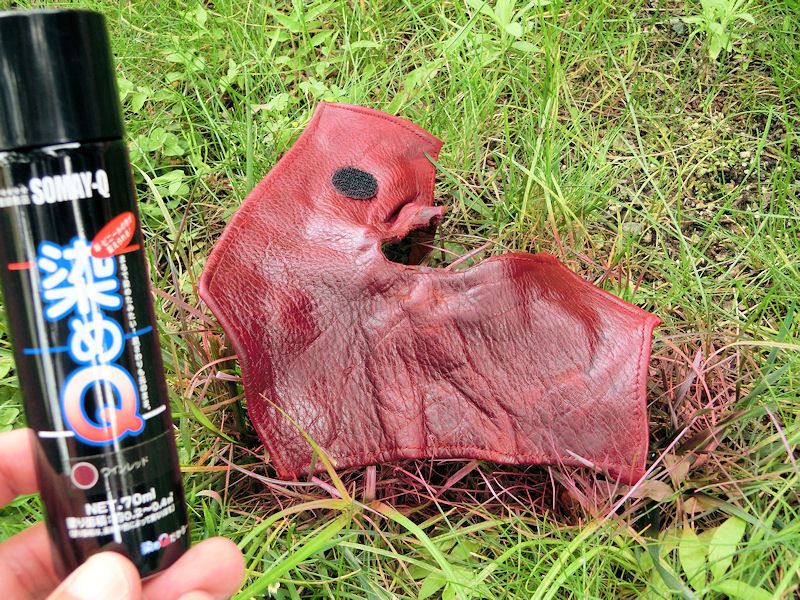
▲ そして、車のインテリアもちょっとリフレッシュするために、シフトレバーのカバーも再スプレーしました。何年前に作ったカバーを再び同じ色の「ワインレッド」革用のペイントにしたんです。
Anyway, to celebrate getting those cool plates I also decided to spruce up the interior a little, by respraying the shiftlever boot I made a few years back. A quick respray with this leather dye, and it looked as good as new.
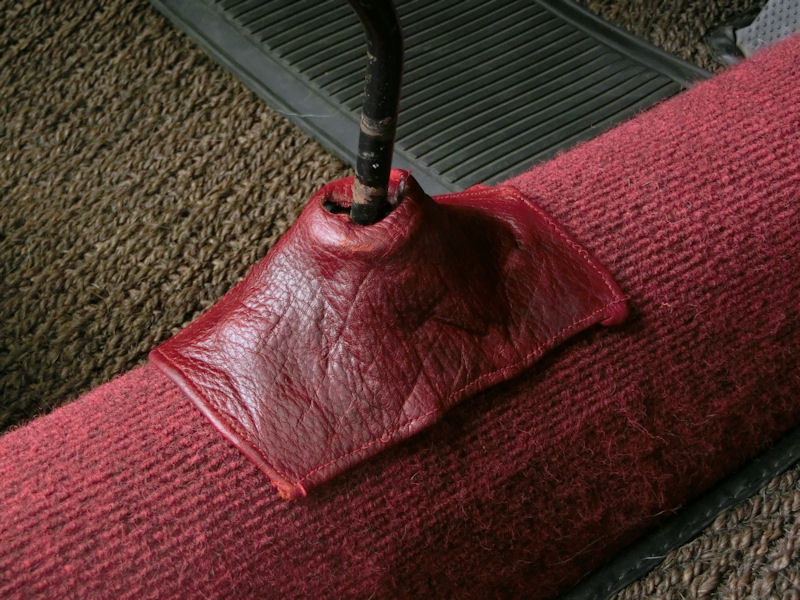
▲ なかなかいいでしょう?
That makes my heart smile!
▲ そして、今回の作品は後ろにあったリフレクターですね。8年前に、日本の初車検の時にこれが必要だったみたいです。しかし、8年後の状態がよくないんですね。フォームで作られて、ペイントのひびもありますがネットで購入すると車のボディに穴を開けないといけないんです。あまりしたくないので、自作のやつを作れるかなぁと思ったんです。
Okay, on to the main point of today's blog..... these rear reflectors! In order to pass Japan's strict road-test when it was first registered 8 years ago, the importer's garage fitted these handmade foam blocks to mount rear reflectors. But over the past few years they've started to crack and split, and generally look a bit rubbish. I could remove them completely, but then it would be illegal for the next road-test, and also unsafe at night.
The only ones available for this type of car, apart from being stupidly expensive, also require you to drill holes in that lovely body. So, to avoid doing that, I decided to try my hand at designing my own mounts.
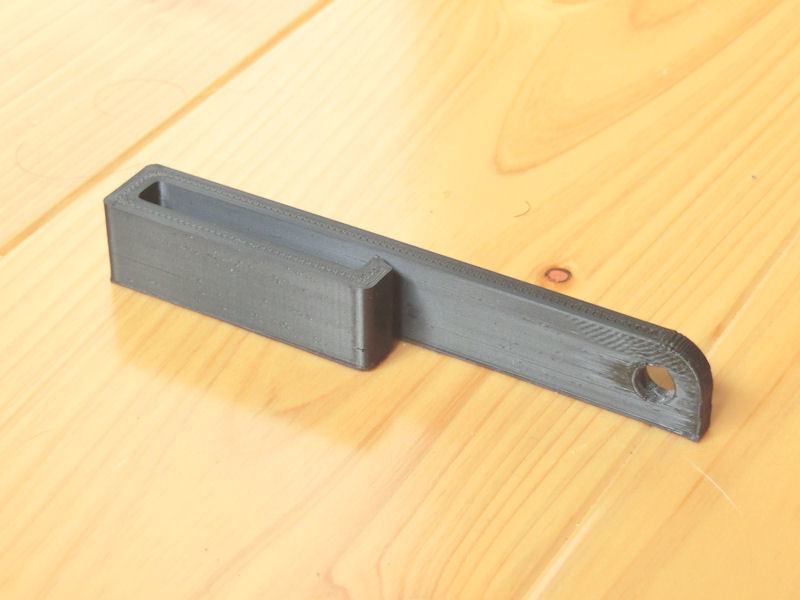
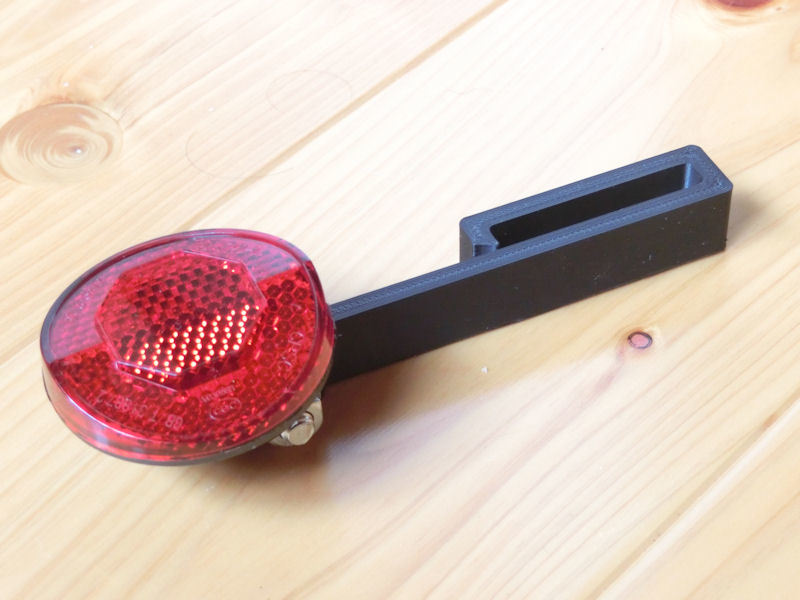
▲ 自作デザインで3Dプリントしました。しかし、いつも使われているPLAプラスチックが熱にちょっと弱いので、今回ABS材で作りました。PLAは200℃で溶けますがABSは約240℃で溶けるので、車パーツにも使えそうだ。
I came up with this simple bracket design (available on Thingiverse for anybody who wants it), and printed it on the 3D printer. I normally print in PLA plastic, but for car exterior parts I decided to try printing it in ABS plastic - which has a higher melting point and is therefore much more durable in the sun and rain. Happily, my first attempt with ABS seemed to work without problems, which is great for such a low-cost printer.
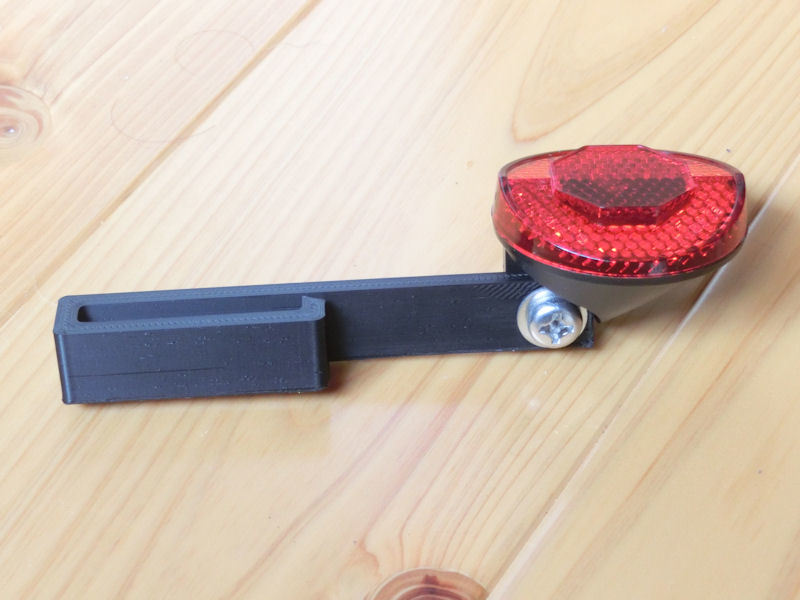
▲ 自転車用のリフレクターをボルトでつけるとこんな感じです。
I mounted a cheap bicycle reflector to the bracket with a simple bolt and nut.
▲ 形を試すために3つのパターンを買いました。
In fact, I bought 3 different reflectors, to see which would look best on the car!
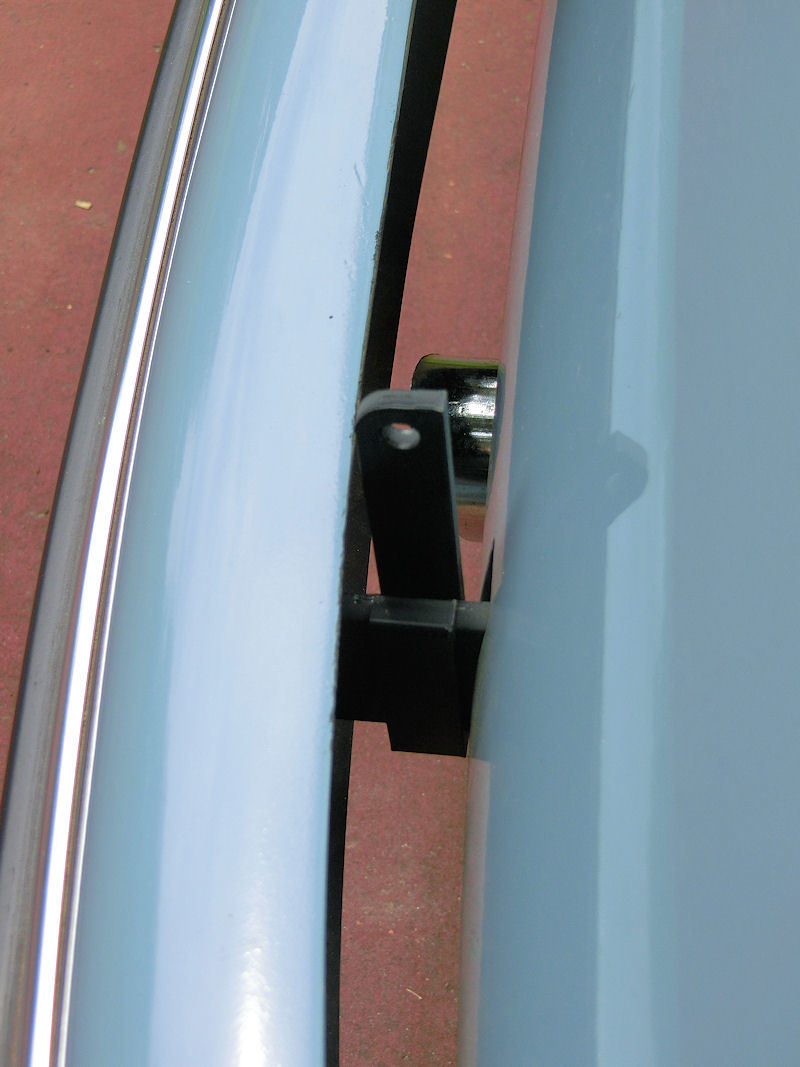
▲ リアバンパーの所にちょっと両面テープを付けると落ちないようにぴったりフィットします。
The bracket clips itself to the mounting bracket for the rear bumper, and a short piece of double-sided tape will hold it in place firmly.
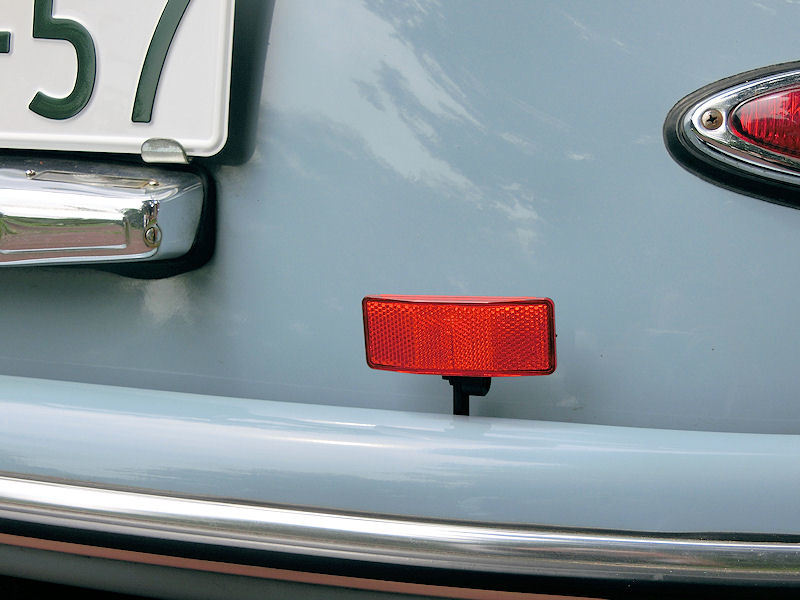
▲ バンパーの上に向いたらこんな感じとなります。やはり大きすぎです。
This was the first reflector shape I tried, which looked too big.
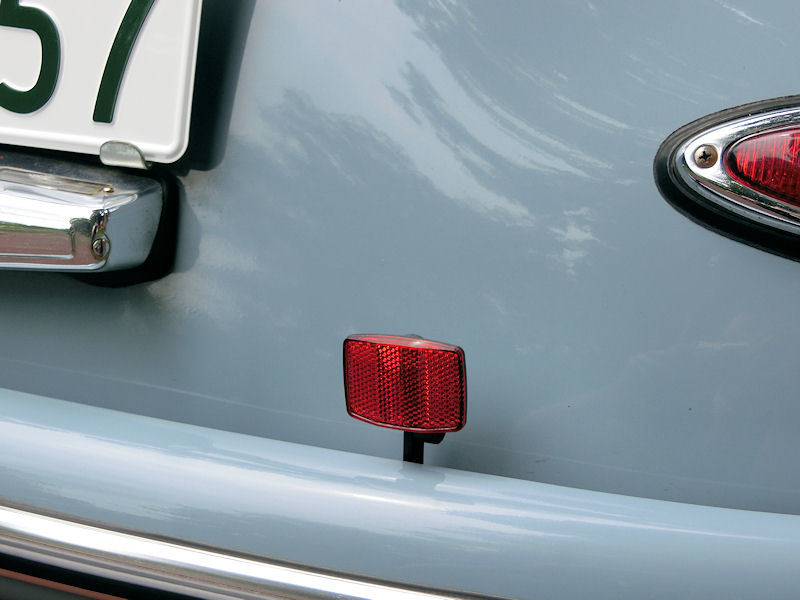
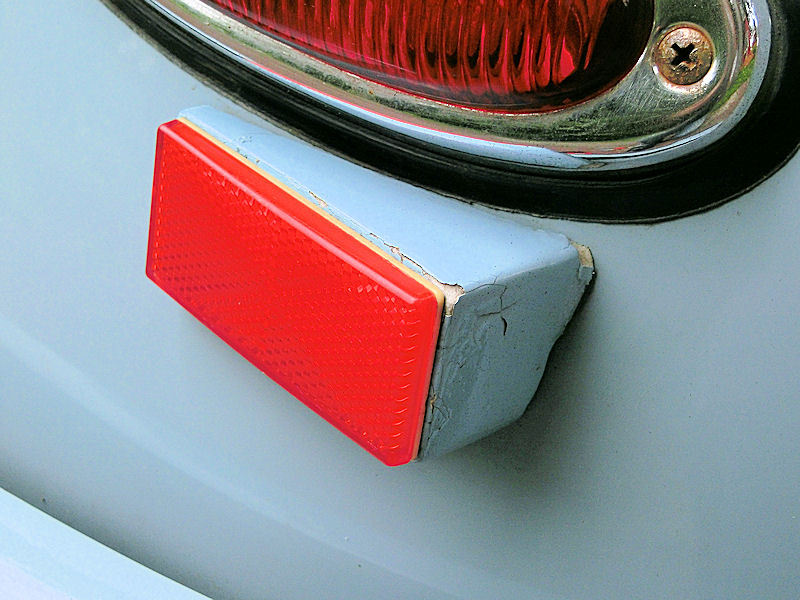
▲ 小さいサイズを付けるとよくなったが。。。
A smaller reflector looked better, but I had one more to try.
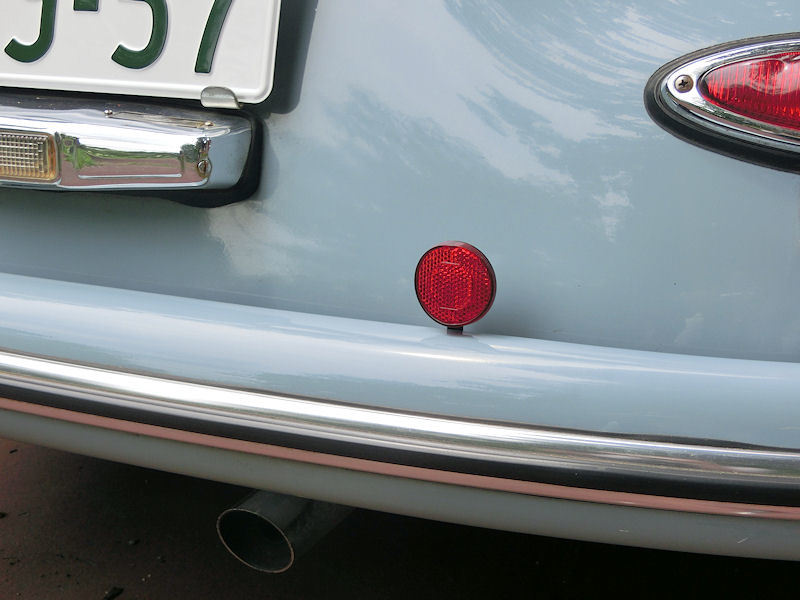
▲ 形的に丸いデザインのほうが好きです。
This little round reflector worked great, but looked a little odd above the bumper.
▲ しかし、バンパーの上だったらちょっと目立つすぎかもしれないので、下にも試してみました。
Luckily, the bracket could also be pointed down to mount a reflector below the bumper, so I tried all 3 designs again...
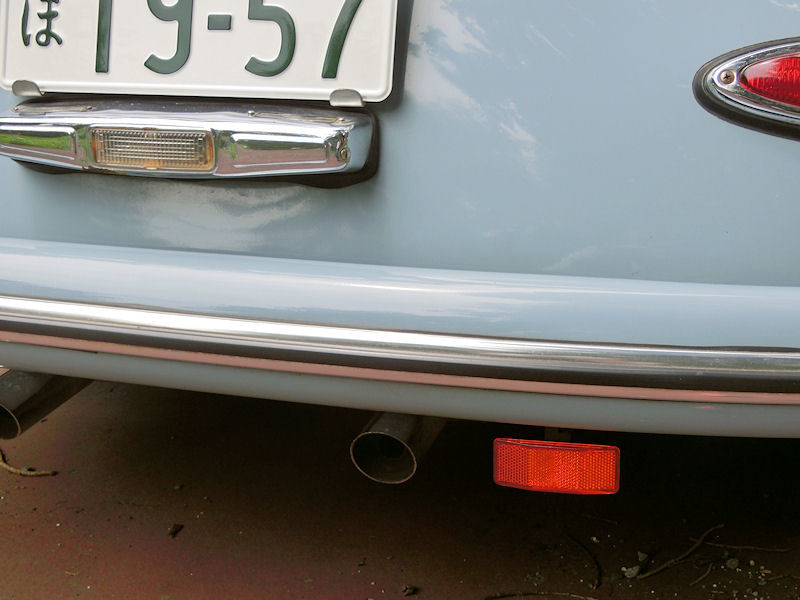
▲ よくなりましたが。。。
Smaller is definitely better...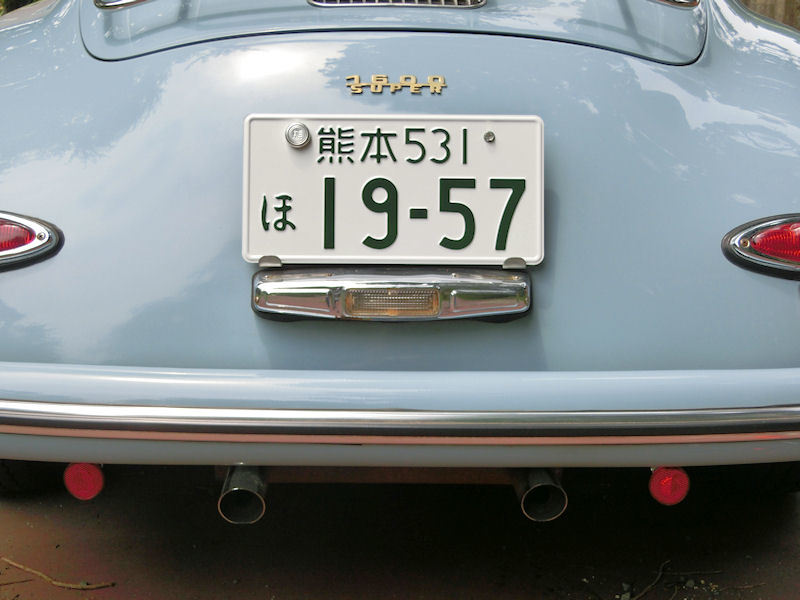
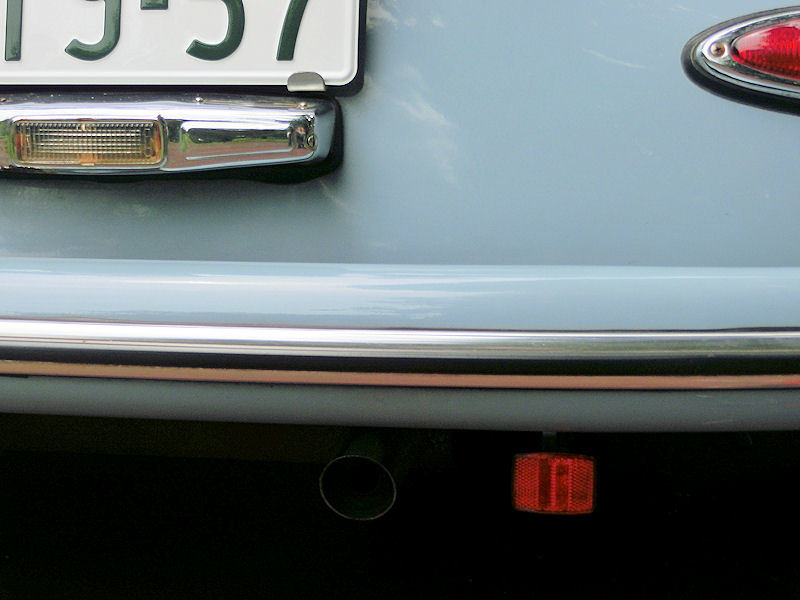
▲ やはりこの丸いデザインにしますね!
目立たないし、暗い道で見えますね。よし、決まりです!
...but I reckon the round ones look best, so we have a winner! They're discreetly placed below the bumper, but are perfectly positioned for cars behind. Success!
Next job is to get the garage built, so I have somewhere to keep this beautiful car!
2階のリビングのライトが全部交換したいです。80年代のつまらないデザインだし、省エネのためにも新しくしたいですが、やはり4つのライトを購入すると高いですね。その代わりに自分で作成しようと考えています。これでちょうど会うデザインも作れるかもね!
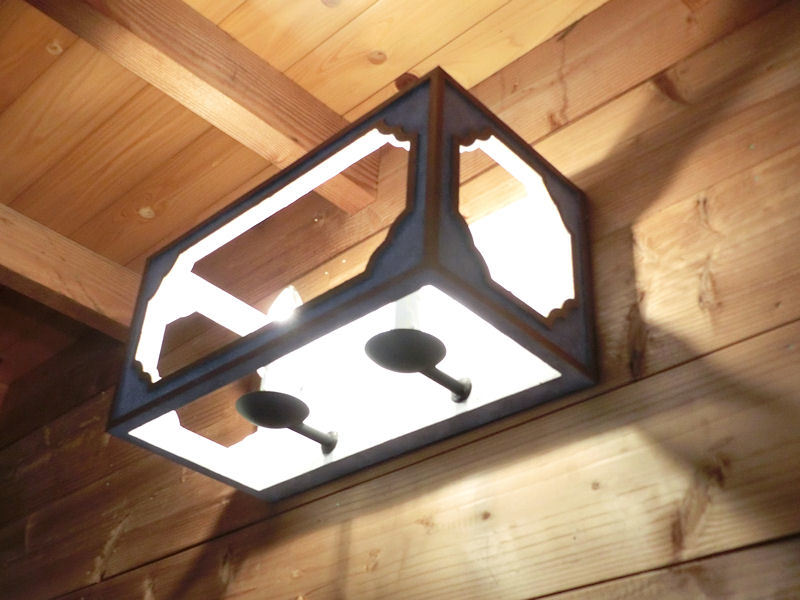
まずは壁掛けのライトを古い80ワットから電球2個で合計8ワットに変わります。フランス風のアンティークなボックス形のデザインをネットで見ましたが、2万5千円ぐらいでした!
A little project I've been wanting to tackle for a while now is replacing the old lights in the 2F living room. They're all 80s-style boring globe lights, and I want to make them a little more stylish and unique - to match the recently-finished shell chandelier. As an added bonus to being able to update the style of the room, the new lights will all be low-energy LED bulbs fittings, too.
I found a French-inspired rustic antique-style wall light design I liked, which has 2 chandelier bulbs in a painted wooden box, but the price online was a staggering $250. So I decided to try making my own, with a little help from my 3D printers....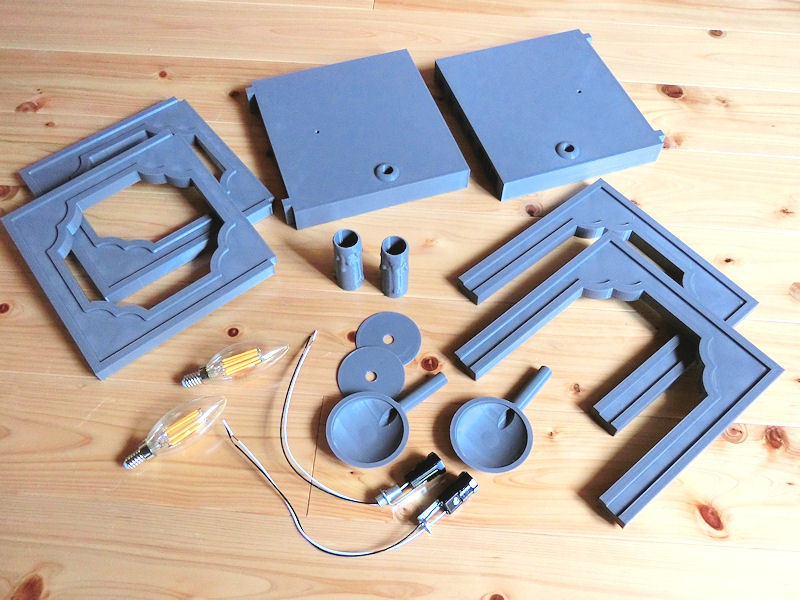
▲ 同じ風で3Dプリンターで作れるデザインを作ってみました。大体二日間かかりましたが、必要なパーツは約1000円のプラスチック材と300円の電球ソケット2個で集めました。そして、4ワットのE12電球はすでに持っていました。
After an evening of 3D modelling on the computer, I came up with a very similar design to the wall light, and after a couple of days of printing I had all these parts ready to assemble. It required about $10 of 3D-printer plastic, and a couple of E12 bulb sockets for $3 each. I had a couple of spare E12 LED chandelier bulbs in the cupboard, which would work perfectly!
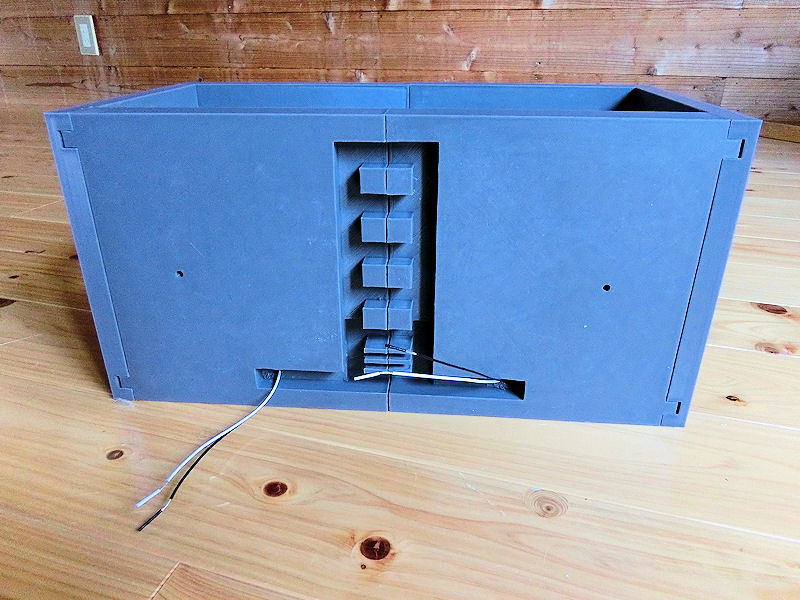
▲ ライトの裏側には電気配線のために開いているスペースを用意しました。
I designed a little bit of hidden space at the back of the pieces, to hide the wiring.
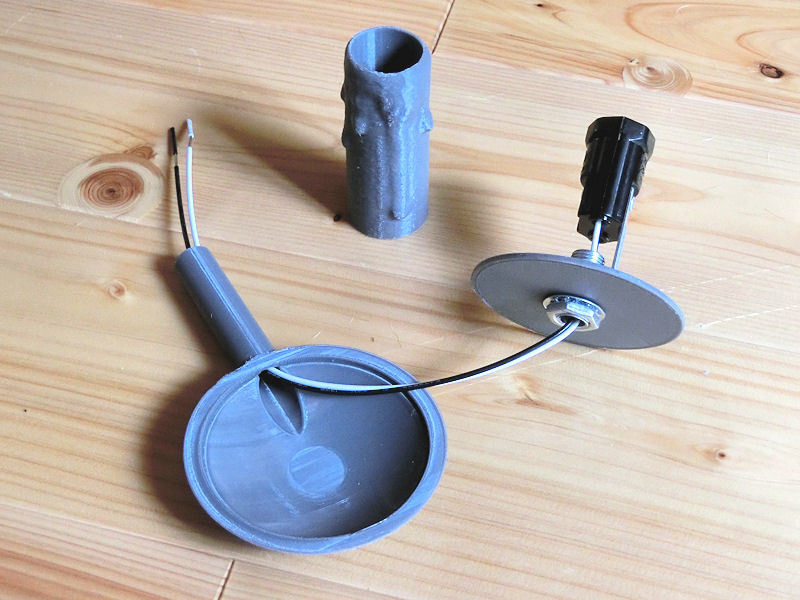
▲ アンティーク風の蝋燭形のソケットをデザインしました。偽物蝋燭の中にE12用のソケットをジャストフィットできました。
I carefully measured the space required to house the E12 sockets, and then (using the 3D software) cut a 21mm hole in this fake candle to hide everything.

▲ ソケットをホルダーに入れるとすべてのワイヤが隠せます。
Slotting the socket and base into this sconce, everything gets neatly hidden away.
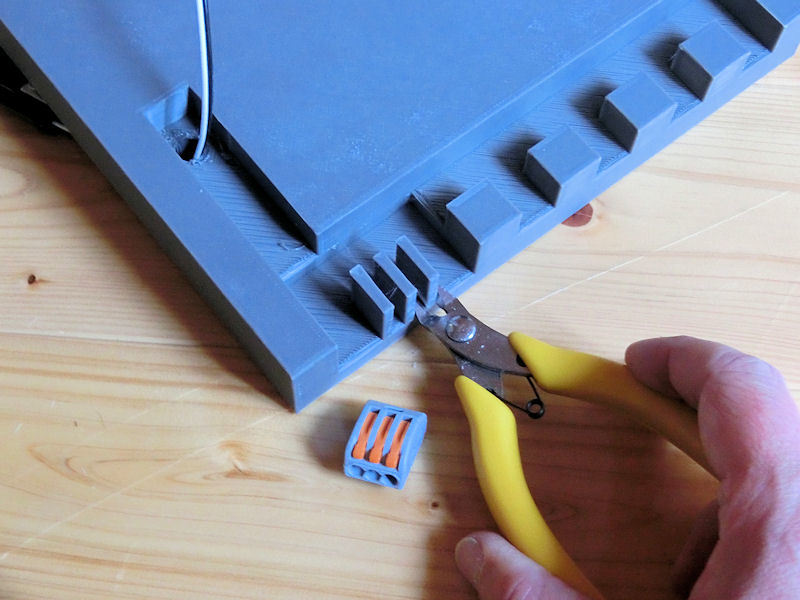
▲ 裏側の電気配線はこんな感じでした。
The rest of the wiring connections will be hidden at the back of the box.
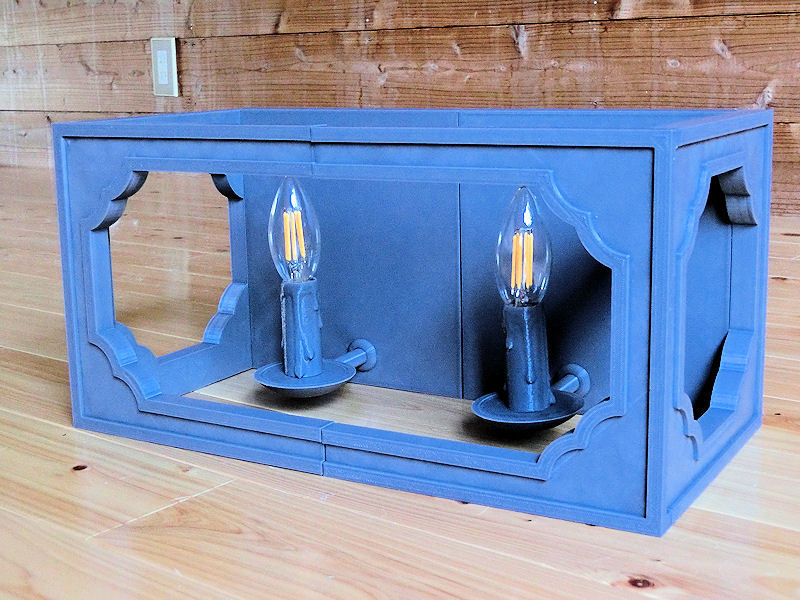
▲ すべてのパーツを組み合わせると完成品になりました。
しかし、アンティーク風にするとペイントが大事ですね!
Here's the finished light fitting, with bulbs in place.
However, that was only half the job, because for the correct rustic-feel, the paintjob would be very important.
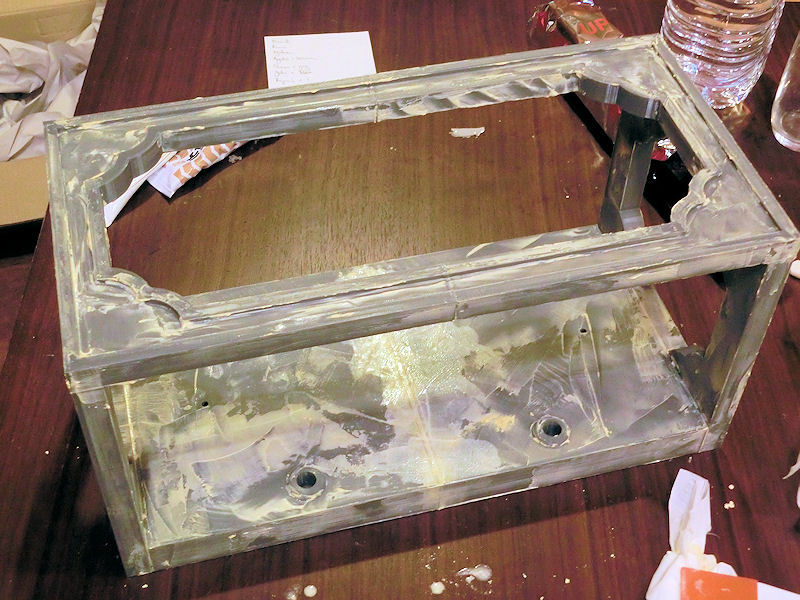
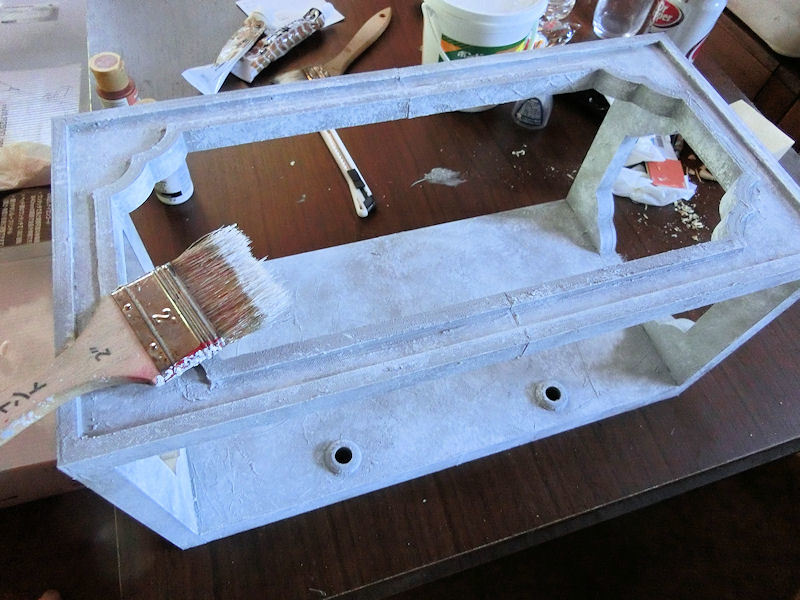
▲ ウッドパテを適当にベラでつけました。
I roughed up all those flat surfaces with some messy application of wood putty.
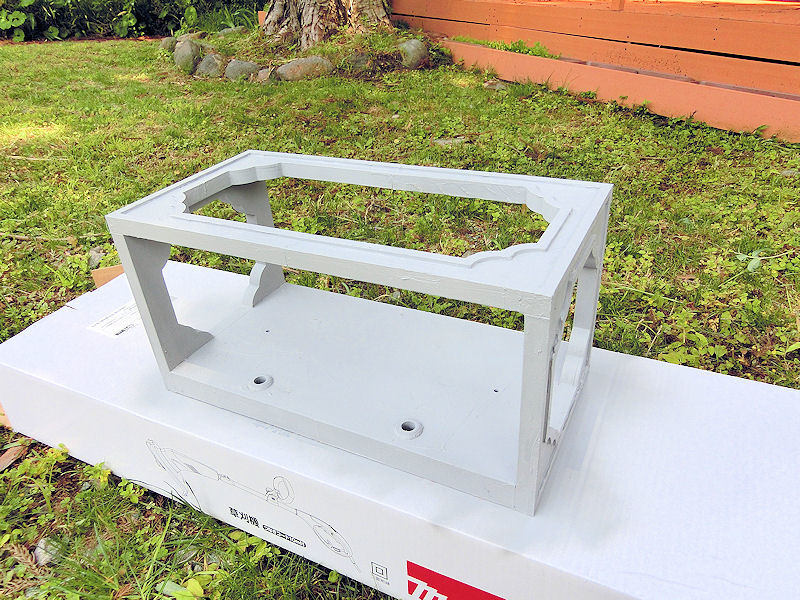
▲ そして、ライトグレーのツヤなしスプレーでベースコートしました。
Then the whole light was given a spray undercoat of light grey...
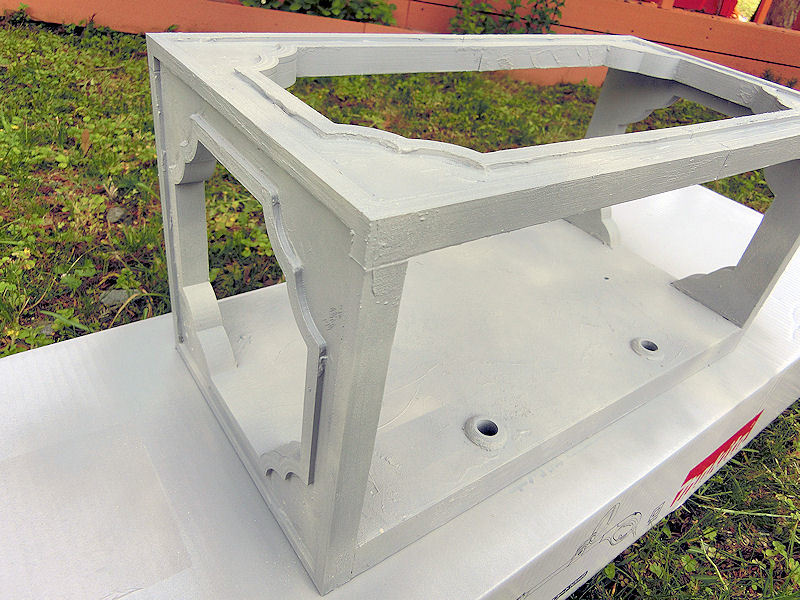
▲ その上に適当にクリーム色もあっちこっちにスプレーしました。
... followed by random patches of cream colour, sprayed on in light bursts.
▲ 白のアクリルペイントをちょっとづつでブラッシュで塗りました。英語の「stipple」は「点描」だそうです!
White acrylic paint was then carefully stippled on with a large brush, to break up the flatness.

▲ 飾りで、周りの部分に銅アクリルペイントをスポンジで押しました。アンティーク風ですのでこれも適当にしました。別にきれいじゃなくてもOKですね。銅の後に、金も同じ風にスポンジで押しました。
これで完成でした。。。
The edges received a patchy stippling with a sponge and some bronze paint ("Worn Penny", I think), and then again with gold paint just to brighten it up.
And with that, the light was finished!
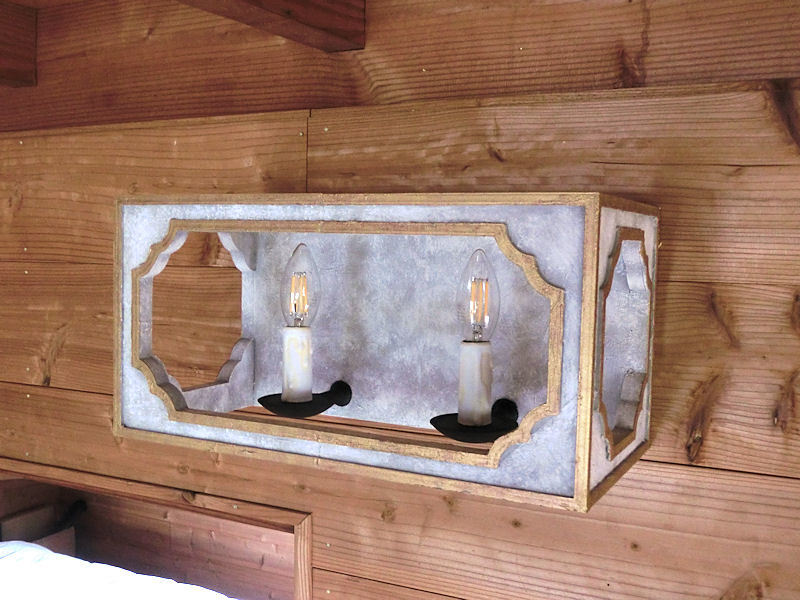
▲ 白い蝋燭を黒いホルダーの上に載せて、壁に付けました。どうでしょうか?
ちょっとユニークなライトになっていましたので、とても満足しています!
The matt black sconces were glued into place, and then the white candles slotted in on top and the whole light screwed to the wall.
I think it's a lovely unique design, and came out really well!
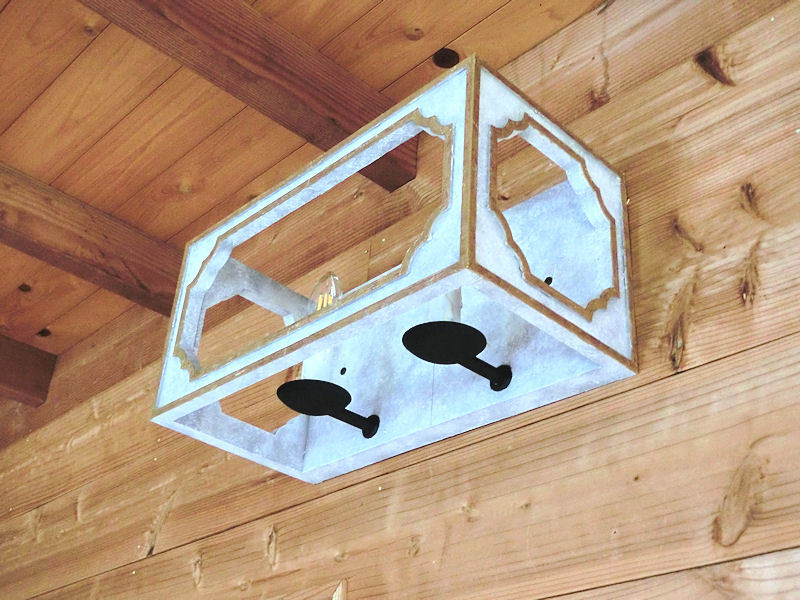
▲ 下から見ろと電気配線が全く見えません。
Even from directly beneath no wiring cables are visible.
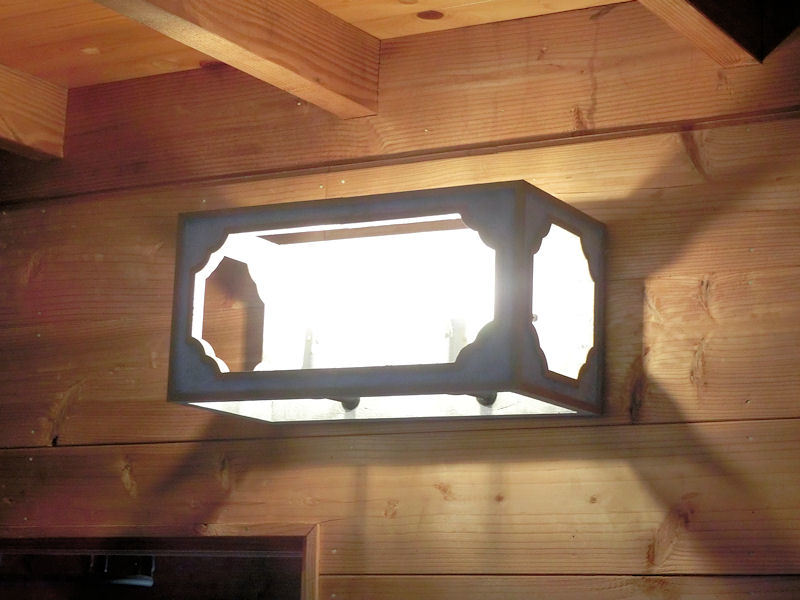
▲ ボックスの壁に大きい穴がありますので、結構照明が届きます。
The top and bottom of the light box let plenty of light through.
▲ ネット価格の25,000円とDIY価格の1,600円を比べたら、結構節約できました!やったー!
So for a project that cost only $16 instead of the $250 for the version on the net, I'm super happy with how it turned out!
2階のリビングはまだちょっと暗いので、もう一つの照明を作成したかった。ただし、その部屋の天井はアピールポイントですので長いシャンデリアを作りたいです!
「カピス」(capiz)という貝殻で作成しようと決めました。そのに高くないし、風が通ったら素晴らしい音がしますので、ちょうどいいと思います。
The second floor's living space is still quite dark sometimes, so I've decided to add an extra light to brighten things up. However, since the lovely tall cathedral ceiling is a wonderful feature of the room, I thought I'd try to make use of all that vertical space, with a tall DIY chandelier.
I decided to try making a chandelier from capiz shells, because they are not that expensive to buy in bulk, and I could make it any size I wanted just by adding more. As an added bonus, capiz shells make a lovely tinkling sound when they bump into each other in a breeze!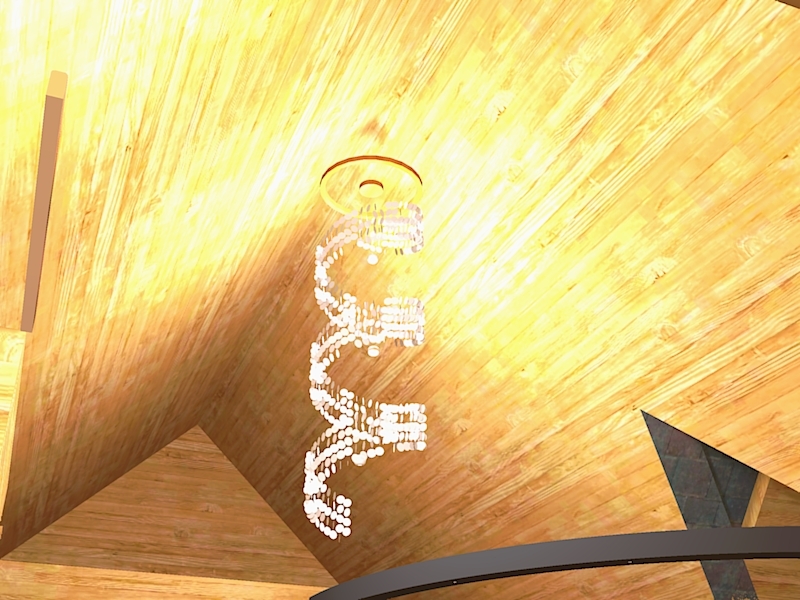
▲ まずは3Dデザインソフト「Sketchup」で必要な大きさを作ってみました。こんな感じにできるかなぁ?
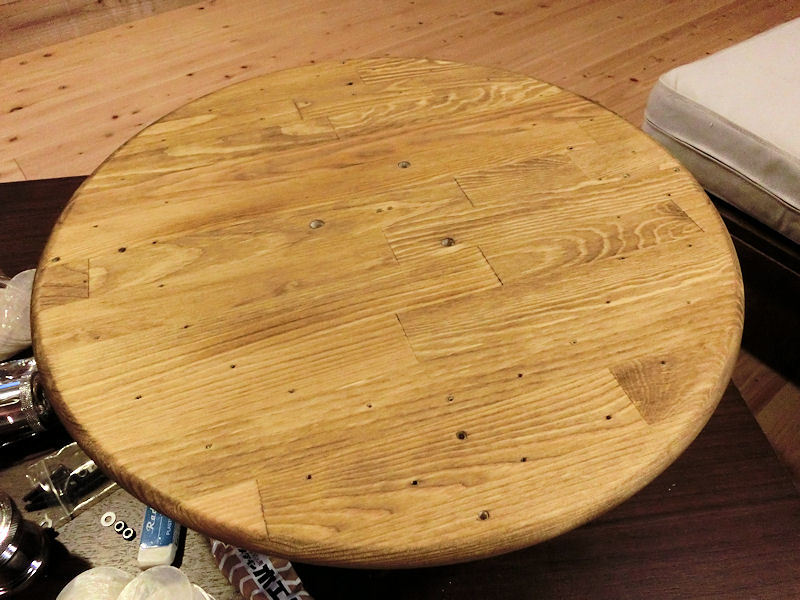
しかし木材のリング形は非常に作りにくいので、その形はやめました。その代わりにテーブル用の丸い木材にしました。
A bit of preplanning was required, to get the size and shape I wanted, and also to work out how many shells I would need to buy. So I tried out some layouts in my favourite free 3D modelling software, Sketchup, and came up with this design. I eventually abandoned the wooden ring design for the top part, in favour of a much simpler solid circle of wood.
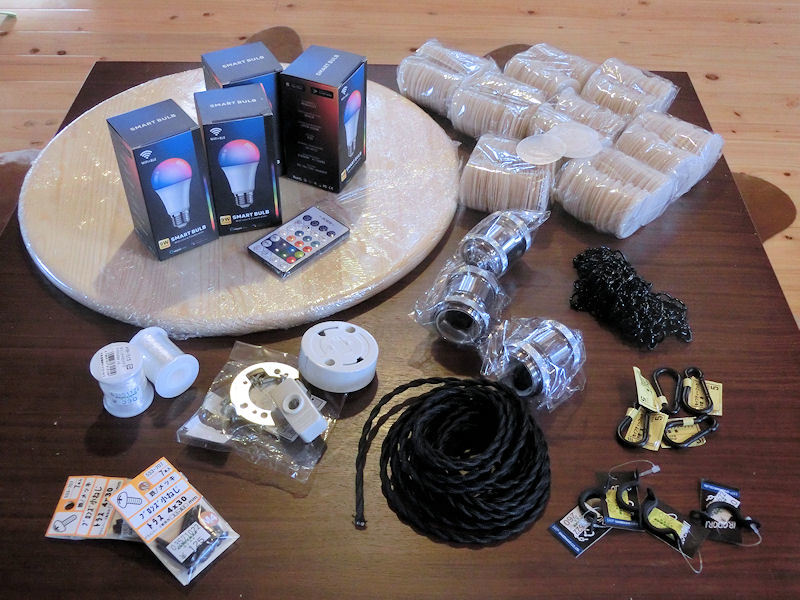
▲ これらのパーツを集めました:
合計約20,000円になりました。このプロジェクトが結構時間かかるけど、そのに高くはないですね。
Then it was some hunting online, to find the parts I needed. This is what I bought:
In total that came to about $200. This project takes lots of time to put together, but doesn't actually cost all that much.
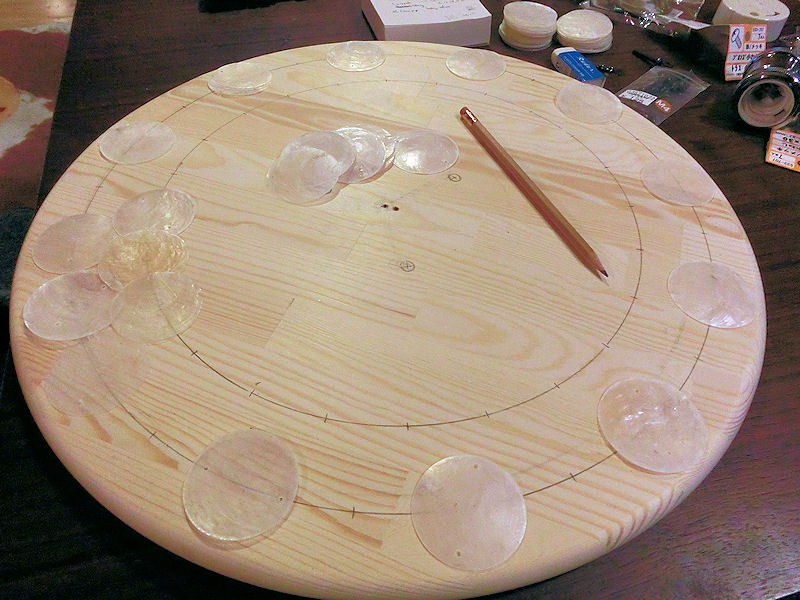
▲ 最初にテーブル板にカピスの位置を描きました。外側に24個、内側に24個でサイズ的に合いました。
各貝殻の所に2ミリの穴をあけました。それらに穴に透明なアクリル糸を通します。
I started by placing two rings of capiz shells around the wooden tabletop, and marking off the positions of each shell. Each ring had 24 shells, so I drilled 48 small holes for the plastic thread to go through.
▲ 真ん中に3つの電気配線のために10ミリ穴もあけました。そして、4か所でチェーン用の穴もあけました。最後にウッドステインで塗りました。
In the centre I drilled 3 larger holes for the electrical cables, and then also holes for the metal chain clips at 4 quarters, and then quickly painted the tabletop with woodstain.
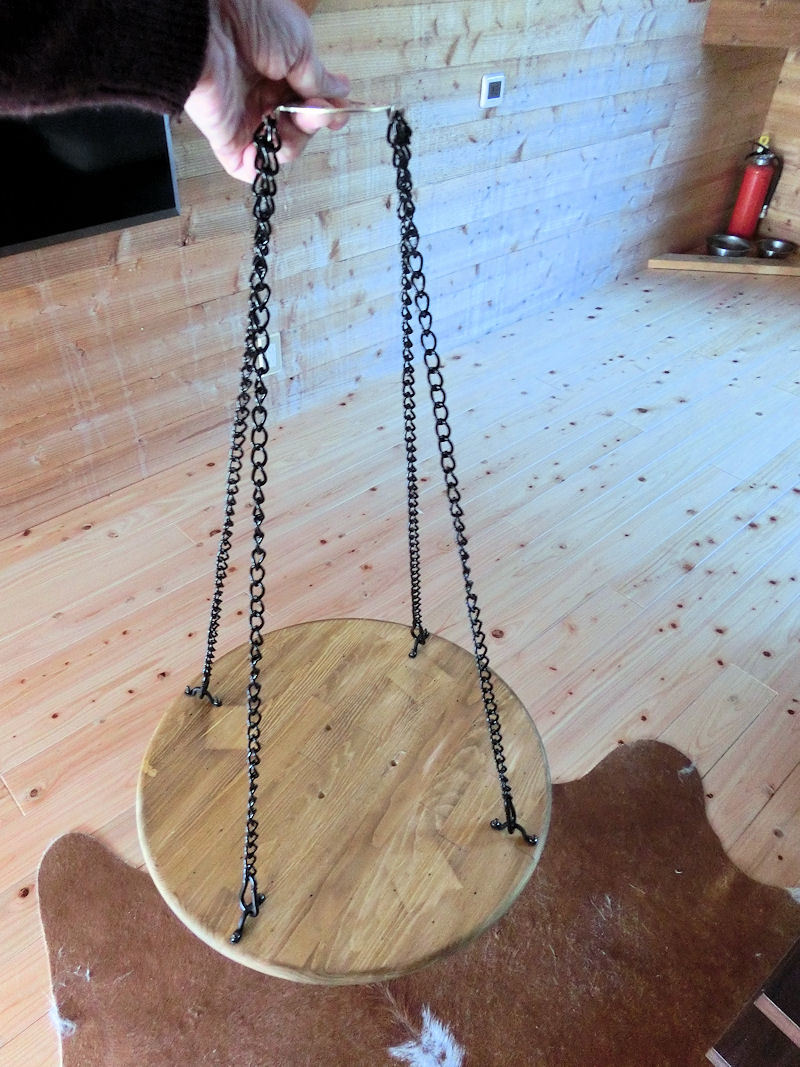
▲ チェーンは4か所から下がります。60cmの長さで切りましたので、シャンデリア本体はそれ下に約2メートルになります。
After attaching metal clips to each of the four 'corners', I hung the chandelier from 60cm of chain. With the height of the shells, it should work out to well over 2 metres in total.
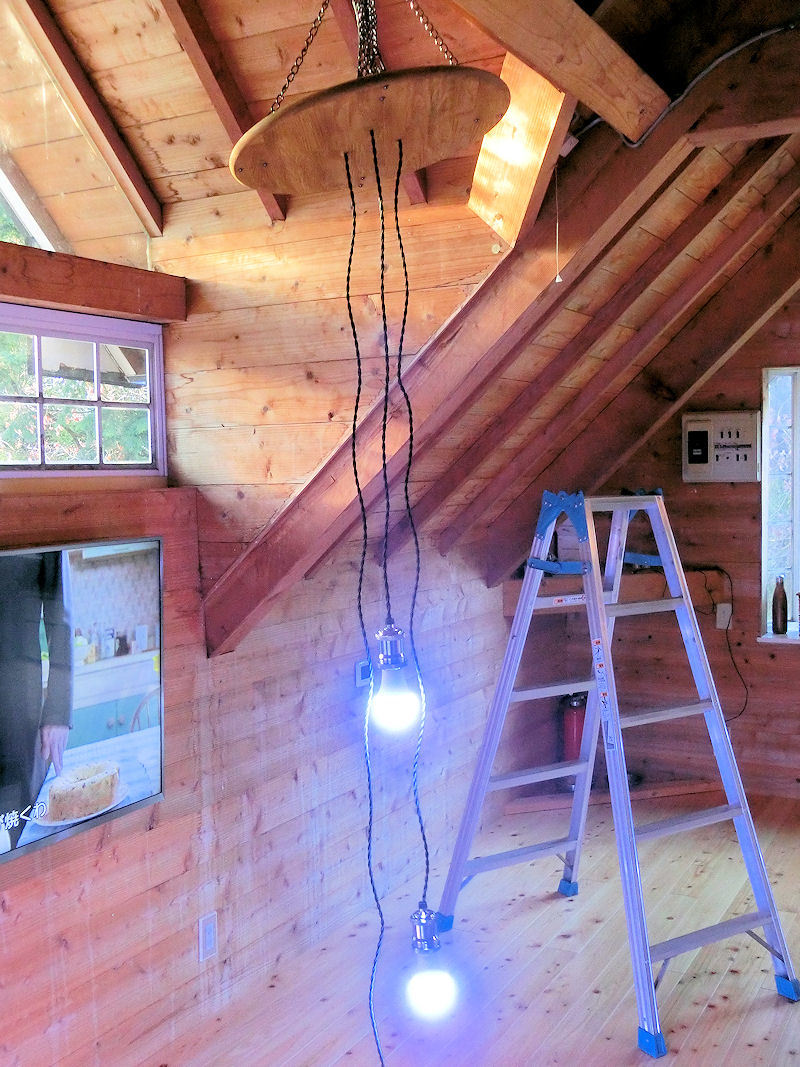
▲ 電気配線はこのレトロな雰囲気のケーブルとメッキのソケットにスマートLED電球をつなぎました。テストのときにこんな感じでした。
では、後はカピス貝殻だけですね。。。
I connected up the bulbs and cables, and plugged it in to check everything was working fine. So far, so good.
Now it's just a matter of adding 800 capiz shells one by one...
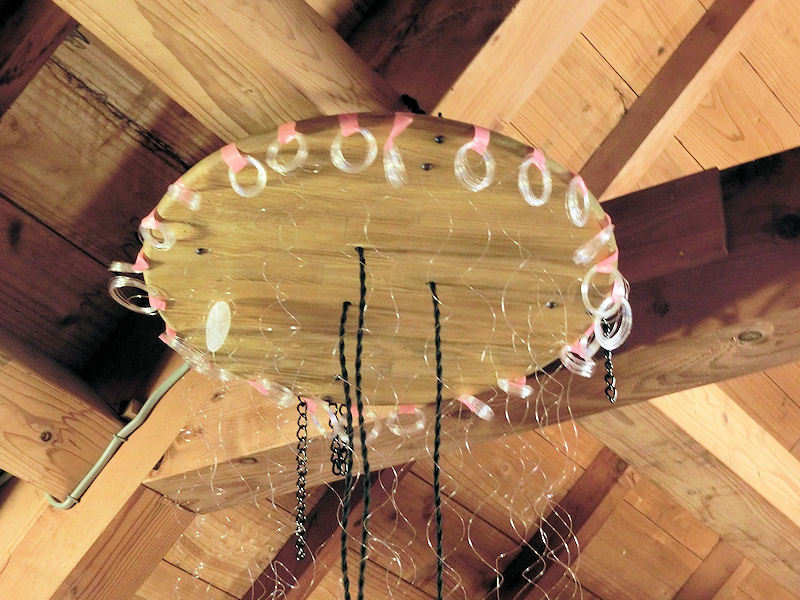
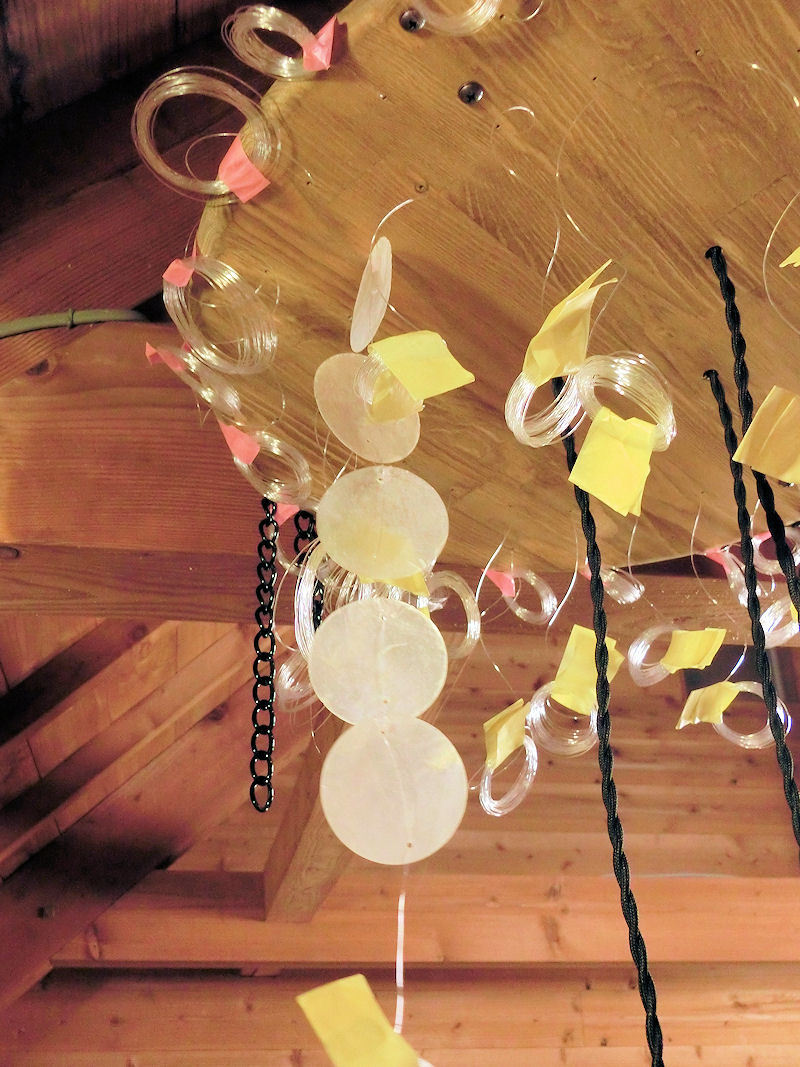
▲ 外側と内側の穴をペアにして、約5メートル長さの糸を通しました。見えない上面に糸をホチキスで止めました。そして、外側の糸をぐるぐる回してピンク色のテープで木材の部分に結びました。
I cut the clear thread into 5-metre lengths, and ran one through each pair of outer and inner ring holes. Then I stapled the middle of each string to the top of the wood, where it can't be seen, just to stop it from slipping.
Next I slowly looped up each length of string from the outer ring of holes, and tied each loop together with some pink masking tape.

▲ 同じ風に内側の糸も黄色テープで結びました。これは大事ですね。これをしないと糸がゴチャゴチャにします。
I did the same with the string from each of the inner ring of holes, but taped them up with yellow masking tape. It's a bit of a pain looping up the strings like this, but it's necessary to prevent them becoming all entangled and knotted.
▲ カピス貝殻に穴が買った頃から穴がありましたので、助かりました。糸を上の穴に通して、2回結んで、下の穴から出ました。各糸には5個セットを結びました。
Time to tie on the first set of 5 capiz shells! I looped the string through the top hole of the shell (happily they came pre-drilled with holes!), and tied a knot in it there, then ran the string through the bottom hole of the shell. Then I just repeated the same process for the other 4 shells. My first set of 5 was completed - only 795 more to go!
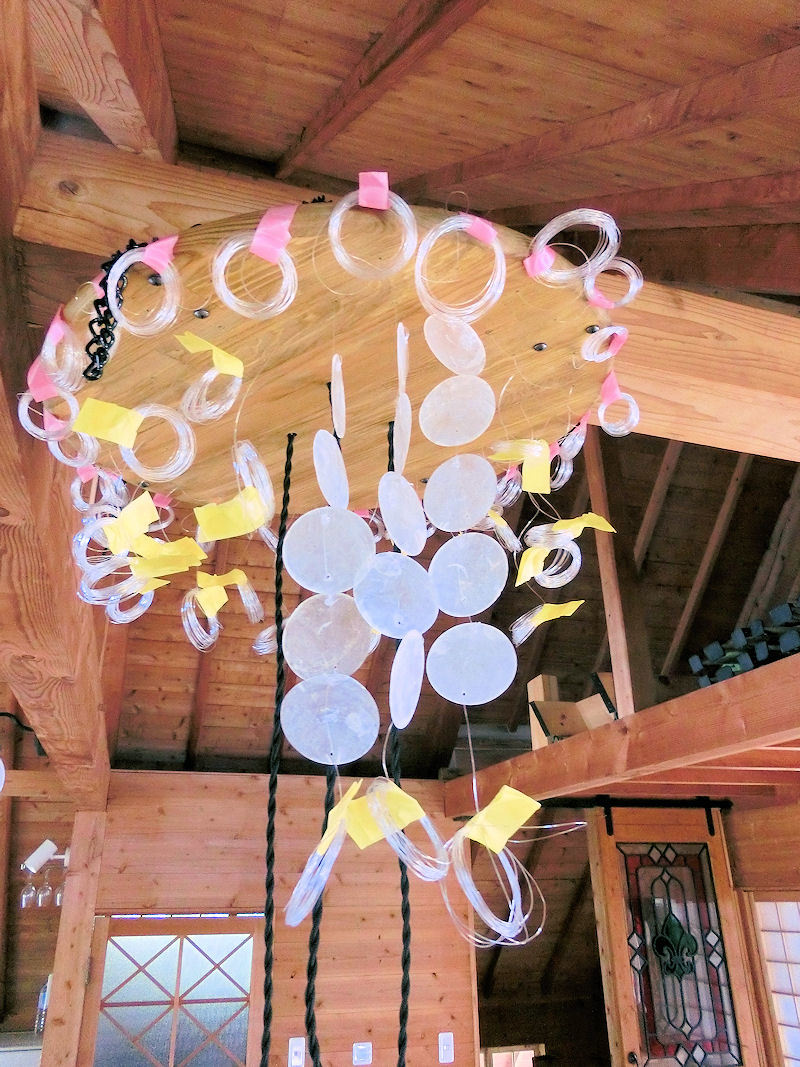
▲ 次の糸から15ミリぐらい下の所に、次の5個セットを結びました。結構ゆっくりな坂になりますが、3Dソフトで試してみたときにこのぐらいのペースで好きならせん状の形にできるかも。
I'd already worked out how much I needed to drop the next string of 5 shells (in the 3D design software), to give me the spiral angle I wanted. So the top shell of the next string was just dropped half a shell from the previous string (about 15mm), which seemed like it would take forever to get all the way down?!
▲ 最初の部分は結構時間かかりました。糸は長かったので、テープを外したらゴチャゴチャになった場合もよくありました。各カピスを結ぶには約4分かかりました!
5個セットを終わったら、また糸をテープで結びました。これで邪魔にならないんです。
These first few strings did take ages to get done, mostly because the long strings kept getting knotted and tangled up with themselves. Once each set of five shells was complete, I carefully looped up the remaining string and tied it back up with masking tape. I think the early shells were taking about 4~5 minutes each, but later on I was able to go at about 3 minutes for each.
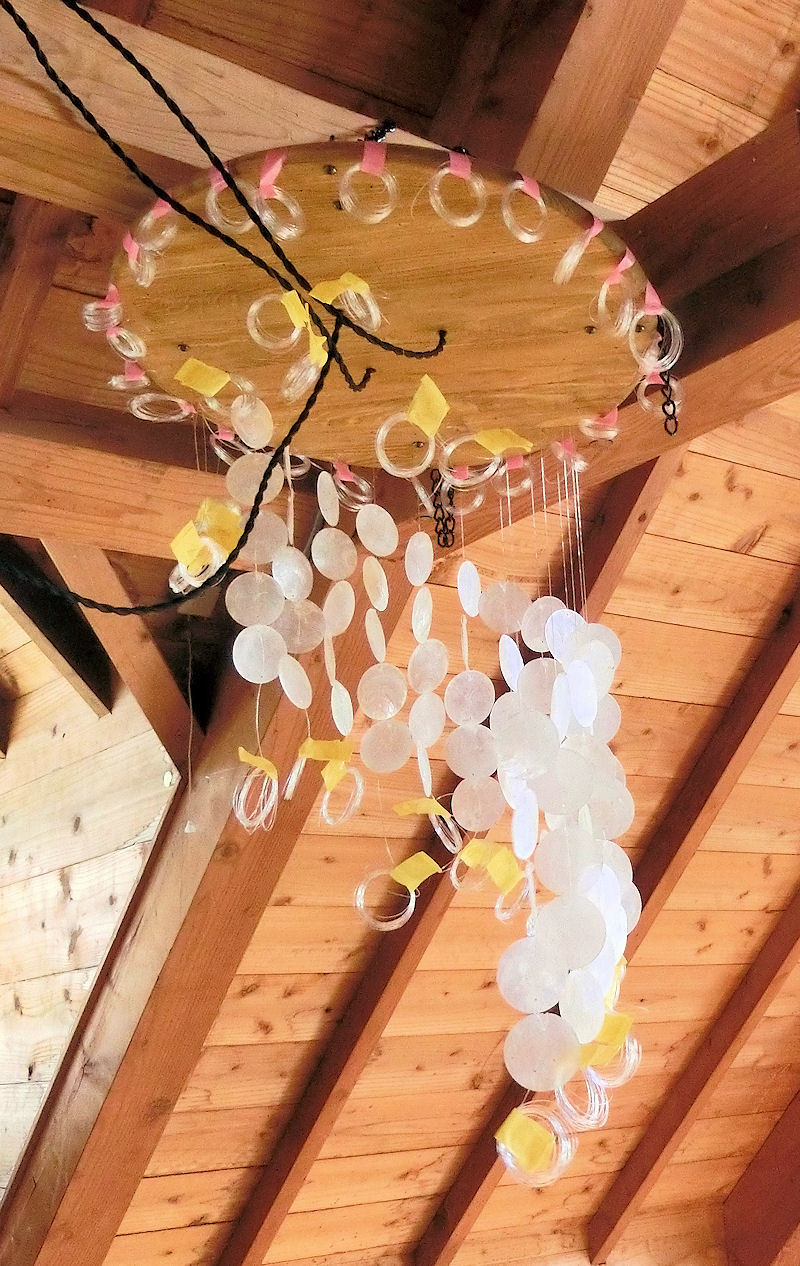
▲ 内側に一周を終わりましたらこんな感じになりました。それから、外側の糸からもカピス貝殻一周を結びました。
Once I'd finished a complete circle of 24 shell sets on the inner ring, I did exactly the same thing with the outer ring, which thickened up the appearance nicely. This where the different colours of masking tapes comes in handy, so you don't get confused which one you're working on!
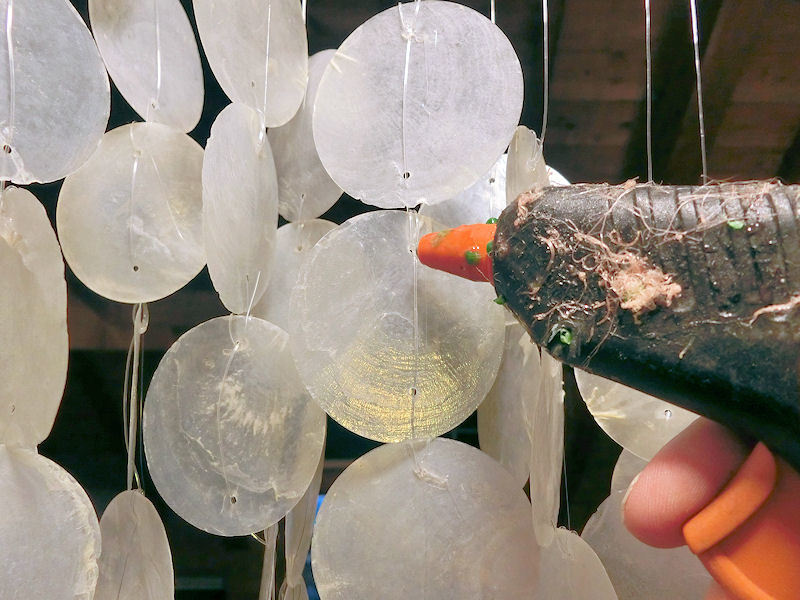
▲ アクリル糸をスリップしないように、写真の様に各結びの穴にホットグルーガンで止めました。
それから毎晩、ビデオを見ながらカピス貝殻を結びました。結構時間かかりました、どんどん大きくなりました。何週間後、約2メートルの高さになりましたので、梯子に上って天井から電気配線を付けました。
完成品はこんな風になりました。。。
The clear plastic string is pretty slippy, so I added a blob of hot glue to the top hole and knot of each shell. That should hold it in place permanently.
So doing 24 strings of 5 shells each, for both inner AND outer rings, x 3 spirals for each ring, takes.... quite a long time! But I was able to watch/listen to videos while I was working away, so it was a pleasant way to pass an hour or two each evening, much like knitting. After a few weeks the strings had reached 2 metres each, so I climbed up on a ladder to add some electrics and a socket to the distant ceiling, and carefully lifted and hung the chandelier.
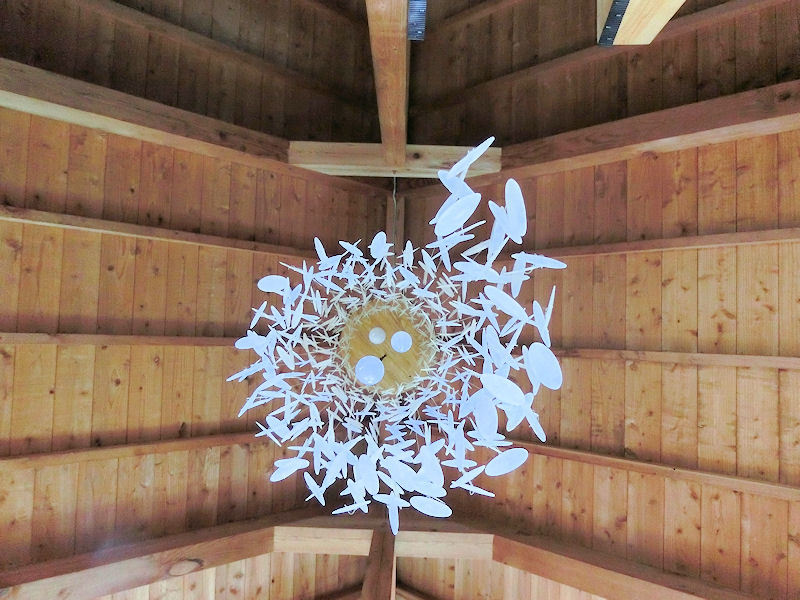
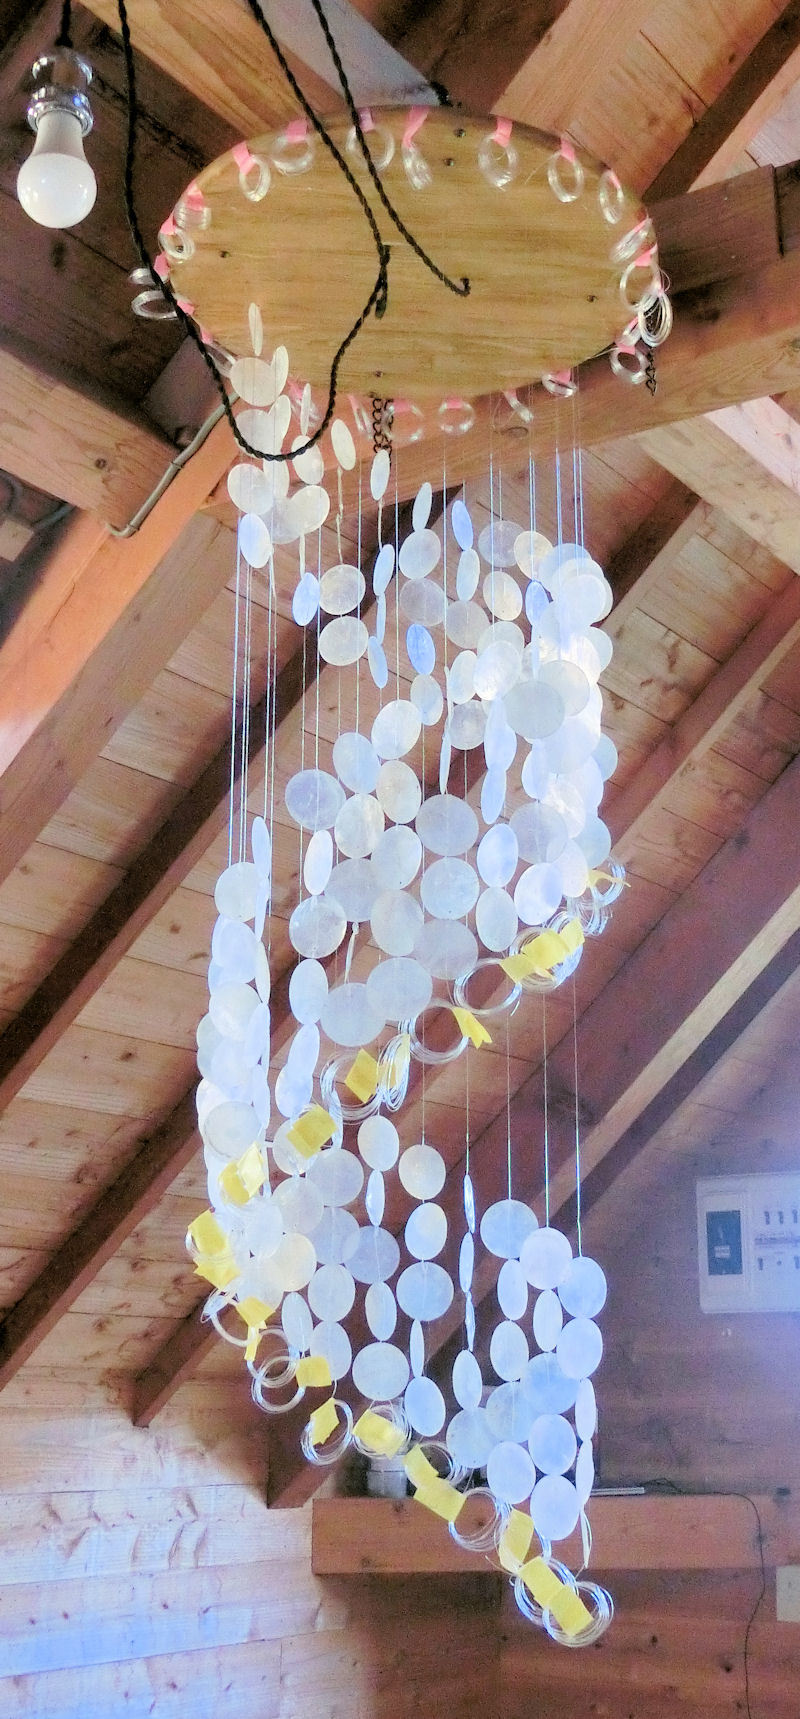
▲ 下から見るとこんな感じです。風が通るときにいい音が出ます!
Here's the finished chandelier as viewed from directly underneath. When a breeze blows, it makes such a lovely sound!
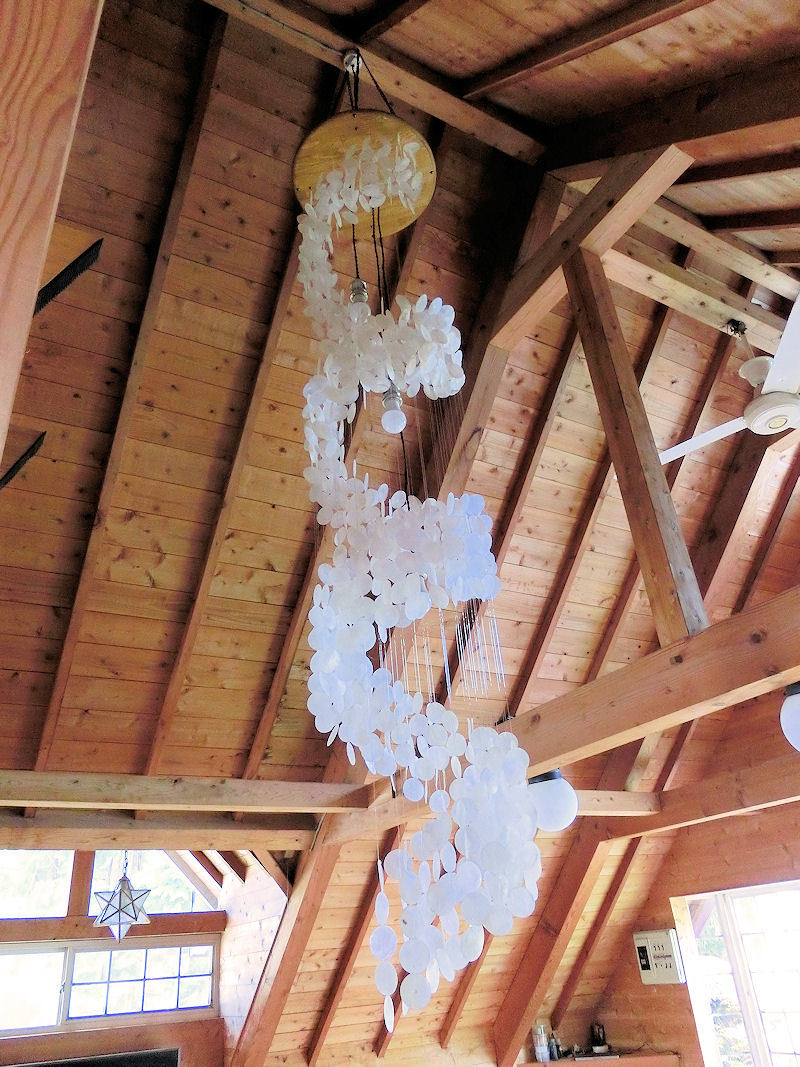
▲ 全部で多分3メートル近くですね。
The whole chandelier and chain is about 3 metres tall!
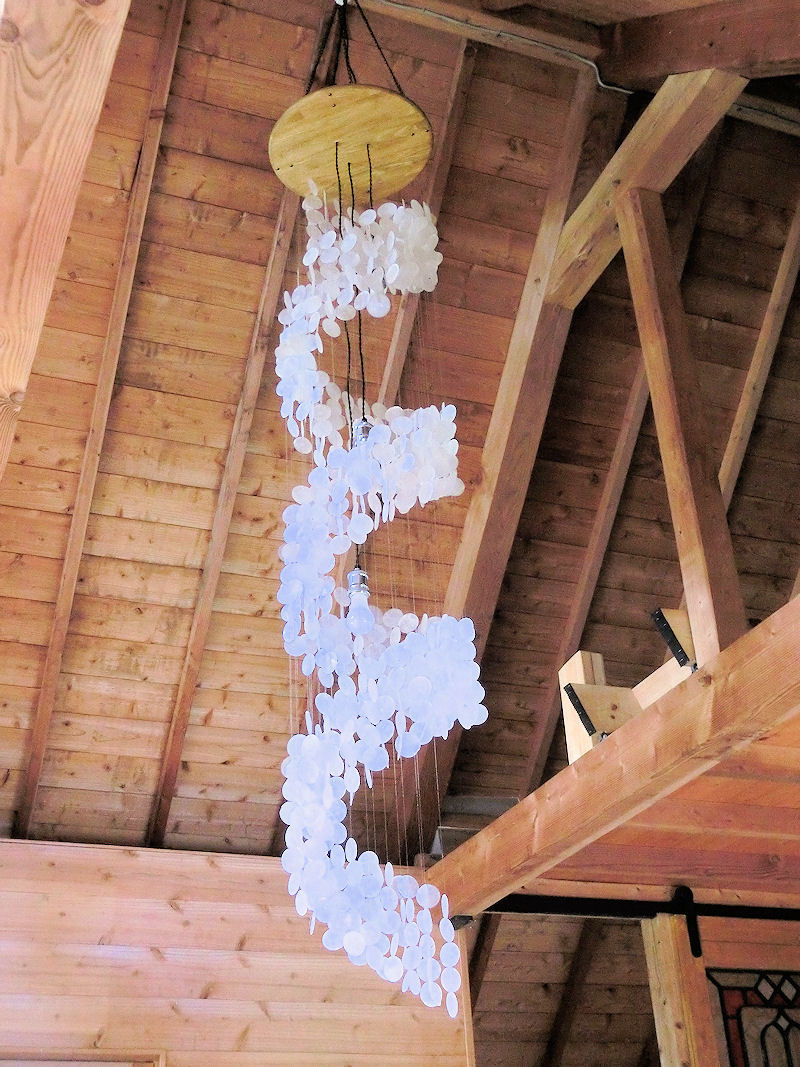
▲ いつかケーブルを違う色に変更するかもしれないですが、とりあえず満足です!
I might change the cables to silver maybe, at some point, but for now I'm pretty happy with how it looks.
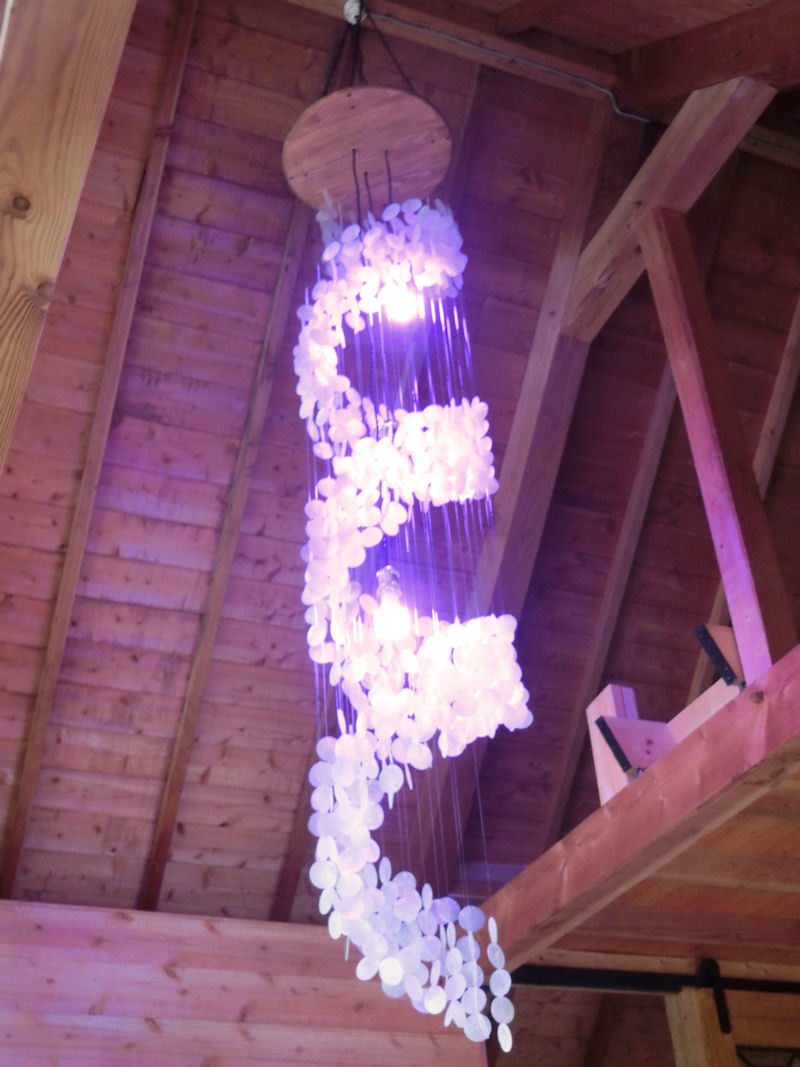
▲ スマートLED電球は普段電球色にしますが、この紫いろも結構楽しいですね!
いかがでしょうか?2万円と約80時間かかりましたが、だれでもできるDIYプロジェクトですね!
Those LED smartbulbs come with a remote control, of course, so I can change the normal warm lightbulb colour to something funky like this purple - which is very soothing!
In total I think it took somewhere around 80 hours to complete this chandelier (which I would have spent watching movies anyway), but for about $200 I think this project was well worth it! What do you think?
春が来ました!まもなく車庫を作りたいと思いますので、材料の種類と価格を調べながら計画を書きました。
Spring has properly arrived in Aso, and that means that rainy season and then typhoon season are not too far behind! So, to avoid any falling-tree incidents like last year, I'm going to start construction on a small one-car garage for my lovely old baby.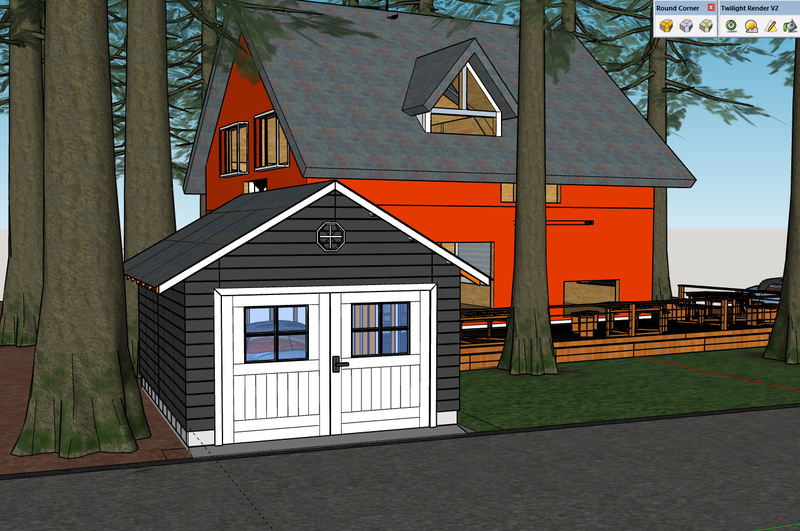
▲ 相変わらず無料デザインソフト「Sketchup」で図面を描きました。現在、車一台の狭いスペースがこっちにありますが、そこに車庫を木材でDIY作成します!
I'm planning to do this whole project on my own, using low-cost DIY techniques wherever possible. The first of these is to carefully draw up plans myself for each stage of the build, while simultaneously researching the best materials and costs for the job!
I started, as always, with my old friend Sketchup. This is free 3D design software that you can download from the net, and allows me to quickly size things out and try different styles. I'm planning to build this garage at the front of the house, over the small bricked parking space that currently exists there. I'm going to need to expand the area by about 80cm to the side and rear to make it big enough to park comfortably and get out of the car.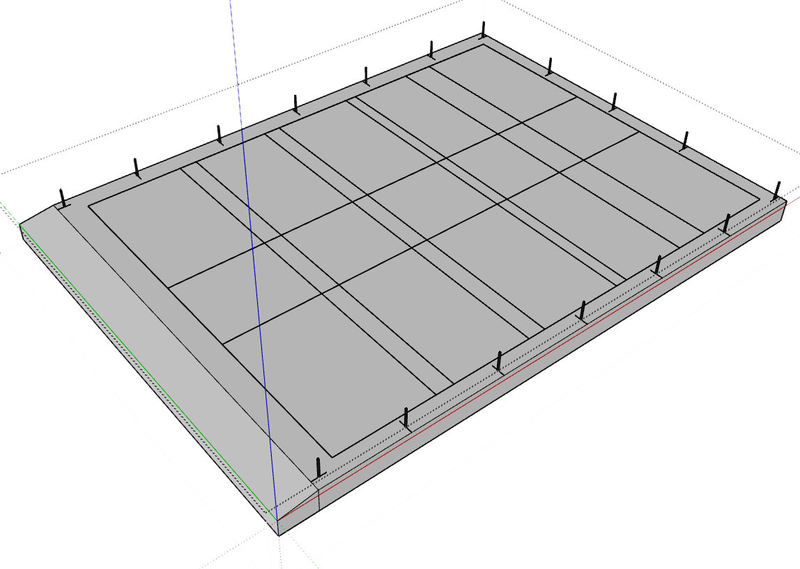
▲ まずは、砂利とコンクリートで土台を作ります。生コンクリートはミクサー者の配達でいただけたら嬉しいですが、どうでしょうね?その中にある黒い線は網メッシュの位置ですね。網メッシュがコンクリートの中に埋め込みます。
The first step is to create a concrete foundation base for the garage, which will probably weigh a little over 1ton when it's finished. I'm planning on digging out the ground, and filling it with compacted gravel before pouring over about 10cm of concrete. It doesn't sound like much, but even that will weigh well over 3 tons just for the concrete! The black lines in the middle are the wire mesh panels which will be embedded in the concrete to give it extra strength.
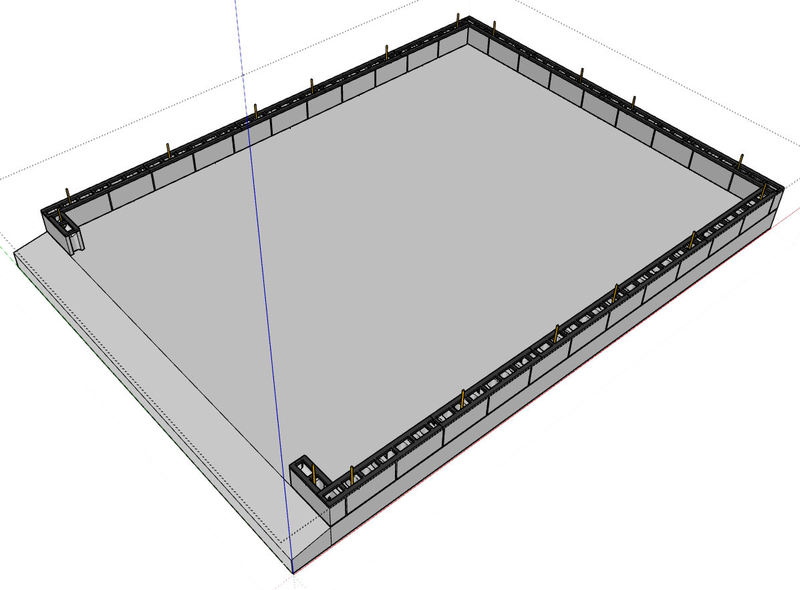
▲ 土台の上にブロックの壁を作ります。
The garage will need a low wall on 3 sides, to prevent water from reaching the wooden building structure, and I've decided to do this with a single layer of concrete blocks. I've done block laying a couple of times in the past, for flowerbeds and so on, but this time it will need to be perfectly level! No pressure, then....
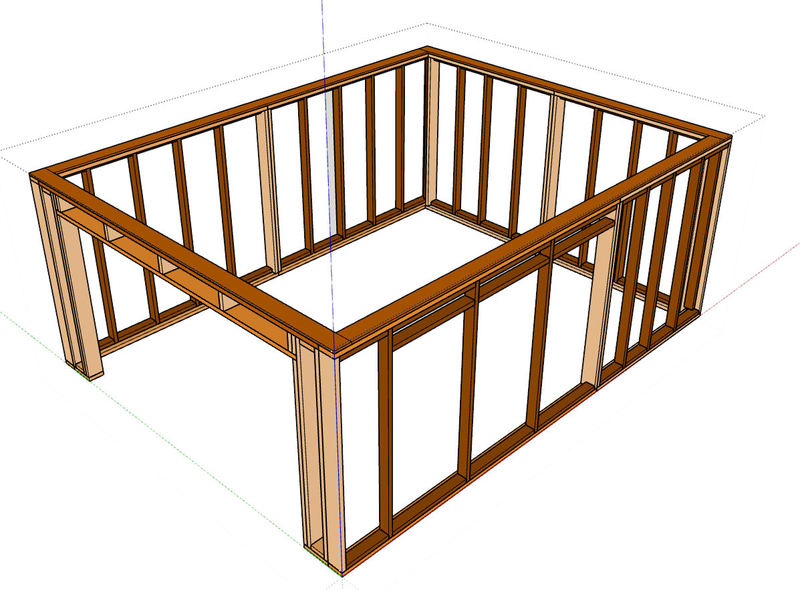
▲ ブロック壁の上に木材フレームを作ります。最近木材の価格で大変高くなりましたので、ちょっと悲しいですが仕方がないですね。できるだけ安い方法「ツバイフォー」のパイン材でフレームを作ります。
The wooden frame wall will be lifted onto the base in sections, and bolted together. Since wood is currently very expensive (double that of pre-covid prices!), I'll be using the cheapest method of constructing the walls with 2x4s. Actually, I plan to use 2x6s (which are wider at 140mm) for the corners, tops and bottoms, and then the thinner and cheaper 2x4s (89mm wide) for the rest of the frame.
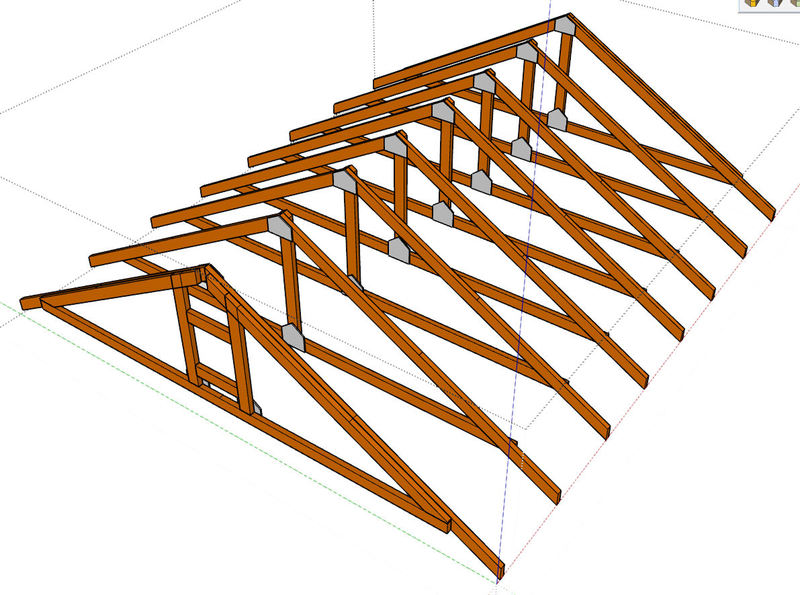
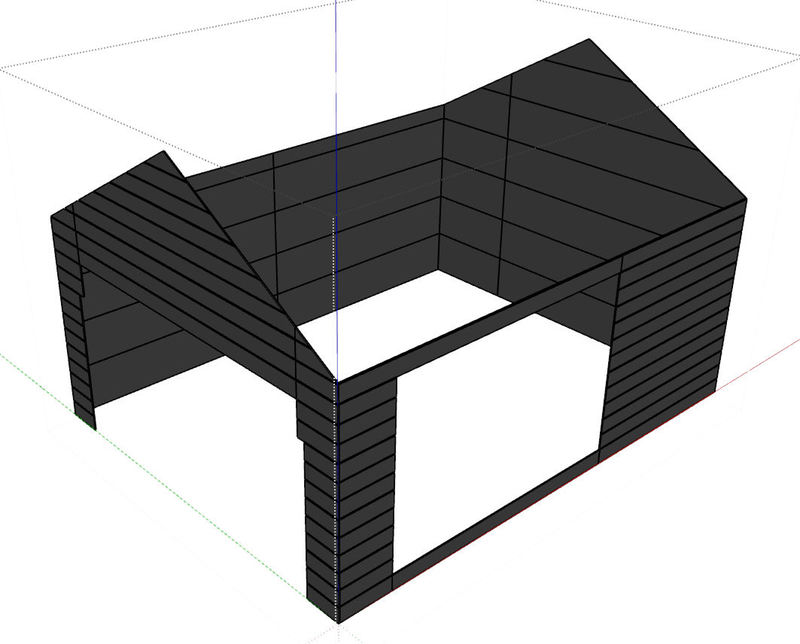
▲ 屋根もやすいツバイフォーの木材で作ります。家の屋根が大体45度でピッチしていますが、メンテナンスのために車庫の屋根を30度ピッチで計画しました。
The roof trusses will also be constructed with 2x4 beams, and then attached to the walls. I've decided to do a 30-degree angle pitch to the roof, because the 45-degree angle of the main house makes maintenance really, really hard! And since it's sheltered by my lovely pine trees, heavy snowfall shouldn't be a big issue.
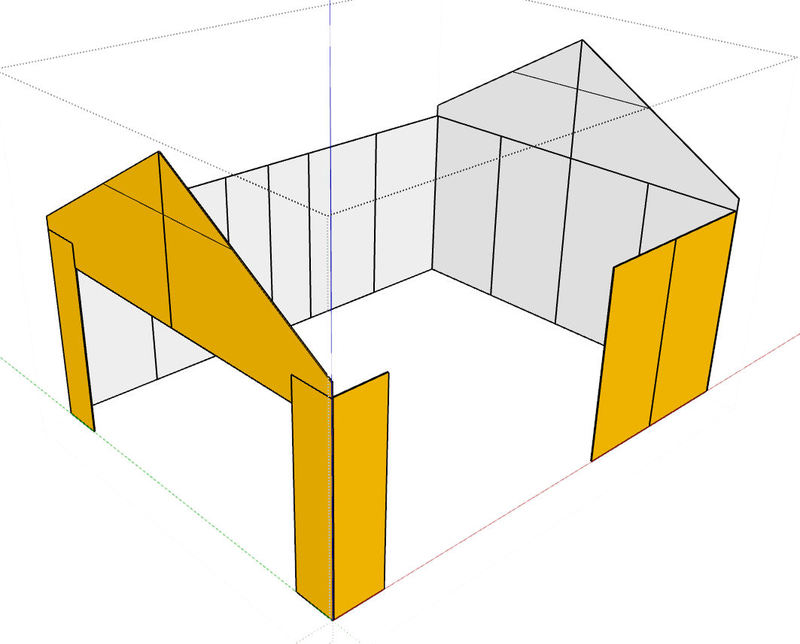
▲ フレームの周りにOSBボードを張ります。内面がインテリアの壁になりますので、白にペイントをするつもりです。
The walls will then be covered in chipboard panels, and I'm planning on painting the insides of those white, since they'll be making up the interior walls of the building.
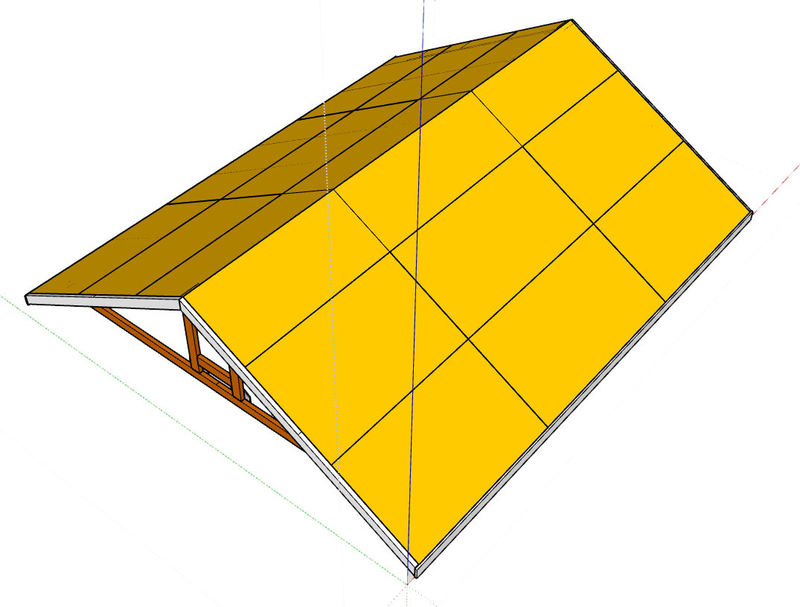
▲ 屋根のトラスを結ぶためにまたOSBボードを使います。その上に防水シートと屋根材を使います。
The roof will also be covered in the same chipboard panels, on top of which I will tack waterproof sheeting and then a top layer of roofing tile panels.
▲ 何年も使いたいのでサイディングを張ります。これは家と同じスタイルをマッチできますが、色合いが家の赤ではなく多分黒にペイントします。
I'm planning on using similar siding panels for the exterior of the garage, so that it matches the style of the house. Those panels are very heavy and a little pricey, but they should last for many, many years. I'm probably going to paint the garage black, because I think it'll look pretty good with the red house next to it.
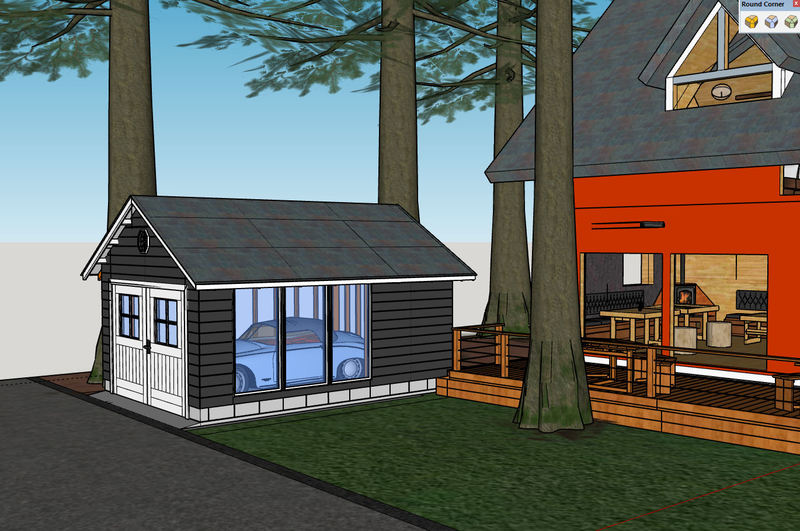
▲ 最後に車庫の正面に大きい両開きドアをDIYで作りたいです。ドアに窓を付けたら、側面の大きい窓3枚から光が入れます。これで道からでも、家からでも愛車の形が見えます!それが大事ですね!
The last job will be to fit 2 large hinged doors to the front. I've decided to stay away from shutters and electric openers, because repair fees are stupidly high. So instead I plan to build a couple of DIY doors and add large glass windows in them. Those windows, combined with the large 3 panel windows at the side, should provide plenty of natural light and also give me a view of my lovely car from the front, the side, AND from inside the house.
Honestly, I think admiring a beautiful car is one of the greatest pleasures in life, so those windows are super important to me!
So my estimated costs are as follows:
That's a total of 650,000yen, which is by no means cheap, but the whole deck was about the same price, and has made a HUGE difference to the house. Hopefully this will too. Anyway, this will be my last project for this house, so I guess it's fair that it's a big one?!
〒869-2226 熊本県阿蘇市乙姫2070-48
営業時間:10:00~17:00*
定 休 日 :毎週日曜日・月曜日
(* ドアが閉まっている場合もあります ー 近くにいます。ちょっとお待ち下さい!)


Shops added to the shop ショップにお店
Repainting a (mini) car ミニカーのリペイント
Buying land in Otohime 乙姫で土地探し
Scale model of the Inaba Residence 稲葉家下屋敷の模型
Customer request - Pokemon Ball! ポケモンボール
Garage construction ガレージ工事 PART 6
Secret Aso-volcano pool 阿蘇山の隠れプール


 神社
神社 寺
寺 茶屋
茶屋 城
城 店
店 家
家 農場
農場 建物その他
建物その他 壁・柵
壁・柵 橋
橋 池
池 LEDライト
0 コメント :
コメントを書く :