

 ホーム
ホーム ブログ
ブログ アクセス
アクセス3Dプリントアトリエ
| << Sign-making 看板作り 2021-04-06 | Basic tables 簡単2x4テーブル作成 >> 2021-04-17 |
デッキの作業が結構進んでいます。この前、デッキの大引きと床ができましたので、今度デッキのステップと柵を作ります。
Work on the deck is progressing nicely. In the previous blog the supports and the floor of this big deck had been completed, so the work this time is to finish off the edge of the deck, make some simple steps at the front, and build a fence around it. Let's get started...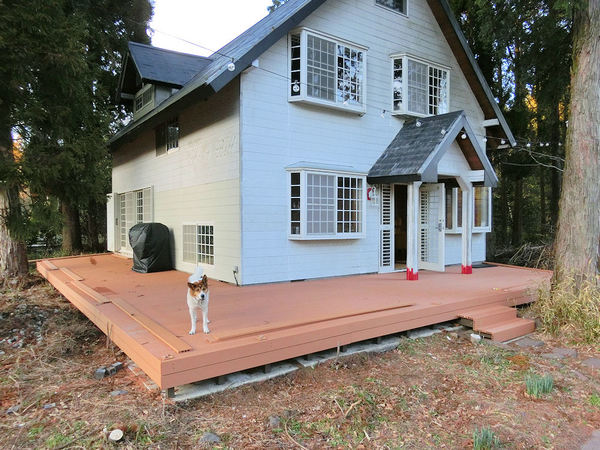
▲ デッキ下の大引きや柱を隠すために人工木材の薄い板を再度に張ります。下のほうが植物や花壇で隠すと思う。そして、6か月以上ステップはなかったですが、やっと作れるようになりました。あとちょっと。。。
To hide the under-deck supports from view, I used thinner planks of this artificial wood around the outside. The bottom few centimetres will eventually be hidden with maybe some flowerbeds or grass, I think? A couple of steps were added at the front, with leftover scraps of aluminium supports to hold it up!
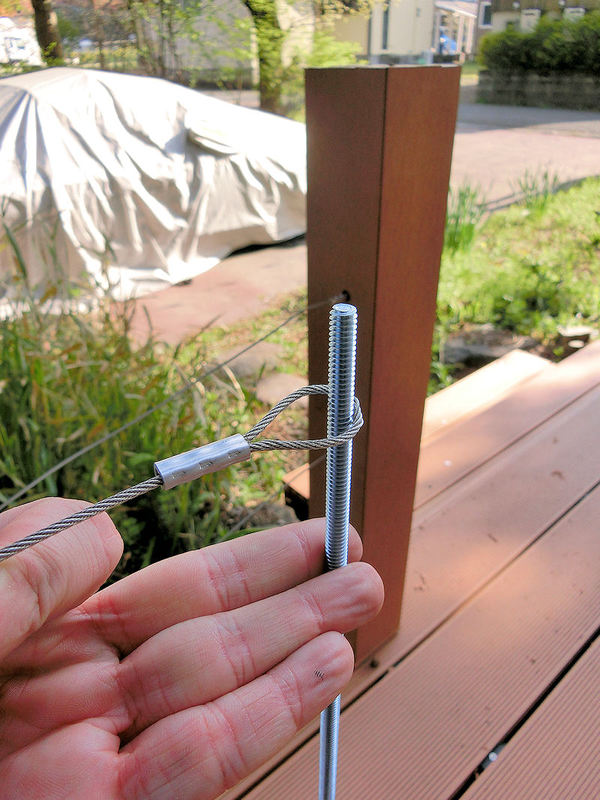
▲ 柵は人工木材とワイヤーで作ります。人工木材はもちろん何年間も使えますが、ちょっと高いですね。ということは柵の柱と手すりだけを人工木材で作ります。残りはモダン雰囲気のステンレス2mmワイヤーでつなぎます。ハンズマンDIY店から80mのワイヤーを買いました。
この人工木材の柱は中空ですので、その中に70cmのボルトを入れて、写真のようにワイヤーにつなぎます。簡単でしょう?!
Artificial wood lasts for years and years, since it doesn't rot like normal wood, but making an entire fence from it would be very expensive indeed. So to reduce costs I decided to only use artificial wood for the upright posts and the top handrail, and fill in the rest of the fence with wire. I had a cunning plan to style it to look a little more modern, and prevent it from looking too bad.
I bought 80 metres of 2mm-thick stainless steel wire from my local DIY store, and a set of aluminium crimps to make the ends. The centres of the upright posts are actually hollow, so I decided to slide in a long metal bolt (to the ends of the fences), and loop the wires around it inside the post.
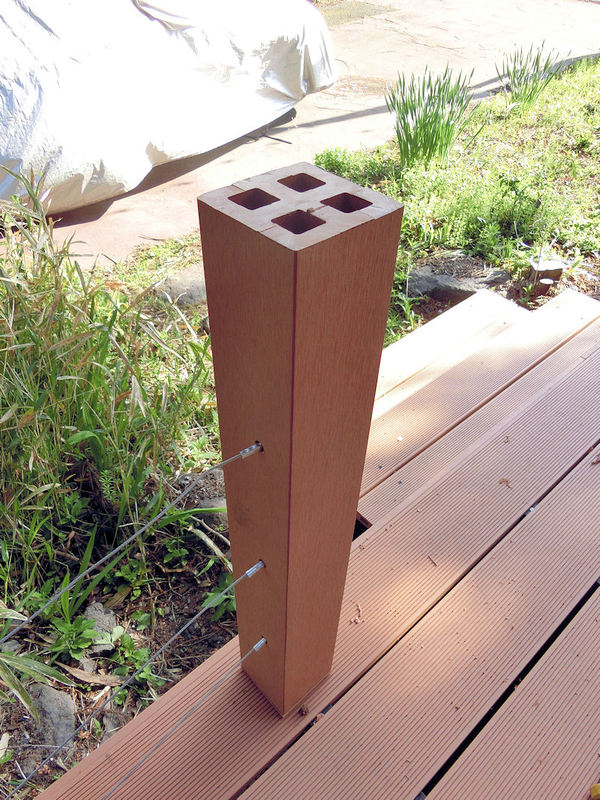
▲ 柱をデッキの床に固定したときにこんな感じでした。
Once the upright post was slotted on to the base pads and the wires were loosely inserted, this is how it looked.
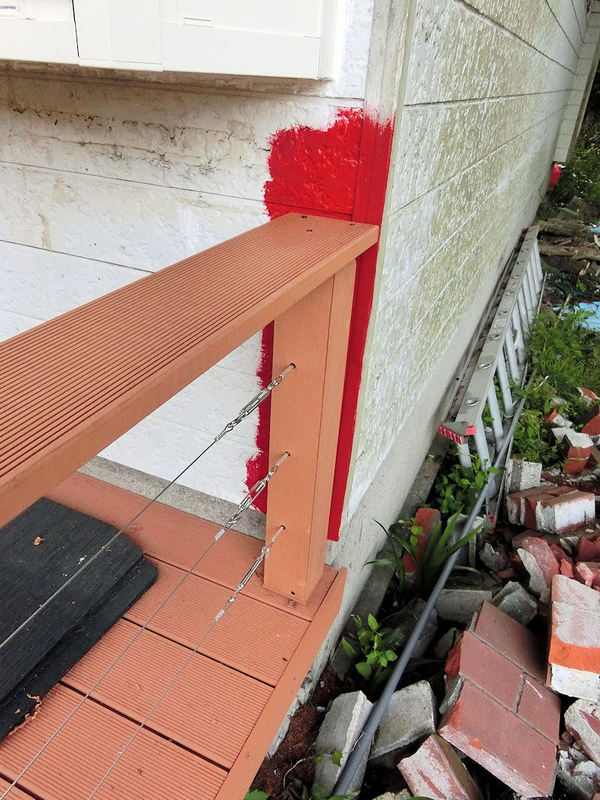
▲ 反対側の柵がこんな感じでした。そのステンレスのネジ/フックが5cmほどアジャストできるので、ワイヤーの張力が調整できます。
Once the top handrails were screwed into place, the fence had enough rigidity to tighten the wires using the adjustable screw hooks at one end. This pulled the wires tight, and finished the job!
▲ 手すりも床と同じ人工木材板を使いました。床との接続ポイントが少ないので、あまり強くないんですがワイヤーのフレームだけで十分ですかね?
最後にステップの端っこにも薄い板をはりました。
There aren't many connection points between the fence and the deck floor, so it doesn't have a massive amount of strength laterally - you can't lean against it safely or sit on it, for example. But it does have enough rigidity to pull the wires tight, so that's fine.
The last thing to do was to attach some edge planks to the front steps.
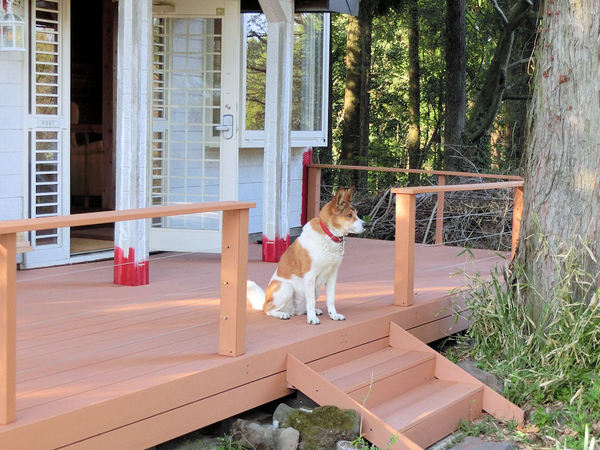
▲ 完成だ!やっと!ケイティちゃんも大喜びです!
And here it is - my finished deck!! At long last!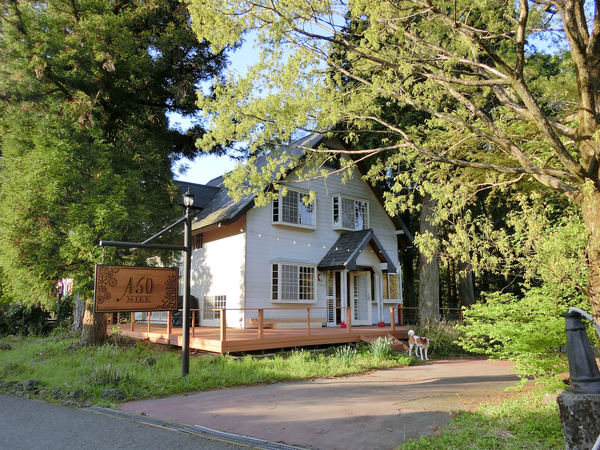
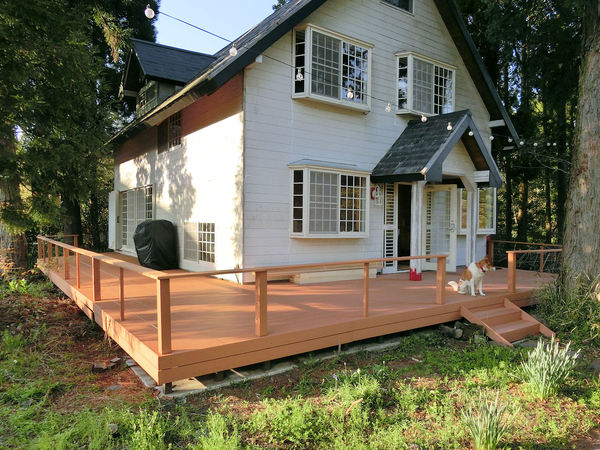
▲ 現在の感じです!
次はデッキ上の家具作成と家のペイントです。楽しみに。。。
So this is how the Aso house currently looks. The next work will be to make some tables and chairs for the deck, and then start painting the house! Woo!!
| << Sign-making 看板作り 2021-04-06 | Basic tables 簡単2x4テーブル作成 >> 2021-04-17 |
〒869-2226 熊本県阿蘇市乙姫2070-48
営業時間:13:00~17:00*
営業日:毎週金曜日・土曜日
(* ドアが閉まっている場合もあります ー 近くにいます。ちょっとお待ち下さい!)


")
Painted models available 塗装済の模型発売中!
Making garage doors ガレージの扉DIY作成
New side-project... a hobbit house! ホビットの家
Shops added to the shop ショップにお店
Repainting a (mini) car ミニカーのリペイント
Buying land in Otohime 乙姫で土地探し
Scale model of the Inaba Residence 稲葉家下屋敷の模型
Customer request - Pokemon Ball! ポケモンボール
Garage construction ガレージ工事 PART 6
Secret Aso-volcano pool 阿蘇山の隠れプール
Garage construction ガレージ工事 PART 5
Garage construction ガレージ工事 PART 4
Garage construction ガレージ工事 PART 3
Garage construction ガレージ工事 PART 2
Garage construction ガレージ工事 PART 1
Making a capiz shell wall light カピス貝殻壁掛けライト
Making a rustic antique-style wall light アンティークなライト作成
Making a capiz shell chandelier カピス貝殻シャンデリア
Online store opening sale グランドオープンの割引
Opening a webstore 通信販売サイトを開店します!
A lucky escape with the typhoon! 台風がヤバいけどラッキー!
E-bike conversion DIYで電動自転車を作った!
$200 Underfloor heating 2万円でDIY床暖房
3D-printed OPEN/ CLOSED sign アトリエ看板作成


 神社
神社 寺
寺 茶屋
茶屋 城
城 店
店 家
家 農場
農場 建物その他
建物その他 壁・柵
壁・柵 橋
橋 池
池 LEDライト