


3D-Print Studio
デッキと柵が終わりましたので、次はデッキ用の家具ですね。できるだけ安くしたいので、DIYで作ります!
It's time to make some deck furniture, and I'm keen to keep the budget down wherever possible.
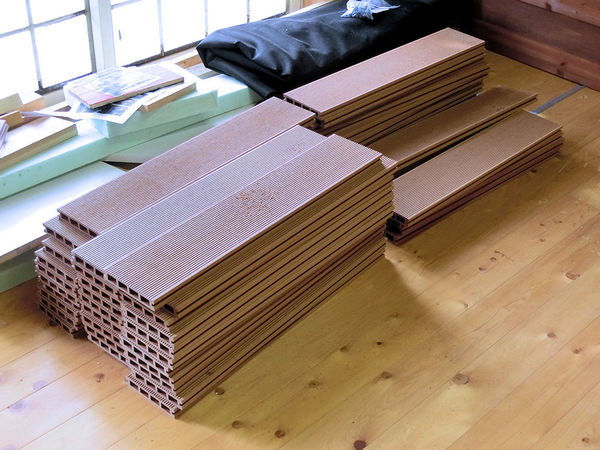
▲ デッキを作ったときから長さ70cmほどの人工木材板を90枚も残っています。これで大きいテーブルと椅子を作りたいです。
I have a stack of about 90 short planks of this artificial wood, which were trimmed off the edge of the deck floor when I made it. Each one is only about 70cm in length, but my plan is to come up with a design which uses these cut-off pieces, and thereby keep costs to a minimum.
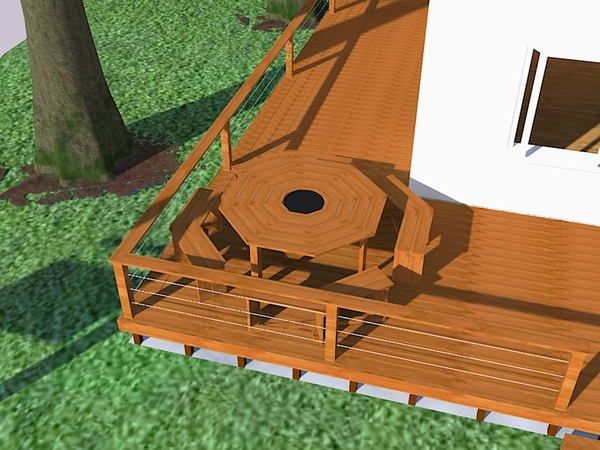
▲ 作る前に3Dモデルのソフトでデザインを考えました。八角の形で作ったら、短い板はそんなに問題にならないんですね。だけど本当にできるかなぁ?
This was my table design, as modelled in 3D software. It's an octagonal shape, which should have plenty of space for 8 people with an electric grill plate in the middle, for occasions when we choose not to use the big BBQ instead.

▲ 8人用のテーブルが結構大きいですので、半分に分けたら4人用のテーブル2台もいいかもしれない?
Of course a table with seating for 8 people takes up a lot of space, so I also designd it to split into two halves, and so normally these could be placed against the edge of the deck as two tables, each with seating for 4 people.
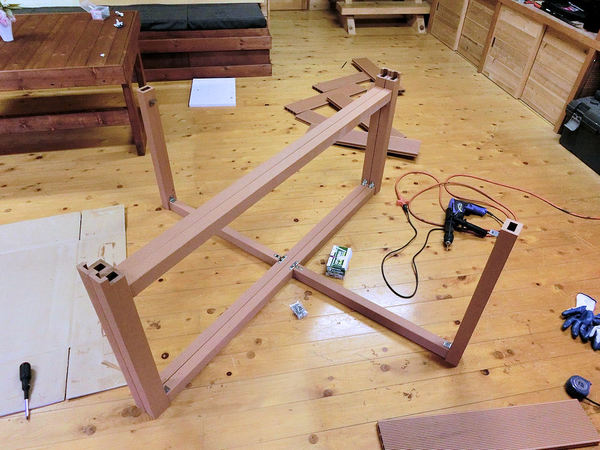
▲ まずは同じ人工木材のテーブルフレームで作りました。この形なら2つのテーブルにも分けることも可能です。
I bought some thin posts of the same artificial wood to make the table legs. You can see that it's constructed in two mirrored halves.
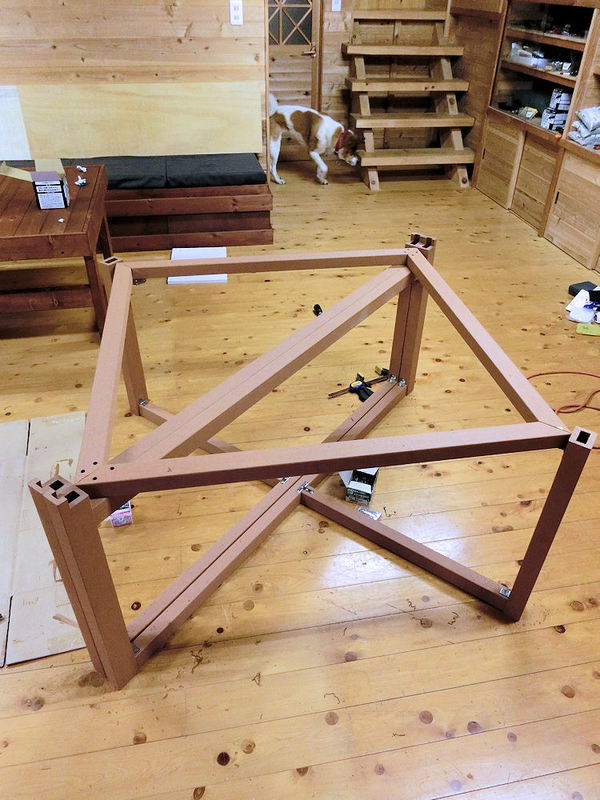
▲ テーブル台の大引きも同じ風に作りました。
I used a couple more beams as the supports for the tabletop.
▲ これは一番下のテーブル台です。2つのテーブルを一緒に使えば、真ん中に電気コンロも入れたいので、これはその電気コンロの台となります。
This was the first of 3 tabletop layers. This layer is the bottom layer, and is just designed to support the electric grill in the middle of the table, when both halves of the table are placed together.
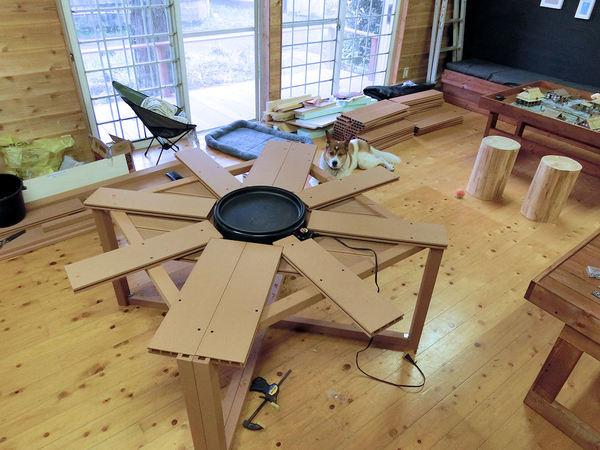
▲ 次は電気コンロの周りに台をサポートする板を載せました。
The second layer surrounds the central grill space, and provides support for the many separate pieces of the tabletop.
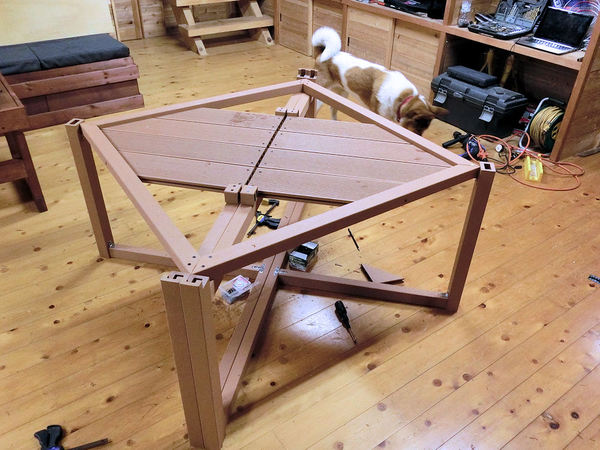
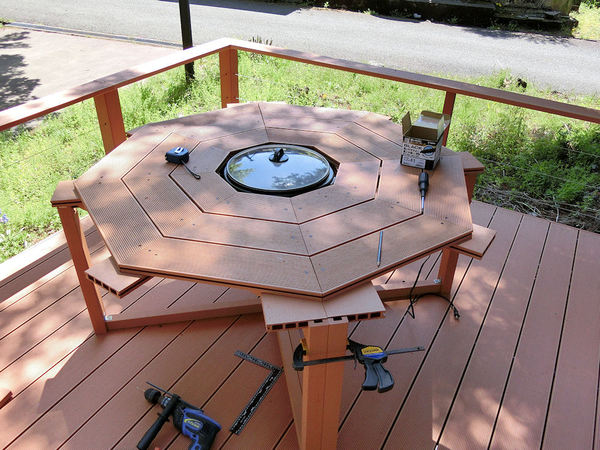
▲ このステージで外に運んで、作業がデッキで続きました。一番上のテーブル台を始めました。
At this stage the tables were getting quite large, so I moved construction to the deck outside, before they became too large to fit through the balcony doors!
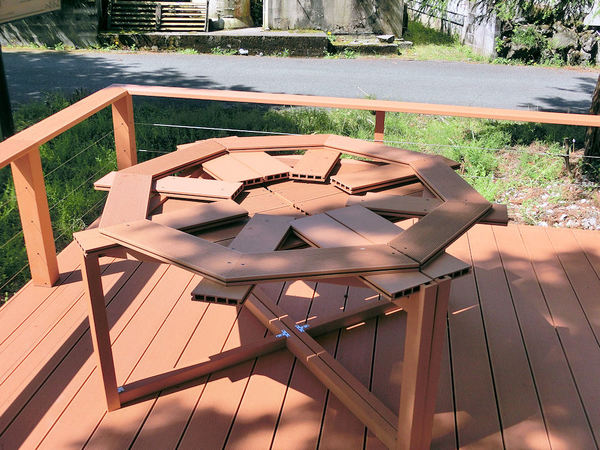
The tabletop is constructed from 4 concentric rings, each of 8 separate pieces. I started with the third ring.
▲ その中にまた板をはりました。
Then I moved to the second ring, inside the completed 3rd ring.
▲ 一番小さい板で電気コンロを囲まりました。
After that I cut the pieces for the innermost ring, and checked the electric grill still fits!
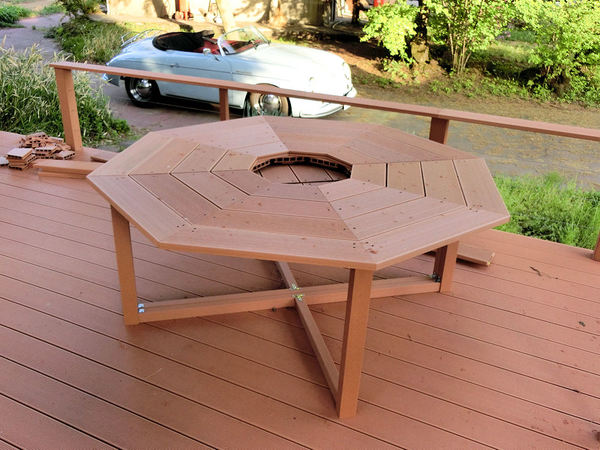
▲ やっとその周りに最後のテーブル板を載せました。
Then finally I was able to finish the outermost ring of the tabletop. It's a pretty big table!
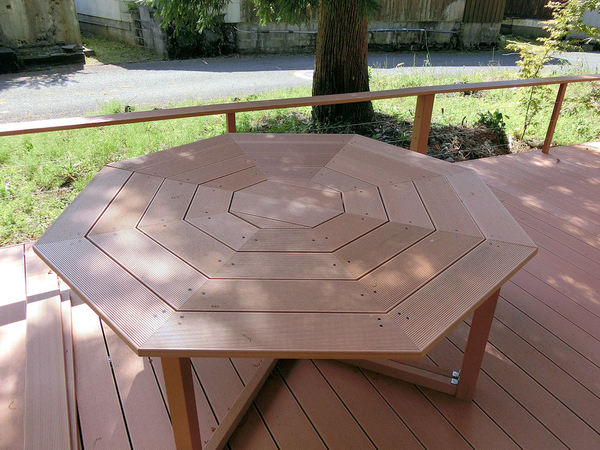
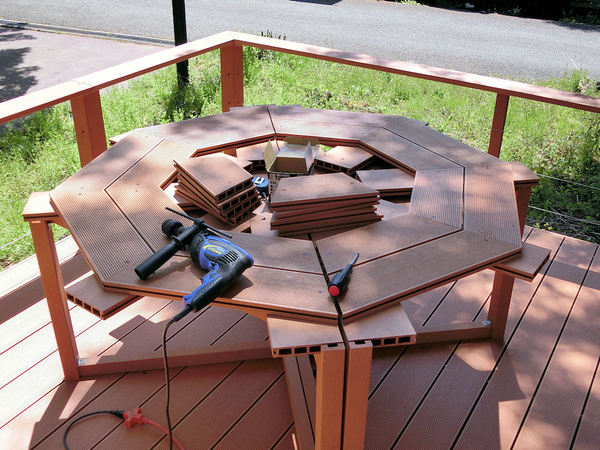
▲ 最後に、真ん中にカバーを載せました。電気コンロが家の中に置きますので、使いたいときだけカバーを外します。
続きには椅子を作ります。。。
The last step was to make a cover for the central circle, in two halves, so that it looks like a regular tabletop when not being used for cooking.
The next blog will be about making 4 bench seats to surround the table! Phew....
1階のホールにはまだ家具があまりない。ベンチ形のソファ2台作りましたが、今回テーブルを作成します!
相変わらず安いパインの2x4で作ります。大体2時間かかりました。
The big hall room downstairs is still lacking some furniture, so it's time to make some cheap and easy tables to go with the bench sofas. As usual I've gone with the simplest and cheapest option of using pine wood 2x4s to knock these together, in a couple of hours each.
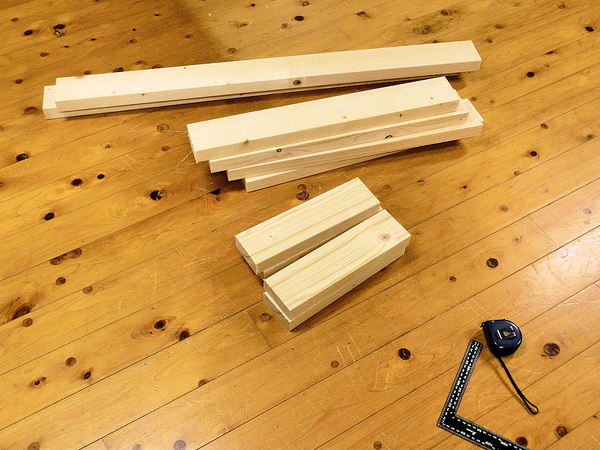
▲ テーブルの脚とトップを別々に作成します。理由はちゃんとありますが、後で説明しますね。まずは2x4の4本を写真のようにカットしました。
The leg section and the tabletop section will be constructed separately, so here's what I cut from four 2x4s to make the leg section for one table.
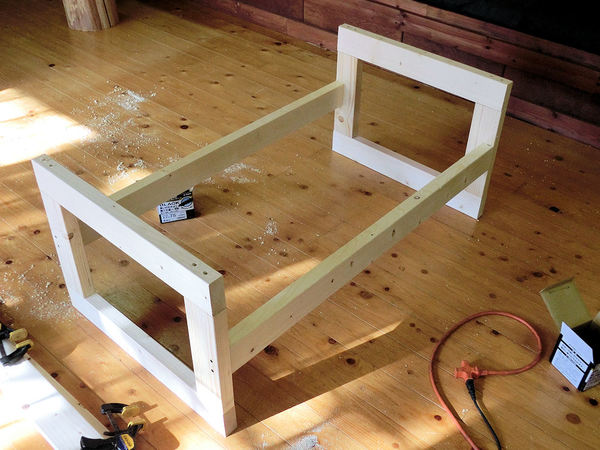
▲ 長い75mmネジで組み立てました。この形はそんなに強くないんですが、多目的テーブルとなります。写真のようで使えばローテーブルになります。しかし、90度回転すると机ぐらいの高さになります。
It was a pretty simple process to screw these 2x4s together into a simple box shape. You'll notice that the rectangle frame at each end is not quite square in shape. That's deliberate, so that you can use the table as a low table when you want to .... or you can rotate the leg section 90 degrees to make a higher table.

▲ トップは18mmのブロックボードです。120cmx90cmにカットして、周りに1x4で囲まりました。この部分も多目的でもなりますですね - 写真のようにも使えますし。。。
I used a 120cm x 90cm cut of blockboard (two sheets of thin veneer with light wood in between) as the tabletop, with some 1x4 planks carefully cut to size and screwed to the outside. Well, actually this is just the inside tabletop, and not the final tabletop, as you'll see from the next photo...
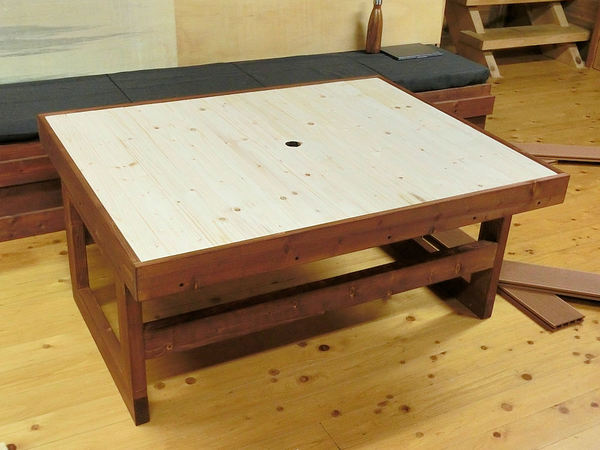
▲ 。。。もう一枚のトップ部分を入れたら、普通のテーブルとなります。これは1x4で作成しました。
I also made this second, higher tabletop surface from 1x4 planks, which can be slotted into the surrounding frame to make the table into a regular, normal table.
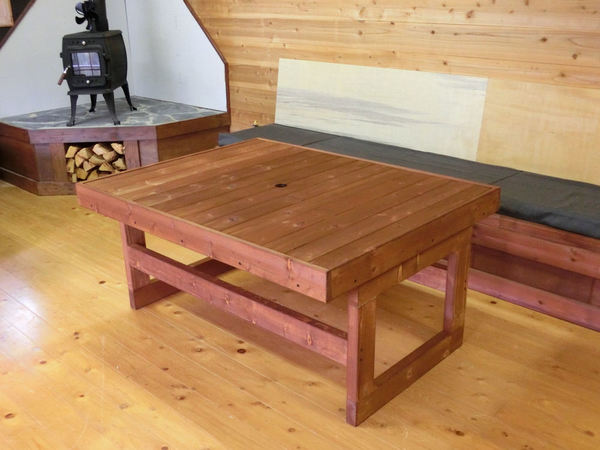
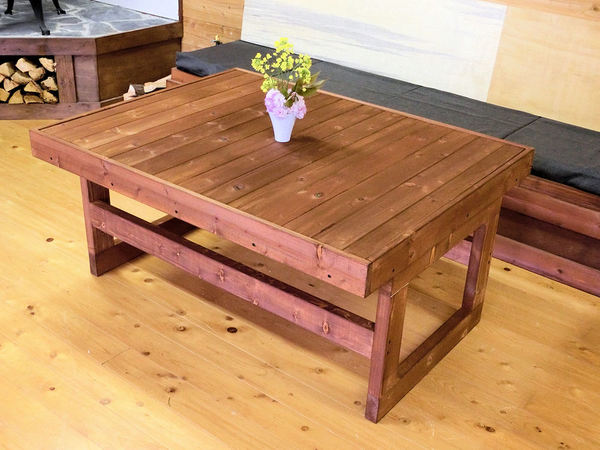
▲ 普通のローテーブルの形です。このトップを取るには指を入れるところが必要でしたので、真ん中に4cm穴をあけました。花瓶で隠すつもりです。
Here's the completed table in its low version, after it was woodstained with a slightly reddish walnut colour. The thing about having a removable top for the table is that you also need some way of lifting it out, so I cut a 4cm hole right in the middle, for me to put my fingers into to lift it out.
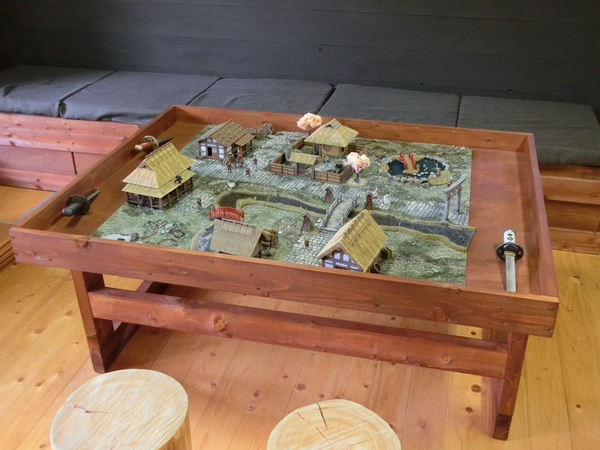
▲ ゲーム用のローテーブルの形です。ボードゲームなどをするときにダイスやフィギュアが床に落とさないように周りの壁が便利です。
This is the low version of the table, with the top removed. This is ideal for playing boardgames or miniature wargames (as pictured), as the surrounding frame keeps dice and figures from rolling onto the floor, and is a fairly safe place to put drinks and snacks too.

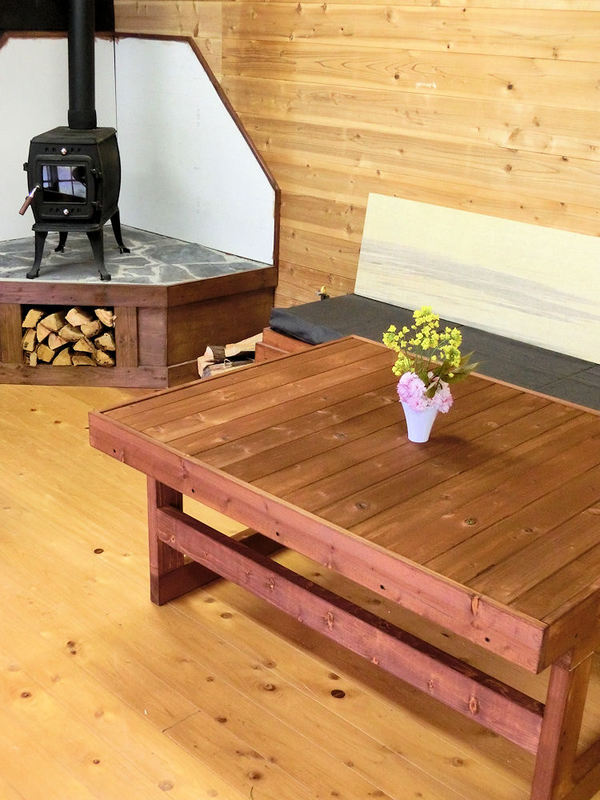
▲ 部屋の雰囲気がこんな感じになりました。こっち側の椅子が大きいヒノキの巻き。
The hall room's looking pretty good now, with two bench sofas against the walls, a woodburning stove in the corner, and two tables. These can also be placed together to make one larger table, of course. The seats on this side are just thick stumps of Japanese cypress, sanded smooth.
▲ 真ん中の指を入れる穴を隠すために、3Dプリンターでカスタムの花瓶を作りました。花瓶を入れるとカワイイテーブルになったでしょう?
Here's my idea for disguising the hole in the middle of each tabletop. I designed a quick vase shape to fit the hole (and another 6cm down inside), and 3D printed them from white plastic. They look pretty good with some simple wild flowers, I think.
▲ これで1階のホールがとりあえず使えるようになりましたので、今度からデッキ用のBBQテーブルを作成します!
With these tables done, the next job will be to make a large BBQ table for the outside deck! Watch this space...
デッキの作業が結構進んでいます。この前、デッキの大引きと床ができましたので、今度デッキのステップと柵を作ります。
Work on the deck is progressing nicely. In the previous blog the supports and the floor of this big deck had been completed, so the work this time is to finish off the edge of the deck, make some simple steps at the front, and build a fence around it. Let's get started...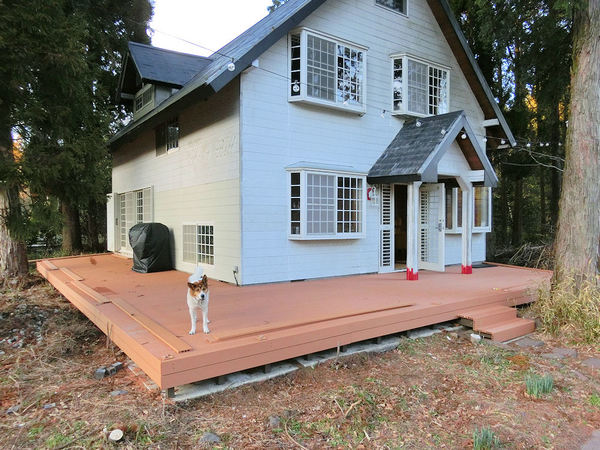
▲ デッキ下の大引きや柱を隠すために人工木材の薄い板を再度に張ります。下のほうが植物や花壇で隠すと思う。そして、6か月以上ステップはなかったですが、やっと作れるようになりました。あとちょっと。。。
To hide the under-deck supports from view, I used thinner planks of this artificial wood around the outside. The bottom few centimetres will eventually be hidden with maybe some flowerbeds or grass, I think? A couple of steps were added at the front, with leftover scraps of aluminium supports to hold it up!
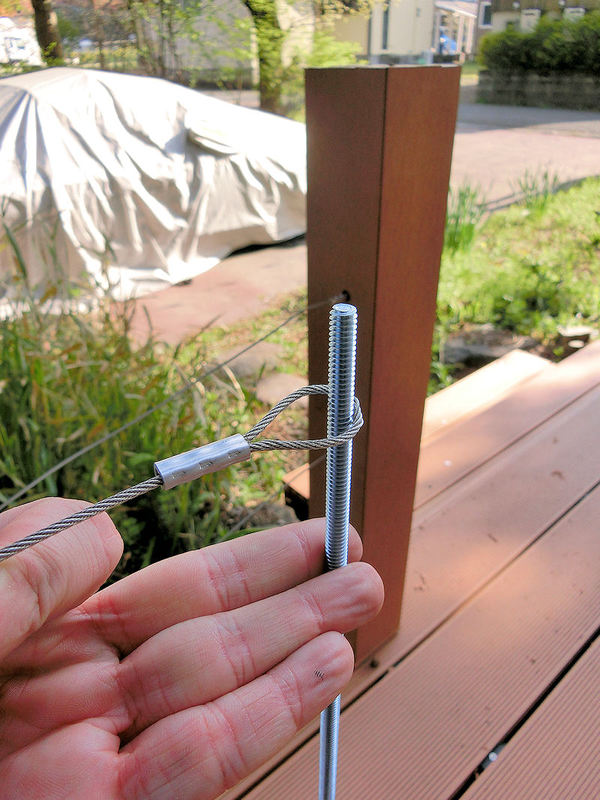
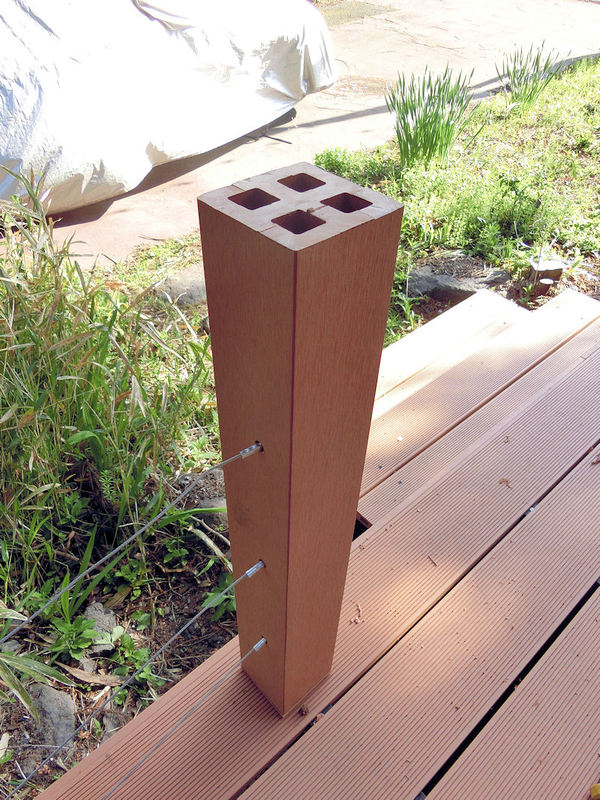
▲ 柵は人工木材とワイヤーで作ります。人工木材はもちろん何年間も使えますが、ちょっと高いですね。ということは柵の柱と手すりだけを人工木材で作ります。残りはモダン雰囲気のステンレス2mmワイヤーでつなぎます。ハンズマンDIY店から80mのワイヤーを買いました。
この人工木材の柱は中空ですので、その中に70cmのボルトを入れて、写真のようにワイヤーにつなぎます。簡単でしょう?!
Artificial wood lasts for years and years, since it doesn't rot like normal wood, but making an entire fence from it would be very expensive indeed. So to reduce costs I decided to only use artificial wood for the upright posts and the top handrail, and fill in the rest of the fence with wire. I had a cunning plan to style it to look a little more modern, and prevent it from looking too bad.
I bought 80 metres of 2mm-thick stainless steel wire from my local DIY store, and a set of aluminium crimps to make the ends. The centres of the upright posts are actually hollow, so I decided to slide in a long metal bolt (to the ends of the fences), and loop the wires around it inside the post.
▲ 柱をデッキの床に固定したときにこんな感じでした。
Once the upright post was slotted on to the base pads and the wires were loosely inserted, this is how it looked.
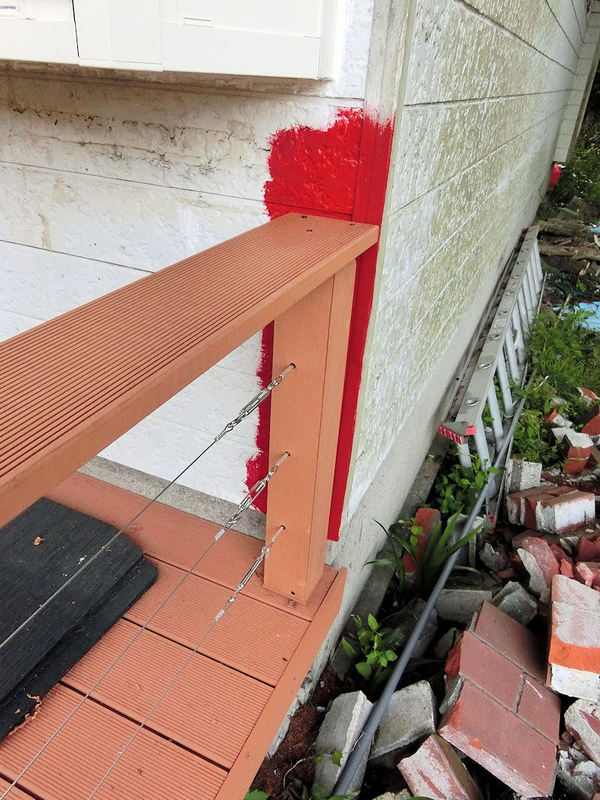
▲ 反対側の柵がこんな感じでした。そのステンレスのネジ/フックが5cmほどアジャストできるので、ワイヤーの張力が調整できます。
Once the top handrails were screwed into place, the fence had enough rigidity to tighten the wires using the adjustable screw hooks at one end. This pulled the wires tight, and finished the job!
▲ 手すりも床と同じ人工木材板を使いました。床との接続ポイントが少ないので、あまり強くないんですがワイヤーのフレームだけで十分ですかね?
最後にステップの端っこにも薄い板をはりました。
There aren't many connection points between the fence and the deck floor, so it doesn't have a massive amount of strength laterally - you can't lean against it safely or sit on it, for example. But it does have enough rigidity to pull the wires tight, so that's fine.
The last thing to do was to attach some edge planks to the front steps.
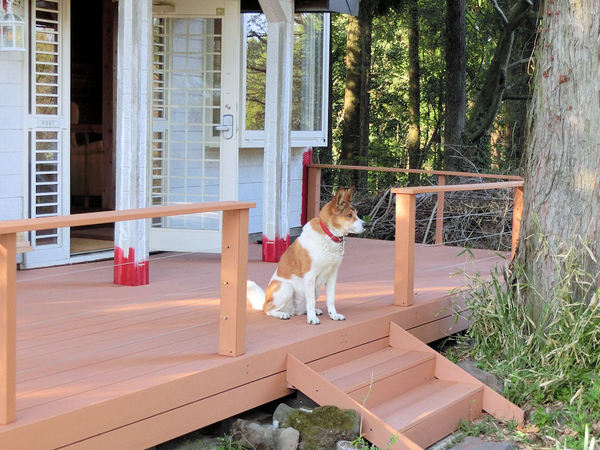
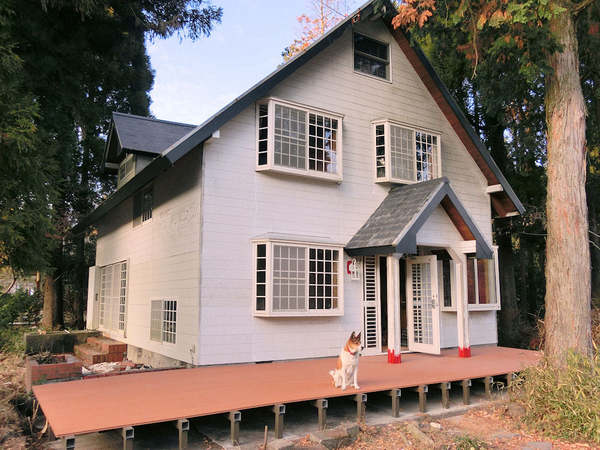
▲ 完成だ!やっと!ケイティちゃんも大喜びです!
And here it is - my finished deck!! At long last!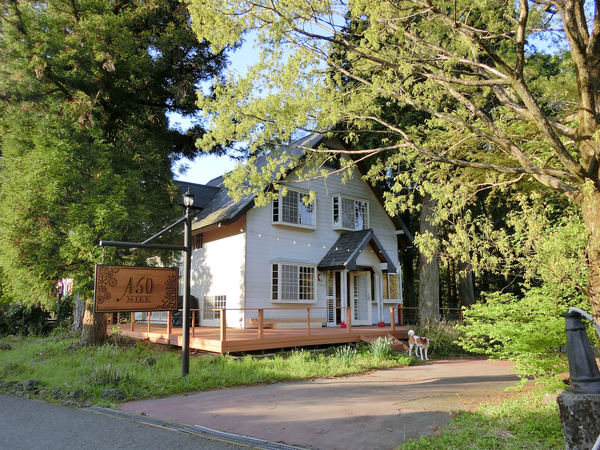
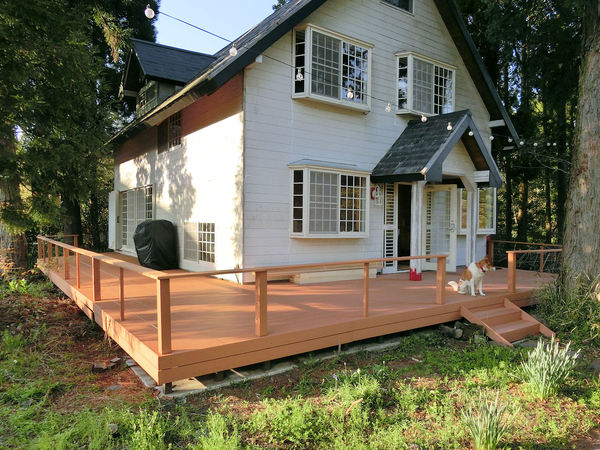
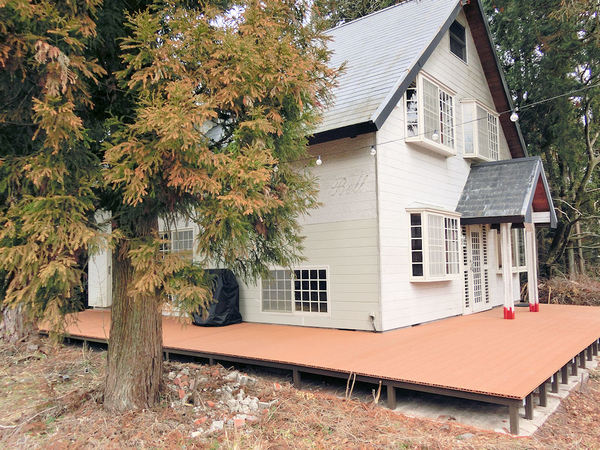
▲ 現在の感じです!
次はデッキ上の家具作成と家のペイントです。楽しみに。。。
So this is how the Aso house currently looks. The next work will be to make some tables and chairs for the deck, and then start painting the house! Woo!!
昔の染め教室の時代から看板柱まだ残っていますので、そこに新しい時代と新しい目的を示す看板を飾りたいです。
There's a lamppost out by the street, from the days when this used to be a dyeing workshop and painting studio. It also has a crossbar for hanging a large sign, so I want to hang a sign there to show the new purpose of the building!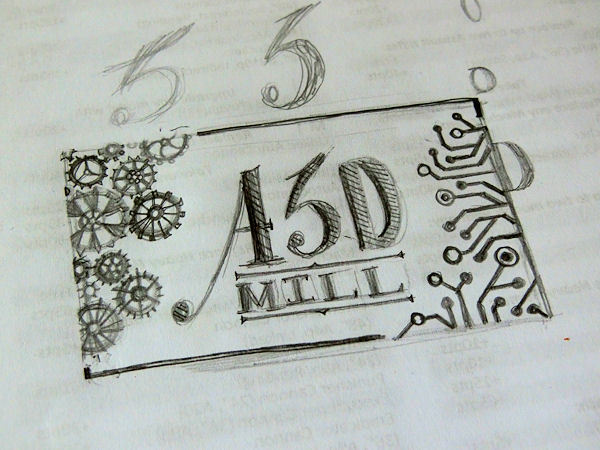
▲ まずはロゴのほうから始めます。まだ目的が決まっていないんですので、あとからそれをロゴに入れます。最初には名前だけを決めます。「Mill」は英語で「Windmill」(風車)や「Watermill」(水車)で使われていますが、最近3Dプリンター業者にも利用できます。ということは3Dプリント工房という意味になります。そして、ロゴの「ASO」の文字をよく見ると「A 3D」にもなりますので、「A 3D Mill」(3Dアトリエです)という意味も入っています。ロゴの周りに昔のローテクの歯車とハイテクの回路基板も混ざっています。最後に「阿蘇観る」という意味も見えますね。(あと、苗字のニックネームも入っていますが、だれも分からないよね!)
I need to start with a logo first, and this is the design I came up with. The text includes the word MILL, which is currently in use for places where 3D printers are working, in the word "print mill". Since that's one of my hobbies (and side businesses), I wanted to include that, and if you look closely at the word "ASO" you can also see the letters for "A 3D ... Mill", which describes the building neatly. Plus it includes my nickname from when I was at school, but of course nobody knows that! Finally, it's also a play on words in Japanese - "miru" means "see", so the sign also reads as "See Aso" in Japanese. Yes, cheesy pun, I know!
The cogs and circuitboard parts are to show the blending of low-tech and hi-tech elements in the building.
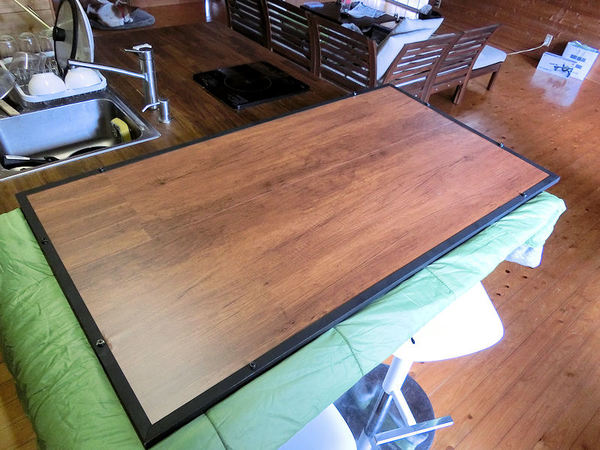
▲ DIY店からプラダン4枚重ねって木材柄のシートをなりました。強化するために周りにアルミのフレームを付けました。
I used 4 sheets of lightweight "plastic cardboard" stuck together, and covered by wood-effect cutting sheet. I added an aluminium frame to give it strength and neaten it up.
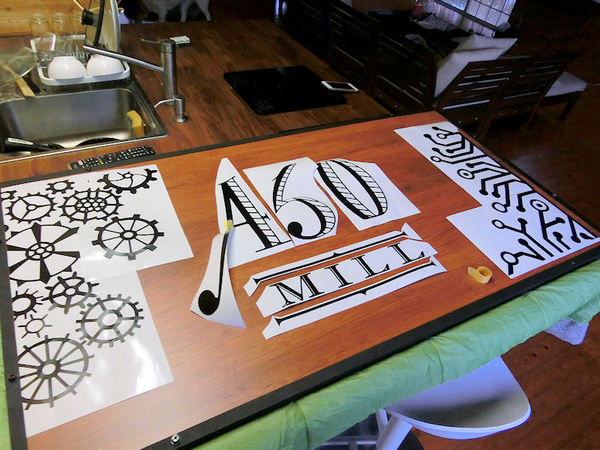
▲ 職業も看板作成の時もありますので、カッティングマシンはすでに持っております。ロゴのデザインをその機会でカットして、両面に張りました。
I occasionally make signboards as part of my job anyway, so I happen to have a small cutting machine. It did a pretty good job of cutting out all the parts of the logo onto black cutting sheet.
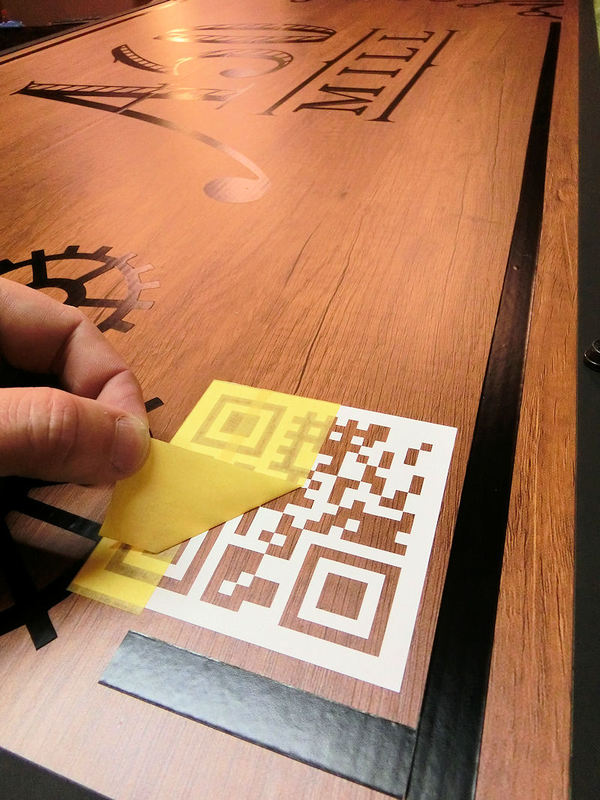
▲ 最後にこのブログのURLを指すQRコードも張りました。
To finish it off, I added a QR code to point curious passers-by to this blog (and eventually a website for whatever business I chose to run here).

▲ 看板柱に付けるとこんな感じです!これで満足です!
じゃ、デッキ作成に戻ります。。。
Looks pretty good hanging outside the house, with a new light above it and some waterproof string lights!
Right, I'd better get back and finish the deck properly...
春が来た!ずっと楽しみにしていたデッキ作りが始めます!
…ですがその前、家のサイディングを直さないといけないんです!
Spring is finally here! I've been looking forward to the first project of the year - a wooden deck!
... but before I get to that, I have to take care of a few fixes to the outside of the house.

▲ デッキ作業の前の様子。草や要らない植物いっぱいありますが、ほとんど抜くつもりです。そして、この写真でははっきり見えないんですが、正面の前に古いデッキちょっと残っています。ただし、結構危ないんですね。あっちこっち壊れています。
This is how the house looked just before I started work on the exterior fixes and the deck. As you can see, there's a lot of overgrown weeds and bushes all over the place, and I plan to take out most of those eventually. It's a little hard to see the old deck at the front of the house from this photo, with all the weeds in the way, but it really needs to be removed! Most of the wood is rotting away, and I've put my foot through it in several places.
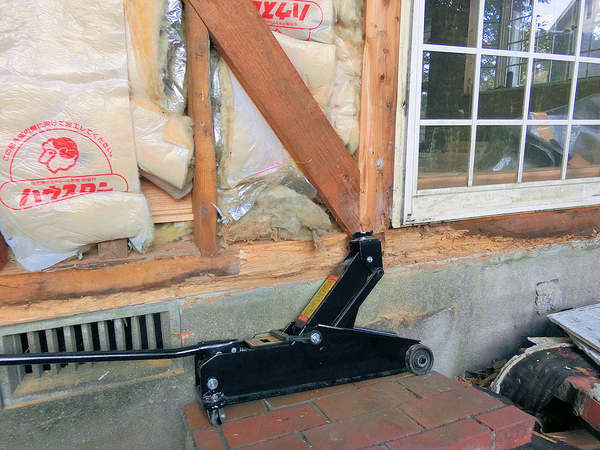
▲ まずは、地震のダメージで割れたサイディングを外しました。4年間も水が入っていた大引きを修理しましたが、3センチほどずれた柱を元の位置に戻すには力が足りませんでした。そこで、3トンのカージャッキでちょっと上げて、ハンマー叩きで横に3センチ戻せました。成功!
近くの工務店から新しいサイディングを注文しました。8枚ほど入れ替えできました。デザインは若干違いますが、家をペイントしたら気がつかないと思います。
The first repair to the exterior of the house was the removal of broken siding panels. The worst patch is at the side facing the street, where a couple of the upright posts inside the walls actually shifted slightly during the big 2016 earthquake, and pulled the siding off. As a result, water was able to get at the wood for 4 years during heavy rain, so I had to make that damage good.
Getting the posts back into the correct place was quite problematic, but I managed to solve it by carefully raising the upright post slightly using a 3-ton hydraulic car jack, and bashing it back in place with a sledgehammer. I replaced about 8 panels with siding ordered from a local store, and hopefully it should be pretty invisible once the house is painted.
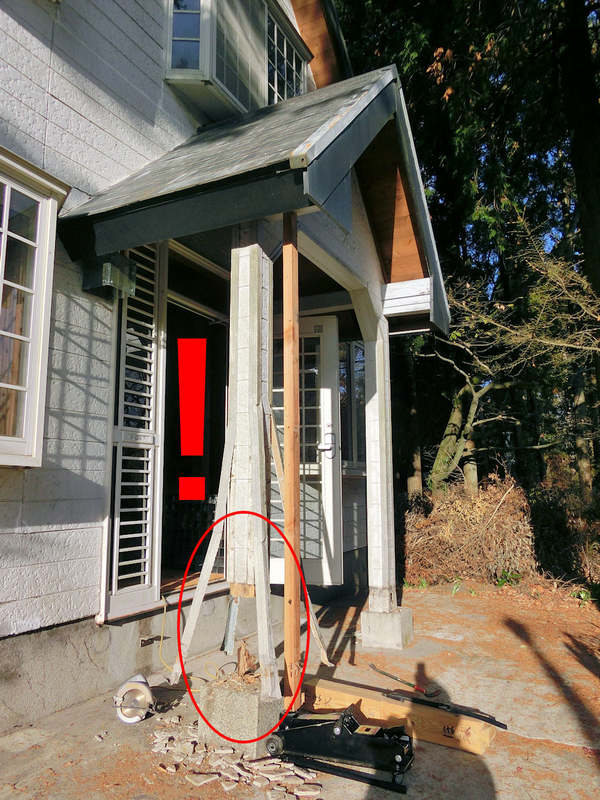
▲ じゃ、次は古いデッキを壊しました。古い木材がとても弱かったので、たった1時間で終わりました。
外したら、ポーチ屋根の柱にまた地震のダメージがありました。地震の時にサイディングが割れたなのに、水が入ってきました。両方の柱の下の50センチほどの入れ替えが必要でした。また3トンのカージャッキでちょっと上げて、修理できました!
The second repair job was on the thick wooden posts supporting the front porch roof. Again, the earthquake had cracked the siding panels and let rain get at the posts, and as a result the bottom 50cm of each post needed to be cut out and replaced. As before, the car jack saved the day, by letting me raise the roof a few centimetres to remove the bad wood and make it good.
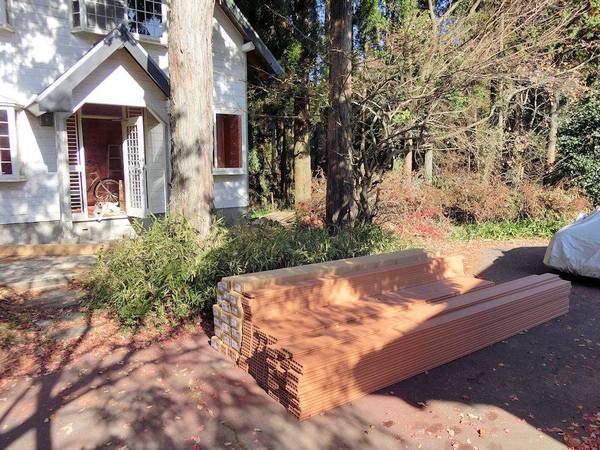
▲ ペンション村の方が「阿蘇の湿度で木材のデッキは大体5年間まで」と言われましたので、今回何年間も使える人工木材でデッキを作ります。20年以上使えたら嬉しい。
ネットでいろいろ調べましたが、やはりハンズマンDIY店から注文しました。作りたいデッキは大型のL形になりますので、3メートル幅で約11mx15mデッキが必要です。せっかくですので、柵を含めて予算は60万円となります。家が安かったから(350万円)、今回だけお大きい買い物します!
商品を集まるのがちょっと時間かかたそうですが、配送料は何と3800円です。大体1.5トンの人工木材がありましたので大型トラックと2人のスタッフで来ました!
Aso has a very humid climate, and according to a neighbour, wooden decks only tend to last about 5 years! Yikes! So I looked into using artificial wood for the decking, so it would last for the next 20 years instead. This is wood-dust, glued into resin and shaped into planks. It shouldn't rot, I hope.
After some internet research, I decided to order all my wood and aluminium support beams from my almost-local DIY store, Handsman. The deck I want to build is about 3m wide, around two sides of the house, in a large L-shape. It's approximately 11 metres at the front, and 15 metres at the side - which is pretty big! So, including the fence I want to include, my budget will be $6,000. The house was very cheap ($35,000) to buy, so I'm happy to spend this large amount this one time, since it will transform the whole house, I think.
The DIY store delivered all the artificial wood and metal beams on one large truck with two staff to shift it - in total it probably weighed about 1.5 tonnes! The delivery fee was $38, which was pretty reasonable, I thought.
▲ アルミの大引きが45センチほど開けて、前からあったコンクリート土台に固定しました。L型ブラケットやビスがすべてアルミ商品に入っていましたので、助かりました。
その上に4メートルの人工木材を載せて、大引きに固定します。
The deck is supported by aluminium beams spaced about 45cm apart, and these are attached to the concrete base using the L-brackets which were helpfully included with each beam.
On top of that, I carefully lined up each of the 4m wooden planks (each weighing about 10kg), and screwed them down.
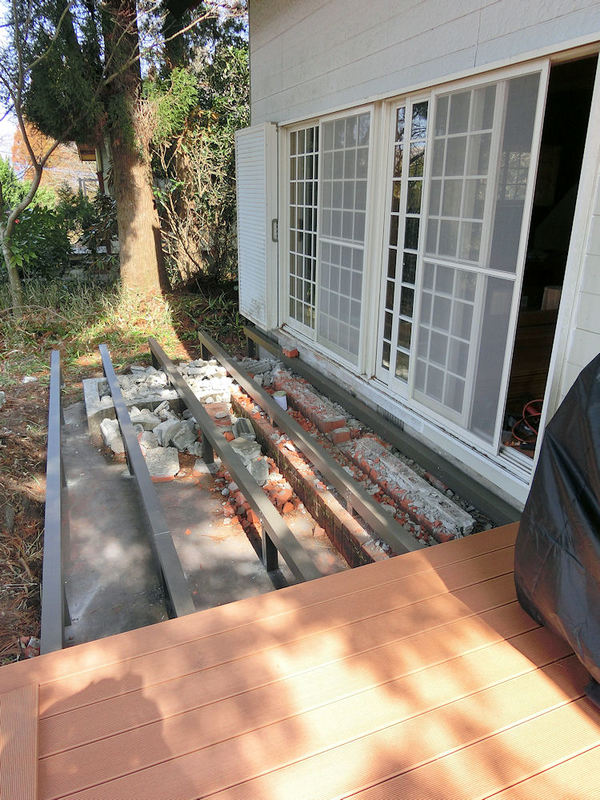
▲ 今までの作業がスムーズに進めましたが、家の横に古いレンガのステップやコンクリートがまだ残っていました。全部取ったらすごく時間かかりそうだったので、上の部分だけを壊してデッキで隠せるようにしました。ちょっと恥ずかしいけど、時間の節約ですね。
So far the deck-building had gone fairly smoothly, if a little slowly. But at the side of the house there was a large amount of solid brick steps concreted into the floor. I was not keen on removing every last piece of this, so I removed the bare minimum using a sledgehammer, just enough to fix the support beams over the top. I'm a little ashamed to admit I was too lazy to remove and carry away several tonnes of brick, and instead just built the deck over the top. Once the edging of the deck is in place, everything will be hidden from view.
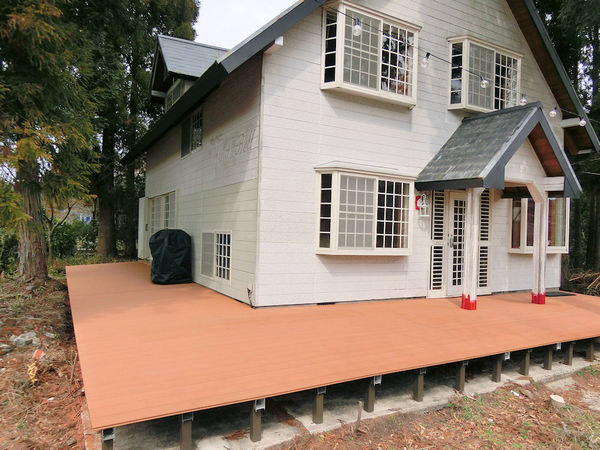
▲ デッキのL型一応できました!端っこがこれから付けますが、とりあえず使えるようになったので、嬉しいです!
At this point the floor of the L-shaped deck was done. Even though the edging has not been finished, at least I can now use the deck! Yay!
▲ 正面にステップも作らないといけないですね!まだまだです。。。
I also need to build some steps at the front. Still lots to do before it's finished....
〒869-2226 熊本県阿蘇市乙姫2070-48
Aso City, Otohime 2070-48
Open from 13:00~17:00*
Fridays & Saturdays
(* if the door's closed, we might have popped out to walk the dog... back soon!)


")
阿蘇山の3D地図テーブルを作ってみた! I made a 3D MAP table!
3D阿蘇カルデラはいかがですか? 3D Maps added to the shop
Painted models available 塗装済の模型発売中!
Making garage doors ガレージの扉DIY作成
New side-project... a hobbit house! ホビットの家
Shops added to the shop ショップにお店
Repainting a (mini) car ミニカーのリペイント
Buying land in Otohime 乙姫で土地探し
Scale model of the Inaba Residence 稲葉家下屋敷の模型
Customer request - Pokemon Ball! ポケモンボール
Garage construction ガレージ工事 PART 6
Secret Aso-volcano pool 阿蘇山の隠れプール
Garage construction ガレージ工事 PART 5
Garage construction ガレージ工事 PART 4
Garage construction ガレージ工事 PART 3
Garage construction ガレージ工事 PART 2
Garage construction ガレージ工事 PART 1
Making a capiz shell wall light カピス貝殻壁掛けライト
Making a rustic antique-style wall light アンティークなライト作成
Making a capiz shell chandelier カピス貝殻シャンデリア
Online store opening sale グランドオープンの割引
Opening a webstore 通信販売サイトを開店します!
A lucky escape with the typhoon! 台風がヤバいけどラッキー!
E-bike conversion DIYで電動自転車を作った!
$200 Underfloor heating 2万円でDIY床暖房
3D-printed OPEN/ CLOSED sign アトリエ看板作成


 Shrine
 Temple
 Teahouse
 Castle
 Shops
Shops Houses
 Farm
Farm Other Buildings
 Walls & Fences
 Bridges
 Ponds
Ponds LED Lights
0 Comments :
Write a comment :