


3D-Print Studio
35年前の建築仕方がおかしい。冬寒い阿蘇なのに、なぜか断熱材や暖房は上手に使っていないでしょう?この家にはエアコンも暖房もないです。周りが林いっぱいありますので夏にはそんなに問題にないんですが、冬には確かに寒い。夜中には毎日-3°~-5°ぐらいまで下がります。
過去にもエアコンの取り付けが何回もしましたので、この家には中古エアコンをインターネットで購入して、自分で付けます。
Japanese house-building techniques from the 1980s were pretty crap, when it comes to heating and insulation. Although this house does have some insulation (rock wool in the walls), I'm planning to add to it where possible. Despite Aso being a cold area in winter (temperatures regularly reach -5C every night), not even a single window is double glazed! Yikes!
I've done many air-conditioner fittings and removals over the years, and it's nothing to be afraid of. It can save you quite a bit of money doing it yourself, and I plan to save more by buying a used aircon unit on the internet.
▲ 窓の上に取り付けますが、その前にコンセントの移動も必要です。窓の横に前の換気扇の穴がまだありますので、同時に作業行います。
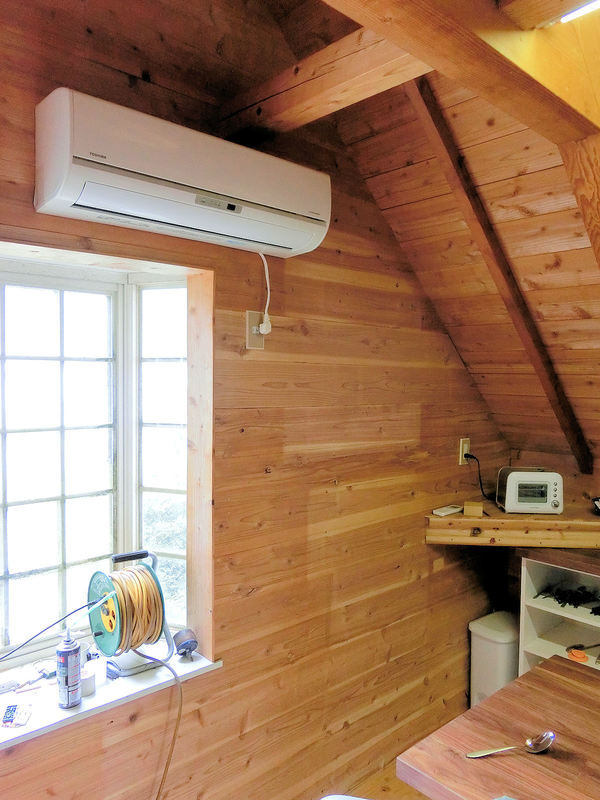
There are no existing aircon holes in this house, so I'll be placing this airconditioner above the kitchen window, where it can also blow air into the living room. This also means I'll need to move the power socket a couple of meters, so I'll also take the opportunity to cover over the green foam in the hole left by the previous extractor fan.
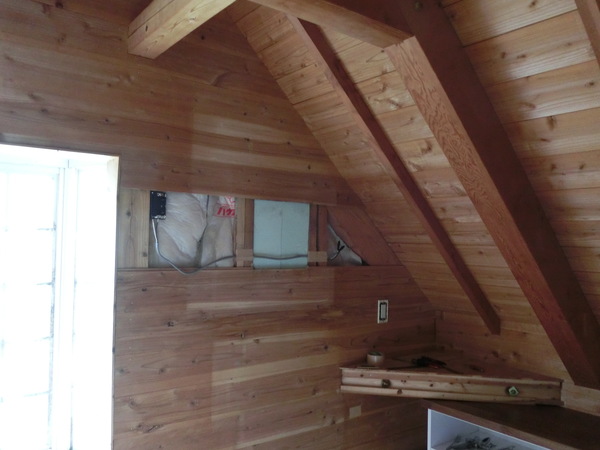
▲ まずは壁の板を外します。そして、前のところから電気配線を窓まで延長します。作業が簡単ですが、もちろんブレーカーをOFFのままでしますね。
First of all I levered off a couple of planks from the wall (these walls do make renovations easier!), and extended the power cable to the new location. It goes without saying, you should do this with the power to the building turned off at the breaker box. While I was doing this, I could also check the location of the upright joists inside the wall, to help me decide where to put the hole for the aircon.
▲ 板を外している間に壁内の位置をチェックします。壁板を付けたらエアコンの取り付け鉄板を図って、穴をドリルで開けます。最後に新品のエアコンパイプを通す。
Airconditioners require two copper pipes for shunting heat/cool back and forth to the fan unit outside, and one more plastic pipe for water drainage (from condensation). Oh, and a 3-core electrical power cable from the local DIY store. The hole required is usually 60mm in diameter, and it's easy enough to drill this out and then slide in a plastic collar and run the pipes through.
▲ 室内機とパイプをつなぎます。大きいシフターレンチ2個があれば十分ですが、室内機を持てる方があれば助かります。Euan、ありがとうね!室外機もシフターレンチとドライバーだけでつなぐことができます。
完成!
この中古エアコンがYahooオークションの店(個人じゃない)から買いました。暖房の時は5kWですので、100Vのシステムには一番強い方です。送料込みで約5万円ほどでしたが、その上に新品のパイプ、外用カバーやテープなども1万円ぐらいで買った。結構節約できたと思う!
Next you'll need to strip the ends of the cable and push those in to the wiring holes, then connect up the pipes. To do that, 2 large shifter-wrenches work fine, although it also helps to have a second person (thanks, Euan!) to hold up the wall unit until you can hang it on the backing plate.
Outside, connect up the cable and 2 metal pipes to the fan unit, and wrap your pipes to protect from the wind and rain. I also added some plastic tube covers to fix it firmly to the wall for extra protection. All done! Honestly, you don't need to be intimidated by doing this yourself - the "professionals" will insist it's a job for specialists, but it's really pretty easy if you have an afternoon to spare.
I bought this used aircon (maybe 4~5 years old) from a store on Yahoo Auctions in Japan, and had it shipped here for about $500 all in - which is a BIG saving on buying new. The equivalent unit new would probably cost $1500 and up. In addition to that I had to spend another $100 on new pipes, tape, and the plastic covers. It manages 5kW when heating, which is about the highest available for a 100V aircon unit. Beyond that, you'll need a 200V system for more powerful units.
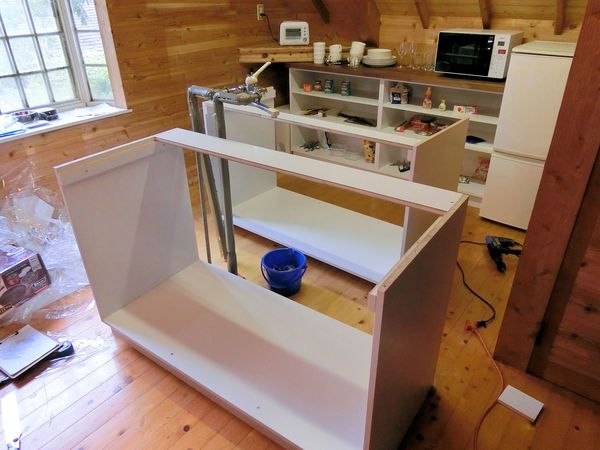
キッチンキャビネットのカウンターがとても綺麗だったけど、そのままだと料理作れないよね。ということはシンク取り付けが次の作業になりました!
Next job in the kitchen was to add some plumbing to the central cabinet.
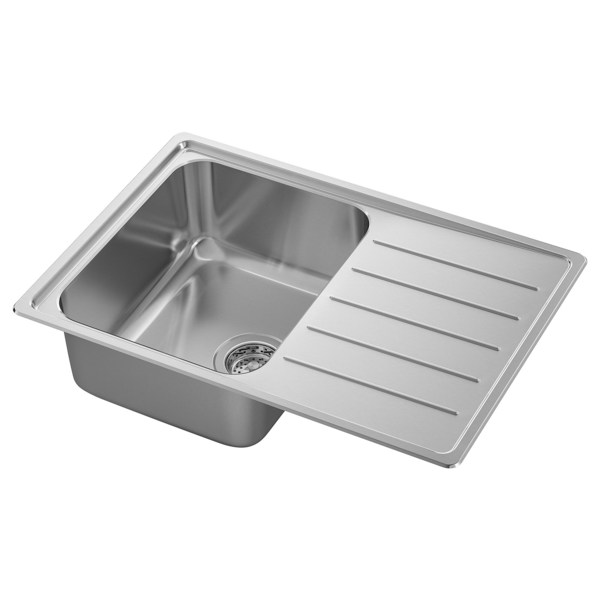
▲ ディッシュウォッシャーを使う予定はないので、洗った皿を乾かすところが要ります。ただし、カウンターが木材ですので、シンク自体に乾かすスペース要ります。ネットでいろいろ調べましたが、やっぱりイケアの「VATTUDALEN」シンク(10,900円)を注文しました。ボウルがちょっと小さいですが一人暮らしには別に問題ないです。
I'm not planning to use a dishwasher, so I'll need somewhere to dry dishes. However I can't place dishes directly on to the countertop to drain into a sink (because it's wood), so I need a sink with a built-in draining board. I found this small but functional stainless steel sink at Ikea, for only $110. It's not the biggest sink around, but at least that will encourage me to wash dishes straight away!
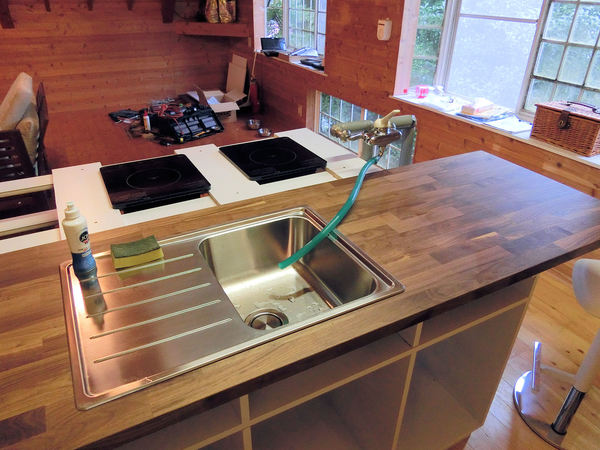
▲ シンクを埋め込むために、カウンターに穴を切りました。一個だけの引き出しが使えなくなりますが、そこにタオルをかけようかなぁ。イケアのシンクには必要な下水パイプなどが入っていますので、接続作業は結構楽だった。仮パイプは写真のようだった。
ただし、水管の移動が大変だった。1階のお風呂部屋の天井から水管の配置変更ができましたが、鉄のパイプが不便ですね。また今度同じような作業があれば、絶対にプラスチックの曲がるパイプを使います。一般的な道具だけで移動と接続の作業ができますが、大きいシフターレンチ2個があれば楽になります。
So with my sink chosen, I cut the hole into my countertop where it would take the space of one drawer unit. Ikea sinks come with all the plastic out-pipes you'll need, so connecting those was easy-peasy. With that, I could at least get water in my new kitchen, via my amazing hosepipe-to-old-pipes setup! haha
Obviously the next step was to remove those old water pipes and move the new pipes a little inside the cabinet. Easier said than done! Happily, I was able to gain access to the pipes via the room below, which is the bathroom - and I was planning on replacing the walls and ceiling there anyway! It was my first time making plumbing connections, so I was a little nervous and just extended the old pipes with the same type of slightly longer metal pipes. It was a real pain in the butt doing that in a confined wallspace downstairs, so next time I will definitely use flexible insulated plastic pipes instead. Lesson learnt!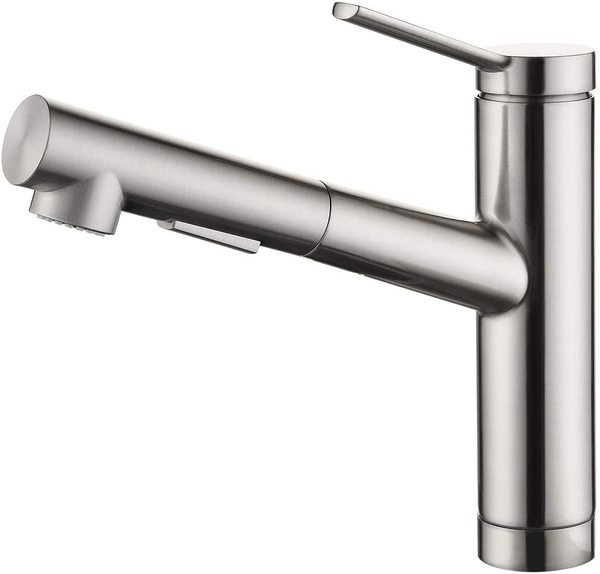
▲ 次の作業が水栓金具ですね。日本製のTOTOやINAXの水栓を使えば、必ず20,000円以上かかります。そして、日本風のボタンいっぱいと文字入りの水栓はあまり好きじゃないからネットで調べました。結局アマゾンからCREAの水栓を見つけました。中国製だとも思うんですが、水栓金具は長く使う商品だから別に問題ない。写真は2020年式のバージョンだ思うけど、買った商品がもうちょっとシンプルなバージョンでした。たった5990円でした。必要なパイプなどが付いています。
With the water pipes moved to their new location, I needed to add a hot-cold mixer tap. If you're planning on doing this yourself, I recommend saving some money by skipping Japanese brands. If you buy from Toto or Inax, it'll cost over $200 easily, but you can get the same product for much cheaper from a non-Japanese brand. I found this Crea mixer tap on Amazon Japan for only $60. I think it's Chinese made, but I'm not overly concerned about it breaking anytime soon! (my previous kitchen's Japanese-made tap, as an example, broke after 11 years!)
Bonus for me is avoiding all the extra buttons and ugly unnecessary labels that Japanese makers insist on putting on their products. Yay!
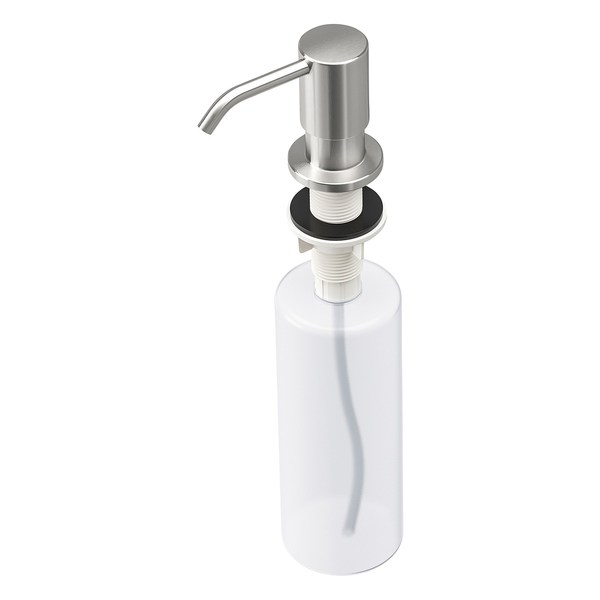
▲ 水栓金具の横に食器用洗剤も入れたかったです。水栓金具と同じステンレスシール仕上げの洗剤ディスペンサーを見つけました。またイケアの商品ですね!埋め込む用の「KNIPEN」(1,999円)です。
The other thing I wanted to include was this push-top soap dispenser. I found this KNIPEN one from Ikea for only $20, in the same brushed stainless steel finish as the tap it would sit next to.
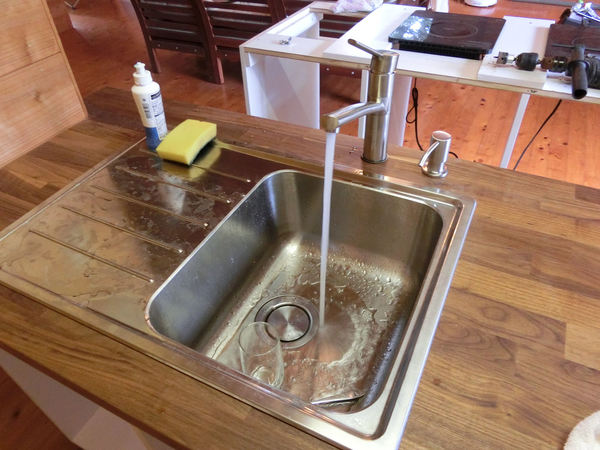
▲ カウンターに穴2つ開けたら、水栓金具と洗剤ディスペンサーがこんな感じになりました。安い価格で大満足ですね!
Fitting the tap and soap dispenser was simple enough - drill 2 holes and screw them in. Now I have running water in my kitchen - what a luxury!
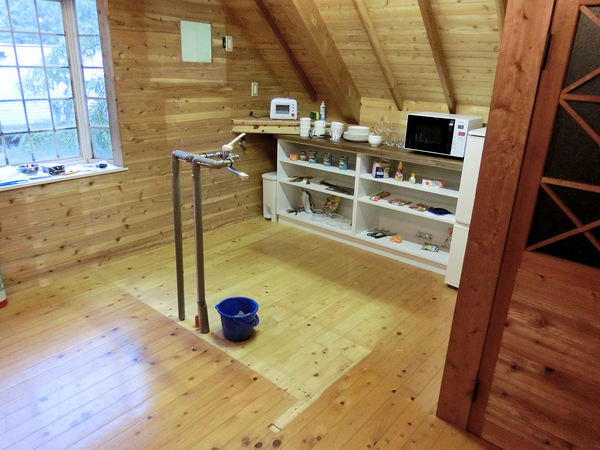
古いキッチンは嫌い。狭くて、暗くて何も使えないところですね。買ったときにこんな感じでした。。。
I hate old kitchens in Japan. If you have an image of sleek minimalist workplaces in your head, don't kid yourself. Almost without exception, they are small, dark, and totally impractical for food prep - never mind chatting with friends or family. This was how the "kitchen" actually looked when I bought the house....
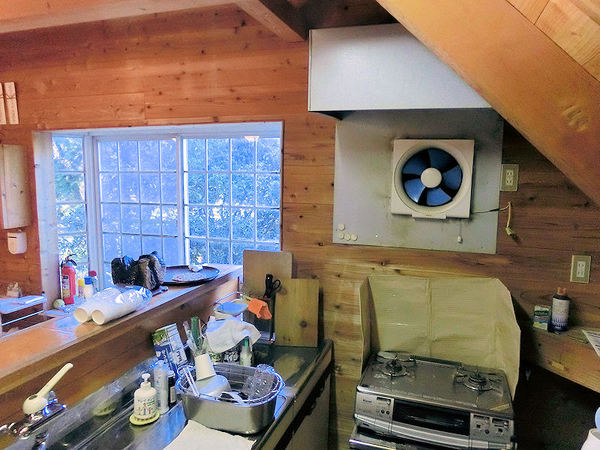
▲ イヤよね?シンクの横にたった50センチのカウンタースペースしかないので、料理作れないキッチンだった。
そっち側が新しいキッチンの入り口になりますので、まずはガスコンロと換気扇を外さないといけないね。大変だったけど、バールを使えばやっとできました。あとは換気扇の穴に断熱材フォームを入れました。とりあえずそれで行きます。
Yes, that's it! The food-prep space is that tiny 50cm counter space in the corner, between the fire-hazard gas burner and the waterproofed-with-tape sink. The cabinets are made of metal, with metal doors, and plenty of grime and rust. Yuck!
Since I plan to move the entrance to the kitchen to that side of the room, those cabinets and the extractor fan will have to be removed. It took a while to lever off the fan unit with a crowbar, but then I was able to block up the large hole with insulation foam. Good enough for now!
▲ つぎは古いカウンターとシンクキャビネットも外さないといけない。これは結構時間かかりましたね!
Next job was to pull out the sink cabinet and this breakfast bar counter. It took a while, but eventually I managed it and threw the whole thing out of the second floor window (I was too tired to carry it downstairs!).

▲ 水管はできるだけそのまま使いたいので、カウンターを取ればこんな感じになった!古いキャビネットは全部息子と一緒にレンタルトラックに載せて阿蘇市の「未来館」リサイクルセンターで捨てました。
So with the old junk removed, this is what I had to work with! Time to get planning....

▲ じゃ、キッチンリフォームを始めましょうか!
最初に無料ソフト「SKETCHUP」で3Dモデルを作ってみました。この前、作ったキャビネットと同じようにイケアのカウンターを使って作成したいので、それに合わせて描きました。今回も同じイケアの186cmx65cmカウンター(KARLBY: 22,900円)を2枚を買いました。各カウンターの下にキャビネット3台とバースペースを作ります。
I fired up the computer and used the free "Sketchup" 3D modelling software to draw up this basic plan of what I wanted to make. I'm planning to use 2 more Ikea walnut counters, so the cabinets were designed to fit those back to back.
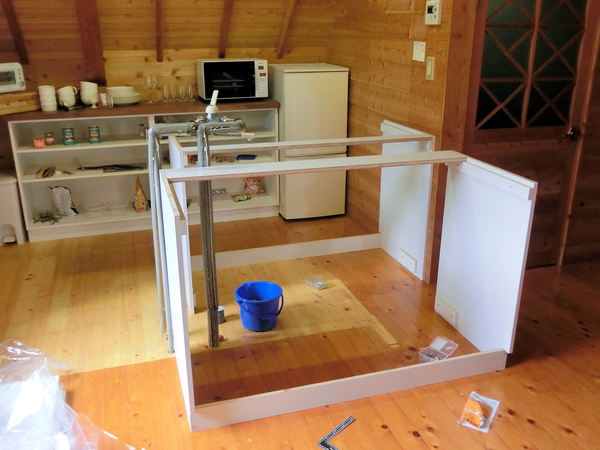
▲ 各キャビネットのドアには幅45センチの化粧板を使いたいので、それに合わせて考えました。147センチほどのキャビネットを作成しました。
The cabinets were also designed to fit the width of three 45cm white veneer boards, which I'll be using as the doors for the cabinets. So, as with the previous cabinet (visible in the background), I slowly put together this simple frame using those 18mm white veneer boards.
▲ 問題もありましたね!見えるかなぁ。。。
はい、そうです。一本の古い水管がたった5センチでキャビネットに入れない。それは残念ですね。下のお風呂部屋の天井から移動しないといけない。作業が後からしますので、とりあえずこれで行きます。
I did hit a small problem though - one of the water pipes coming through the floor doesn't quite fit inside the cabinet! I knew it might be a problem from the start, but it was still disappointing to find it mere centimetres out. I'll have to move those pipes by going into the ceiling space of the room below, but that's a job for another day!
▲ 一枚の186センチカウンターを上に載せたら、ちょっと使えるスペースになりました。
I was still able to place one of the two long counters on top, so at least I have a bit of counterspace to sit for now.
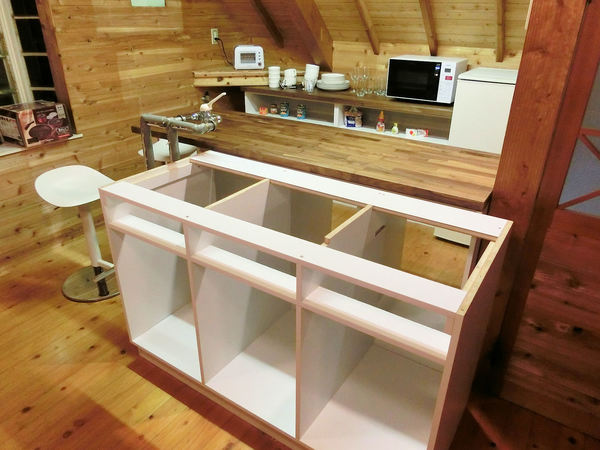
▲ これらのキャビネットには引き出しも入れますので、最初からフレーム準備をしました。できるだけ、ネジの配置も隠せるところにしました。
I'm planning to add top drawers to each of these cabinets, so I built in some basic framework for those too.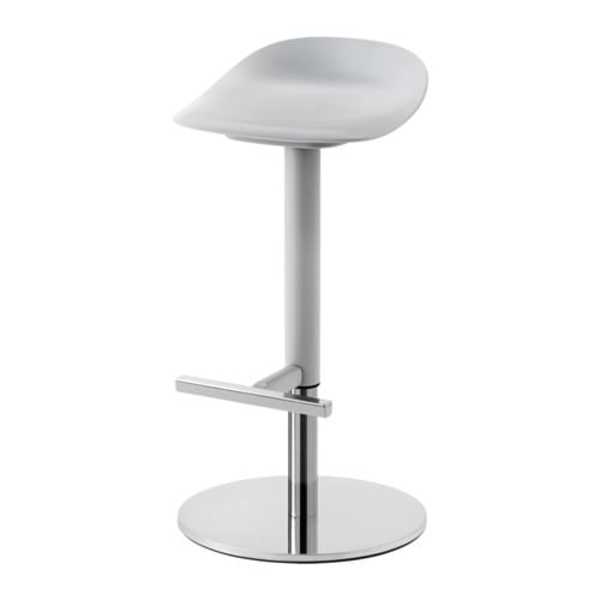
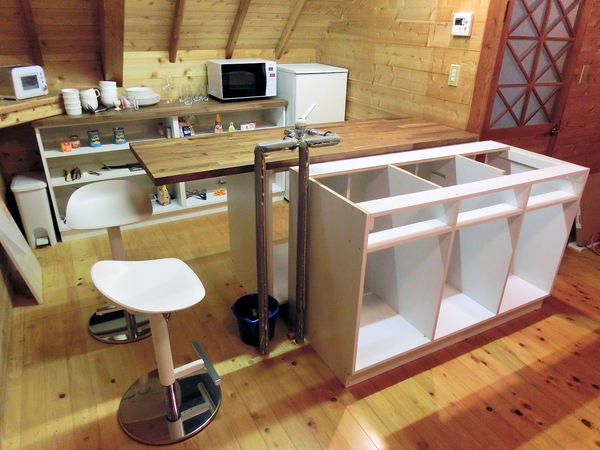
▲ 友達に聞いてみましたが、このスタイルの椅子が一番人気だった。イケアの「JANINGE」(17,990円)を二個買いました。
After a quick poll on facebook amongst my friends, I chose two of these bar stool chairs for the kitchen, to fit under the counter at the end of the cabinets. $180 from Ikea, but worth it!
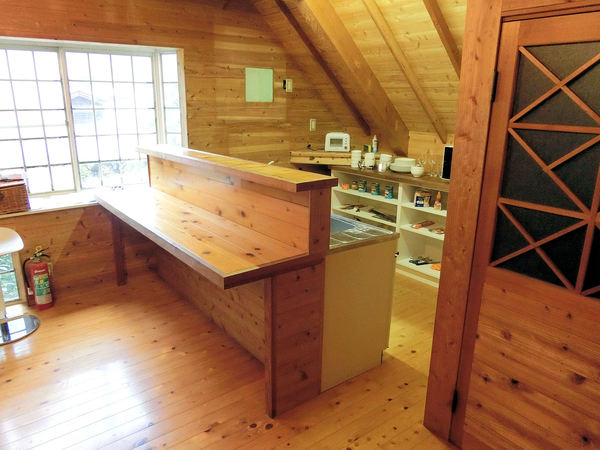
キッチンは不便!天助は斜めですし、小さい壁が3つあります。しかし、一番長い壁には低い窓がありますので、家電は置けないんだ!
窓をカバーして、ゼロからDIYキッチンを作るしかない!システムキッチンはこのスペースには使えませんが、お金はもったいないので予算20万円で頑張っていきたいね。
This slightly unique Japanese house's kitchen is, to be honest, totally terrible. It's tucked away in one small corner of the house, with the entrance next to the rusty metal sink cabinet requiring you to squeeze into a 43cm gap! Who plans these things?!
Once you're in the tiny kitchen, it gets worse! Of the three small walls available to place furniture, one is required for the entrance, and the longest wall has a low window in it, so you can't put anything there either! What a mess!
Kitchens are important. They should be a place you enjoy spending time, not small, pokey and badly laid-out. So the only thing to do here is to cover up that window, maximise wall space, and start completely from scratch! My budget for this kitchen build is about $2000, so keeping costs low with good condition used appliances (e.g. fridge) helps too.
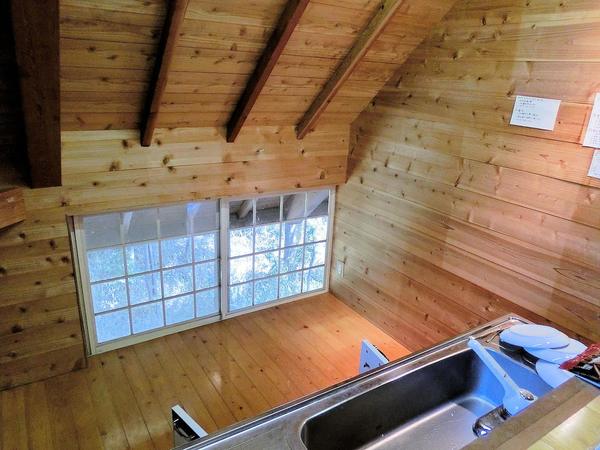
▲ この低い窓が結構かわいいですが、あまり役に立たないんです。物が全然置けないし、あまり明るくはないんです。
This is the low window in the kitchen. It's not very useful under the roof eaves anyway, since it doesn't really let much light in, so I don't really have a problem covering it over.
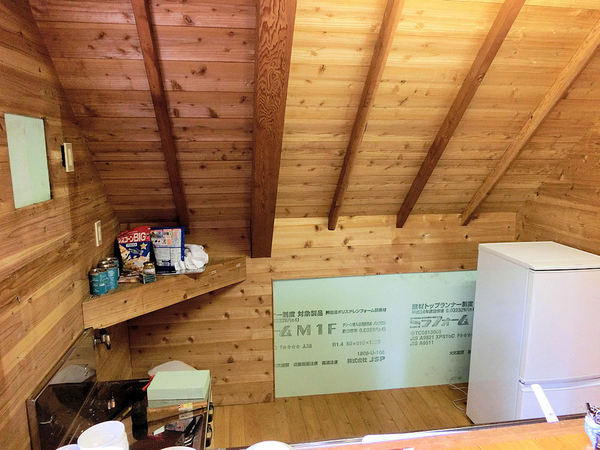
▲ まずは10センチ断熱材フォームで窓をカバーしました。外側から誰も見えないので、別に気にしていない。カバーしたら、やっと冷蔵庫が置けるスペースができました!
First thing to do is cover the window with a 10cm sheet of insulation foam. I'm not going to completely remove the window, as nobody can see it from the woods at the back of the house.
Finally I have somewhere to put the fridge!
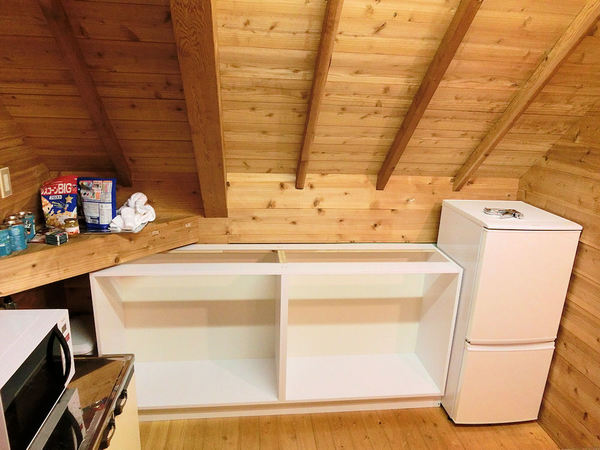
▲ 左側にある▷形の部分は建物強化のために必要ですので、その▷と冷蔵庫の間にキャビネットを入れます。三角の板を外せば、新しいカウンターがちょうどフィットします!
イケアで181cmx45cmのカウンター(KARLBY: 17,900円)を買いました。キャビネットはDIYで作ります!
近くのホームワイドDIY店で白い化粧版40センチ幅(アイリスオーヤマ)を買いました。10センチのベースの上にちょっとずつでキャビネット本体を作りました。作り方は結構簡単ですが、まっすぐ切るのが大変です。
The cabinet would fit in between the triangle frame support (required to hold the house up!) and the fridge. I bought a 181cmx45cm walnut veneer countertop from Ikea for $180, and sketched out a 180cm cabinet to fit. Using 40cm wide white veneer boards from the local DIY store, I first built a 10cm base for the cabinet, and then carefully added sides and supports on top.
The biggest problem is keeping your lines straight if you're cutting boards, so whereever possible I used the veneer boards at their original size without any cuts.
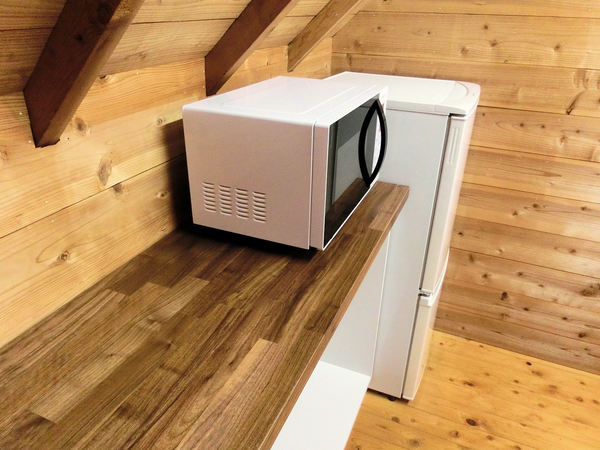
▲ イケアのウールナットカウンターを上に置くととりあえず完成。キャビネットのドアが後から付けます。ドアも60センチの化粧板を使います。
Placing the Ikea counter on top and screwing it in felt really satisfying! For now, this will do. I'll be adding cabinet doors later on, also made from 18mm veneer boards.
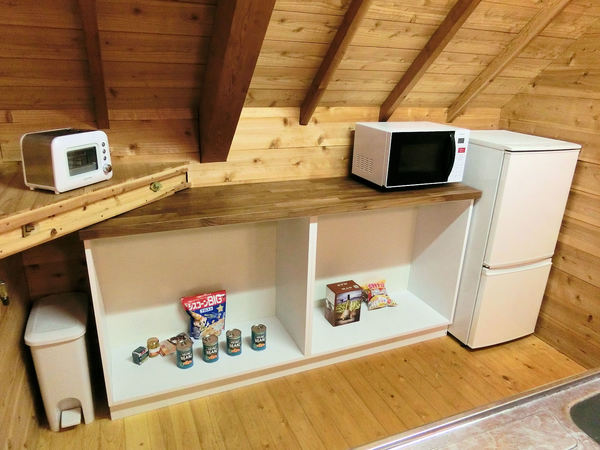
▲ 中の棚も後から付けます。今のままでも満足ですね!
カウンターは2万円、化粧板(棚&ドア含めて)は約3万円使いましたので、合計5万円でDIYキャビネットになっています。どうですか?
Including the doors, hinges and shelves inside (also to be added later), and the $180 for the counter, this cabinet came to probably around $500 in total. A little more than I hoped, but it looks good, is solidly built, and should be indistinguishable from a shop-bought system kitchen when it's finished.
2016年熊本地震が強かったらしい!2階の便器が地震の時に壊れたそうです。上のタンクと下の便器の接続ポイントが完全に割れました。
何か月もヤフーオークションで同じ便器を探してみました。なかなか中古品の同じ白はあまりないみたいだが、数か月後にやっと出ました。
The 2016 Kumamoto earthquake did quite a bit of damage to this area, and this house in particular. One of the easiest repairs was also one of the funniest - the upstairs toilet. It shattered at the tank connection point (see the pic), and I wanted to get exactly the same model to replace it.
Unfortunately they no longer make that model, since it's 35 years old. So I scoured Yahoo Auctions (similar to ebay) for several months, and eventually the same toilet in white was sourced from a house-renovation company in Osaka. 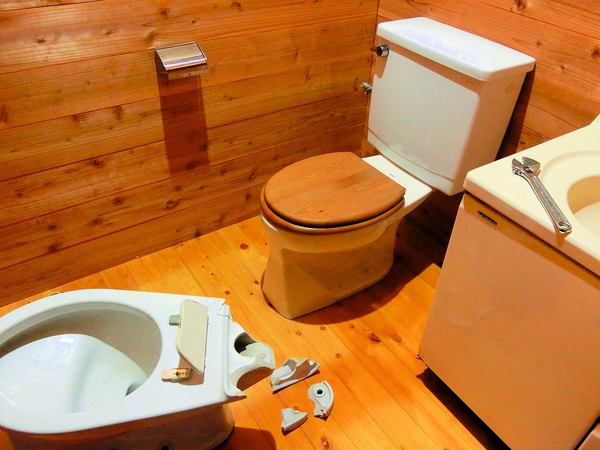
ヤフーオークションから送料込みで15,000円で購入できました。古いやつをスパナ―で取って、新しい水道用のパテを穴の周りに付けてから便器を配置しました。約30分かかりました。最後にイケアの2000円シートを付けました。
古い便器を阿蘇市の「未来館」リサイクルセンターで捨てます。
So I picked up this old but clean replacement loo for $150 including shipping, which compares well to buying a new toilet for 6 or 7 times that cost. Removing the old broken unit was easy enough, and then I ringed the hole with plumber's putty (which is designed to never dry out) to make a watertight seal with the china and bolted the replacement in its place. Probably took 30 minutes in total.
The wooden seat was about $20 from Ikea, and looks much nicer than those overly-complicated hi-tech bidet seat units (generally about $250~), I think. The old broken toilet was taken to the local recycling centre, where they charge a small fee based on weight.
〒869-2226 熊本県阿蘇市乙姫2070-48
Aso City, Otohime 2070-48
Open from 13:00~17:00*
Fridays & Saturdays
(* if the door's closed, we might have popped out to walk the dog... back soon!)


")
阿蘇山の3D地図テーブルを作ってみた! I made a 3D MAP table!
3D阿蘇カルデラはいかがですか? 3D Maps added to the shop
Painted models available 塗装済の模型発売中!
Making garage doors ガレージの扉DIY作成
New side-project... a hobbit house! ホビットの家
Shops added to the shop ショップにお店
Repainting a (mini) car ミニカーのリペイント
Buying land in Otohime 乙姫で土地探し
Scale model of the Inaba Residence 稲葉家下屋敷の模型
Customer request - Pokemon Ball! ポケモンボール
Garage construction ガレージ工事 PART 6
Secret Aso-volcano pool 阿蘇山の隠れプール
Garage construction ガレージ工事 PART 5
Garage construction ガレージ工事 PART 4
Garage construction ガレージ工事 PART 3
Garage construction ガレージ工事 PART 2
Garage construction ガレージ工事 PART 1
Making a capiz shell wall light カピス貝殻壁掛けライト
Making a rustic antique-style wall light アンティークなライト作成
Making a capiz shell chandelier カピス貝殻シャンデリア
Online store opening sale グランドオープンの割引
Opening a webstore 通信販売サイトを開店します!
A lucky escape with the typhoon! 台風がヤバいけどラッキー!
E-bike conversion DIYで電動自転車を作った!
$200 Underfloor heating 2万円でDIY床暖房
3D-printed OPEN/ CLOSED sign アトリエ看板作成


 Shrine
 Temple
 Teahouse
 Castle
 Shops
Shops Houses
 Farm
Farm Other Buildings
 Walls & Fences
 Bridges
 Ponds
Ponds LED Lights
0 Comments :
Write a comment :