


3D-Print Studio
玄関の窓の入れ替えができましたので、今度は玄関のリフォームをしたいですね。この玄関はものすごい大きいですが、玄関だけで使えばちょっともったいないかなぁ。ということは暖かい「読書スペース」に変更します!
With the new front window in place, I can finally turn to renovating the downstairs. To start with, I decided to build a little reading nook into the oversized entrance hall, since it didn't really serve any purpose. If I later decide to make this a shop or cafe, it could easily be converted to a register/admin space.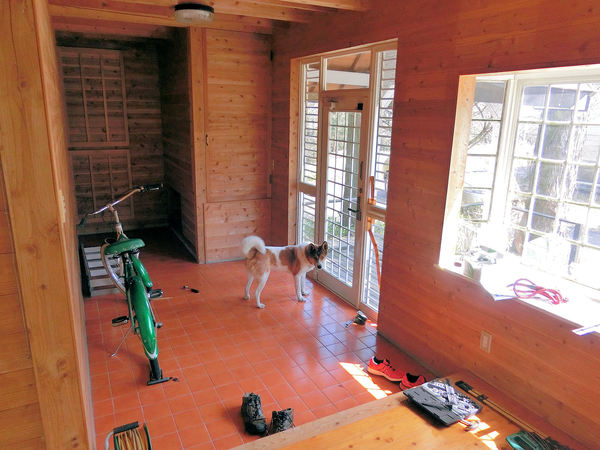
▲ 家を買ったときの状態。ほら、非常に広いでしょう?ドアの左側に壊れていた展示窓の収納スペースですが、その壁を外したら小さい部屋は作れそうです。
So this is how the space looked when I bought the house. As you can see, the genkan (entrance hall) is pretty wide, and since in Japan this space is only really used for removing shoes before entering the house proper, it seemed like a waste. The large cupboard in the far corner is in fact the shop-window display area, that the house previously featured. That window exploded in the earthquake in 2016, and I've no desire to keep that area there - instead, knocking out the cupboard walls would let in tons of light.
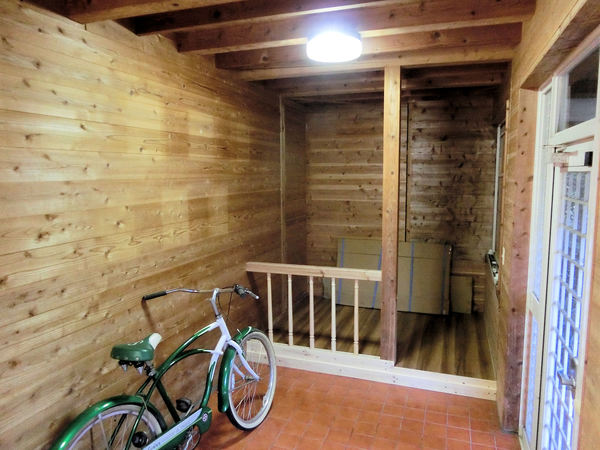
▲ 真ん中の柱だけをそのまま残した。タイル床の上に2x4とフローリングで新しい床を置きました。そして、柱の左側に手すりを作りました。ハンズマンDIY店からテーブルの脚5本買って、そのまま使いました。
With the cupboard walls removed, the only part I needed to leave in place was this central pillar. So I decided to build a simple railing to the left of it (using table legs from my local DIY store), and have the entrance to a raised area on the right. The new floor was a simple build from 2x4s and some cheap wood flooring.
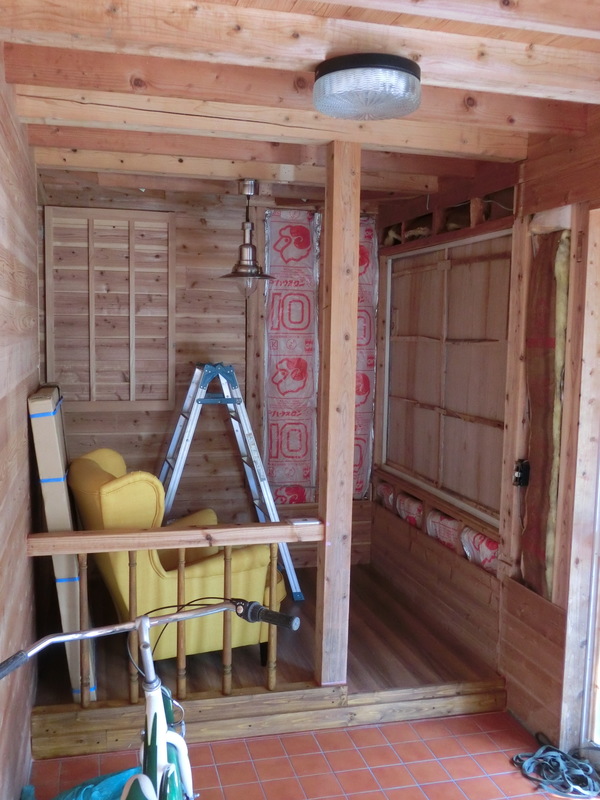
▲ 手すりを色ステインして、やっと家具が入れる状態になりました。アームチェア(STRANDMON, 24,990円)とライト(OTTAVA, 5,499円)はイケアから買いました。
After the railing had been stained to roughly match the surrounding wood, it was time to add an armchair and a retro-industrial decorative light. Running a new power cable to the middle of the ceiling required removing some of the wall planks to find the connections, but it was so worth it.
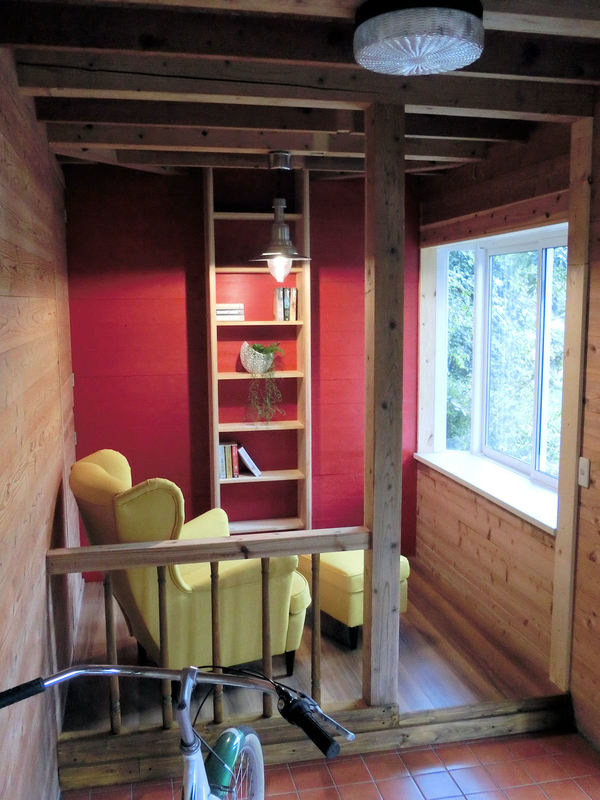
▲ 最後に壁を茜色にペイントしてから、床から天井までのシンプルな本棚を作りました。新しい窓を入れたら完成でした。このアームチェアを入れるとちょっと狭くなったけど、一人の読書スペースには最適です。窓から阿蘇さんも見えますので、大満足!
Here's the finished "book nook"! I painted the far wall a vibrant 'madder' red (it's a root used in dyeing, apparently), and contrasted that with a floor-to-ceiling bookcase in natural wood. A pretty simple job, but look at the difference!!
With the new window in place, it's a cosy and bright space for one person to relax and read in the daytime, with a view of the woods and the Aso volcano out of the window. I love it!
▲ キッチンとバスルームがやっとリフォームできました。ということは暮らせる家になりましたので、次の作業は地震から受けたダメージの修理ですね。あっちこっちにサイディングの小さいひびなどもありますが、やっぱり正面の窓から始めたいです。
2016年まで染め教室のアトリエでしたが、地震の時に玄関横にある展示窓が爆発したそうです!それからの3年間、窓なしでビニールシートで隠していただけです。嵐の時に強い風と雨がよく入ってきました。2019年家を買ったときに結構悲しい状態でした。
With the bathroom and kitchen both finished, the house was finally liveable, so it was time to move on to the exterior of the house - it was time to fix the 2016 earthquake damage! There's quite a bit of cosmetic damage to the exterior (cracks and broken siding etc), but I think we'll start with the biggest problem....
Until the 2016 quake this house had been a dyeing workshop, and had had a large shop display window at the front. Presumably to display dyed clothes and other products. But the big quake had shattered that window completely, and it was hurriedly patched with a plastic sheet for the next 3 years. Sadly, occasional spring storms had let in some wind and rain, so it was in a pretty sad state when I bought the house in 2019.
▲ まずはひどい天気から家を守りたかったので、シートを取って、仮に板を入れました。
So one of the first things to do after buying the house was to remove the old plastic sheet cover and patch it with some spare wooden boards.
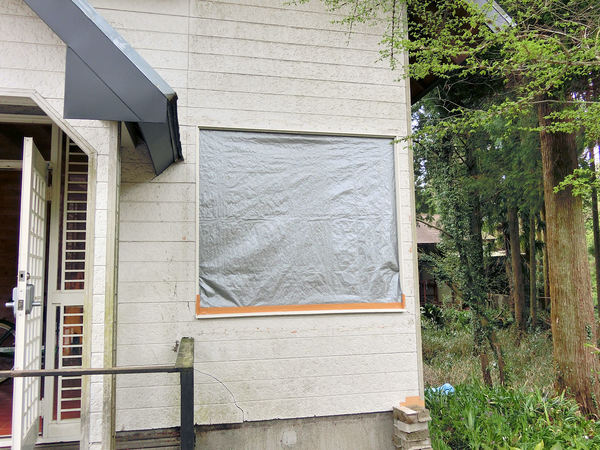
▲ 板の外側にまたシートを張りました。とりあえずこれで行こう!
After some new plastic sheet was wrapped around, it was at least waterproof for a while.
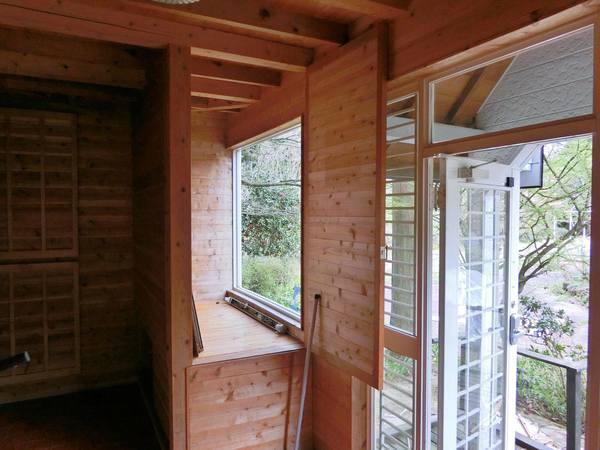
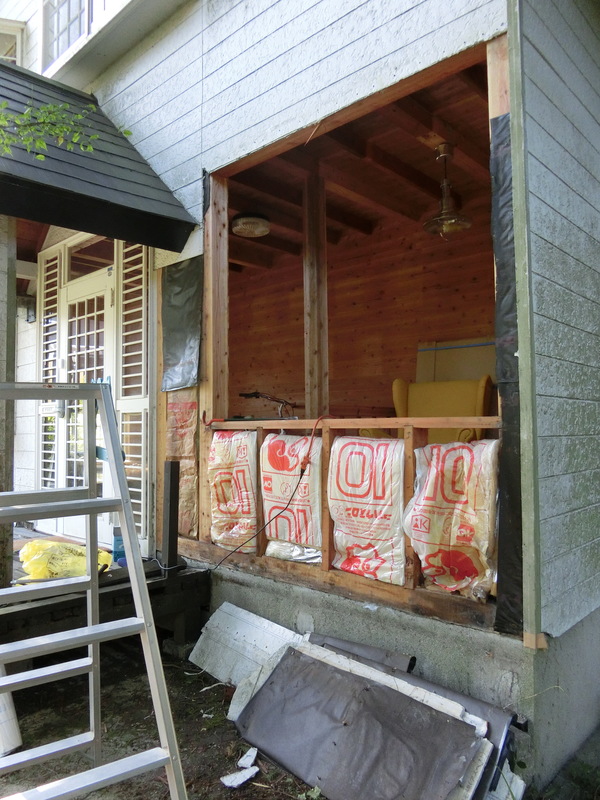
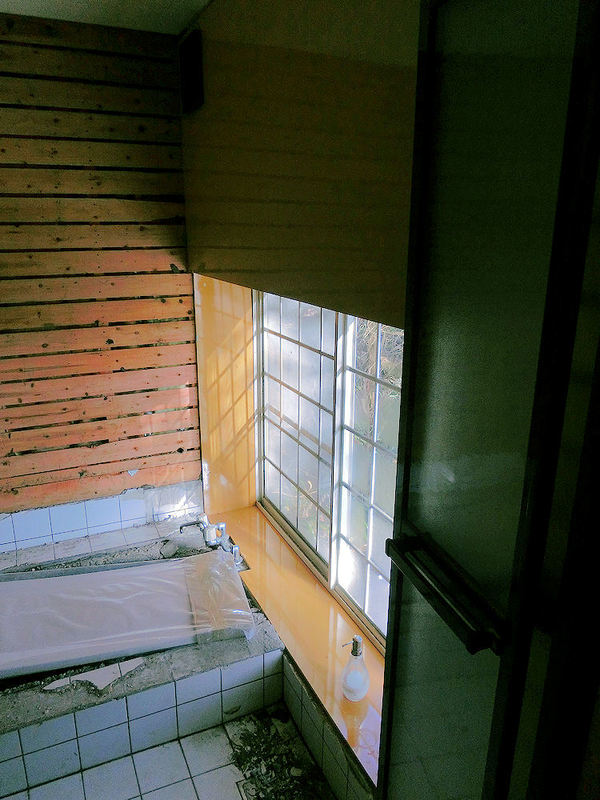
▲ 一年たちましたがやっとエクステリアの修理が始まりました。板を外した時に玄関からの景色がよかったです。阿蘇さんも見えますし、そこに新しい窓を入れ替えます!
Jumping one year forward, and it's finally time to deal with the house's exterior. With the temporary boards removed, the view was actually pretty good, with a fine view of the Aso volcano. So I hatched some big plans to knock out the internal walls of that display cupboard area and put in a large picture window.
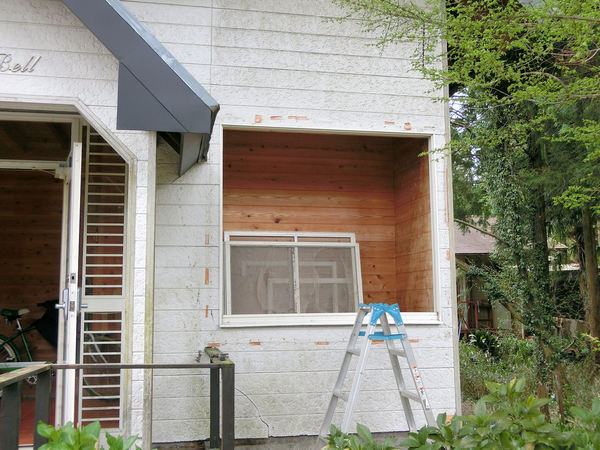
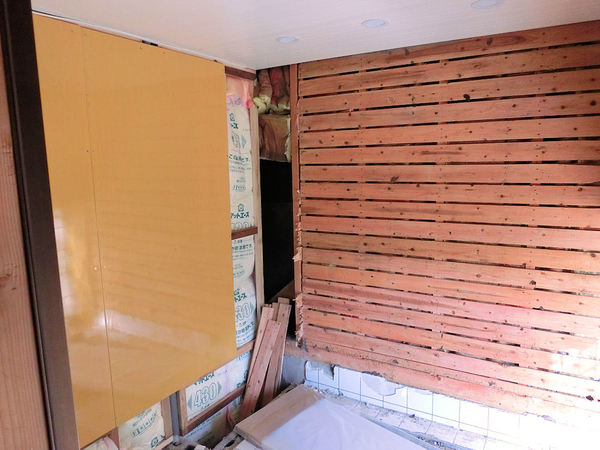
▲ 古い展示窓のサッシを外すには、周りのサイディングも外さないとね。めんどくさいけどしないといけない作業でした。
After carefully pulling out the old aluminium window frame, I also had to carefully remove several of the surrounding siding boards. If you don't do that, then it's impossible to waterproof the new window frame!
▲ ここまでサイディングを外しました。いいチャンスだったので、新しい断熱材も入れました。
So while I was pulling off the old exterior boards, I also took the opportunity to fit some new glass-fibre insulation.
▲ この家の窓サッシが面白い形ですけれども、結構高い種類です。80年代の窓サッシにはペアガラスはなかったそうですが、今回ペアガラスしかないみたいです。確かに高いタイプです!サイズはちょっと大きくして、楽天の店から17万円で買うしかなかった。
悲しい買い物ですね!キッチンと大体同じ価格ですが、今回は修理だけです!????
2~3時間ぐらいで自分で組み立てましたが、やはりこんな大きさと重さで一人で運べなかった。近所のShujiさんと一緒にフレームに持ち上げました。Shujiさん、ありがとうございました!助かりました。
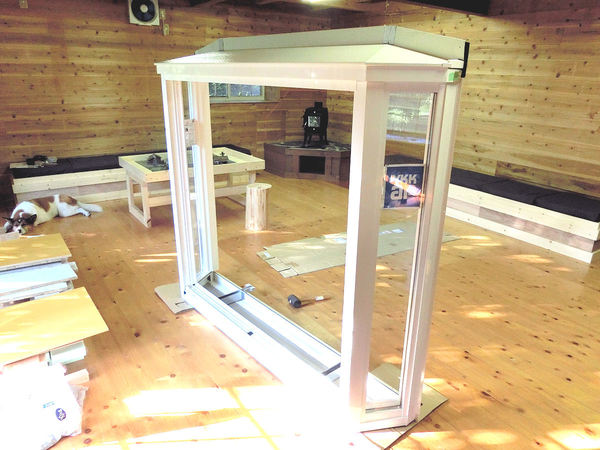
Right, onto the new window! The windows of this house jut out about 30cm from the walls, which is quite a pretty window design. Unfortunately it's also a very expensive shape of window, especially since they only make double-glazed versions these days! So this window was ordered from a Rakuten online store for about $1700! That's almost as much as the entire kitchen rebuild cost, but just for a repair job! Oh dear.
It was a fairly easy process to put together the various parts of the window frame kit, just following the paper instructions. It took maybe 3 hours, but then I had to recruit the help of my neighbour Shuji to help me lift the whole thing into the empty window socket. Thanks, Shuji!
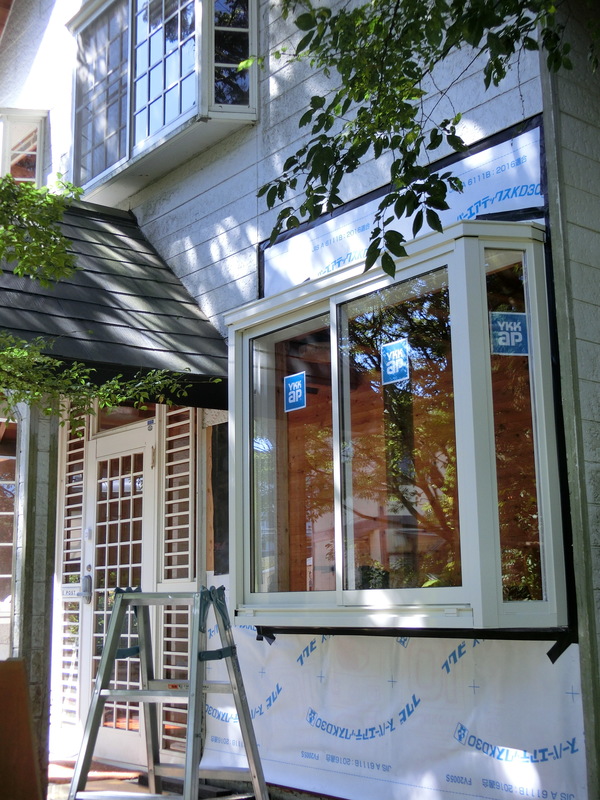
▲ 新しい窓サッシを入れた日の写真です。新しい防水シートとテープで天気から守ります。後はサイディングですね!
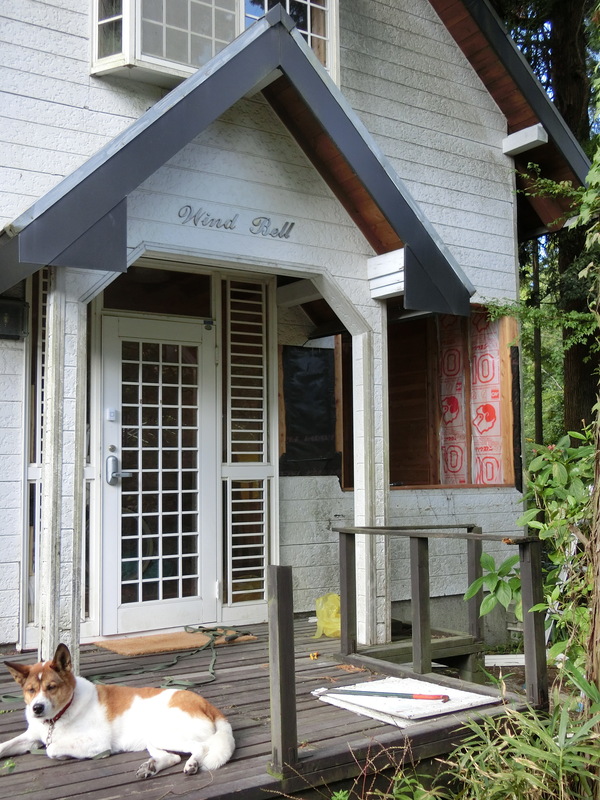
2016年からずっと悲しい正面でしたが、やっと家の笑顔が戻せました!
So here's the new super-shiny window, fitted into the front wall of the house. Waterproofing sheets and tape will keep it watertight, and then the only thing remaining is to fit the old exterior boards into place around it.
After 4 long years of neglect, the house has finally regained it's front face again! What a difference!
やっとバスルームの作成が終わりました! 完成の写真を見せましょうか。。。
My $2000 DIY bathroom project is finally finished, and came in pretty much on budget! Let's take a look...
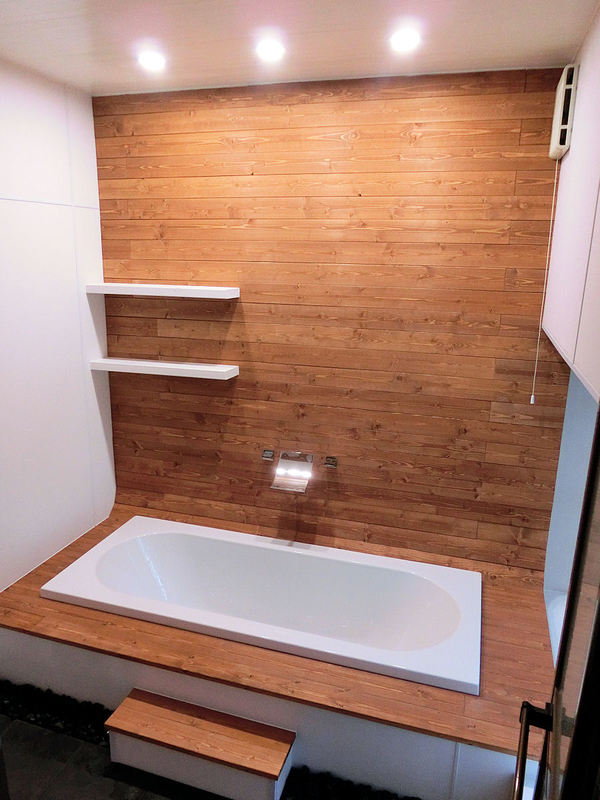
▲ イギリスから来たバスタブとユニークな蛇口はよく合いますね!棚に何を置こうかなぁ。。。
小さいステップの周りに黒い小石をアクセントで入れました。
I think it really was worth getting this bathtub shipped from the UK via Ebay, as it completely transforms the bathroom into something special. The curved wooden back wall and ultra-modern waterfall taps looks fabulous together!
The little step up to the bathtub isn't strictly necessary, but it looks good surrounded by the black pebbles at the edge of the floor.

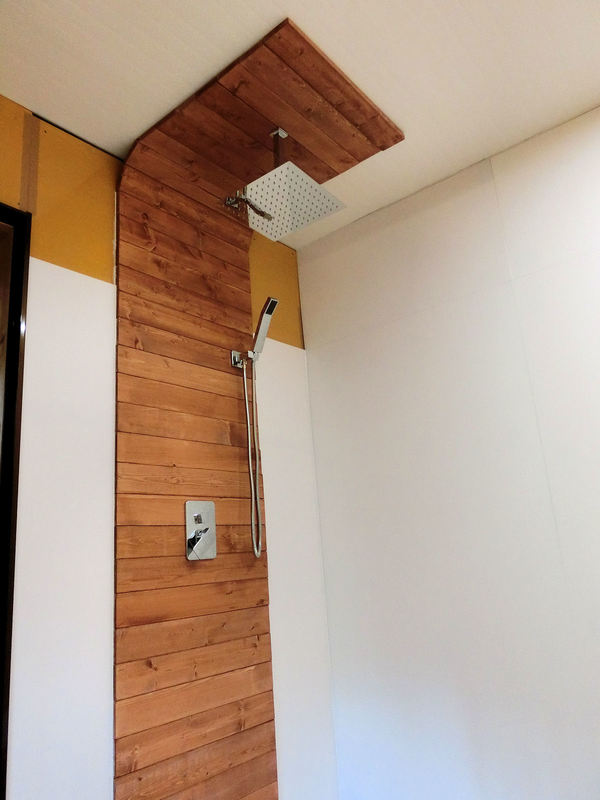
▲ 反対側のシャワーも素敵!壁と天井の木材部分がアピールポイントです。
Opposite the bathtub we have this unique shower area, with a mirrored version of the curved wooden wall extending up onto the ceiling.
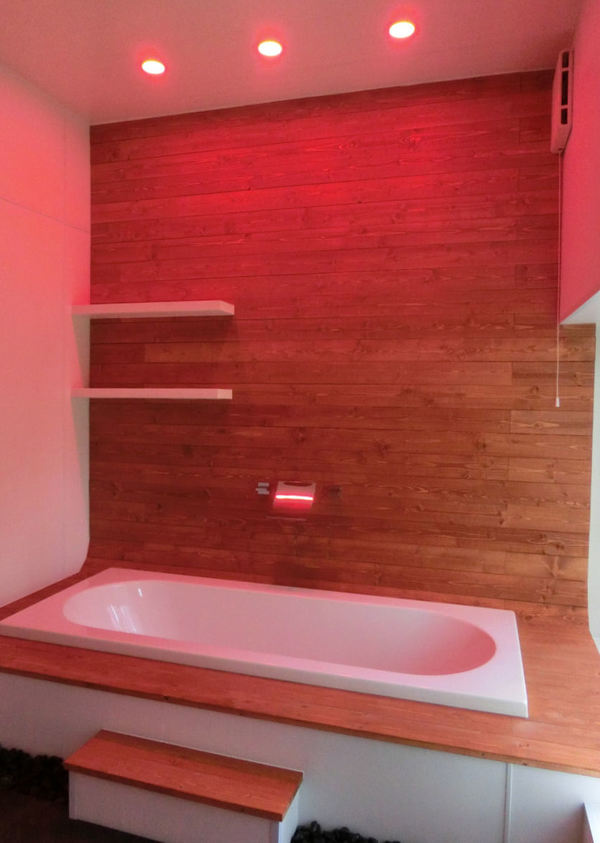
▲ そして、LEDの照明をムードライトにも使えます!
暖かいRED.....
You can have some fun with the lighting controls, which look especially good in a hot steamy bathroom!
Here's a pic of the bathroom in energising red...
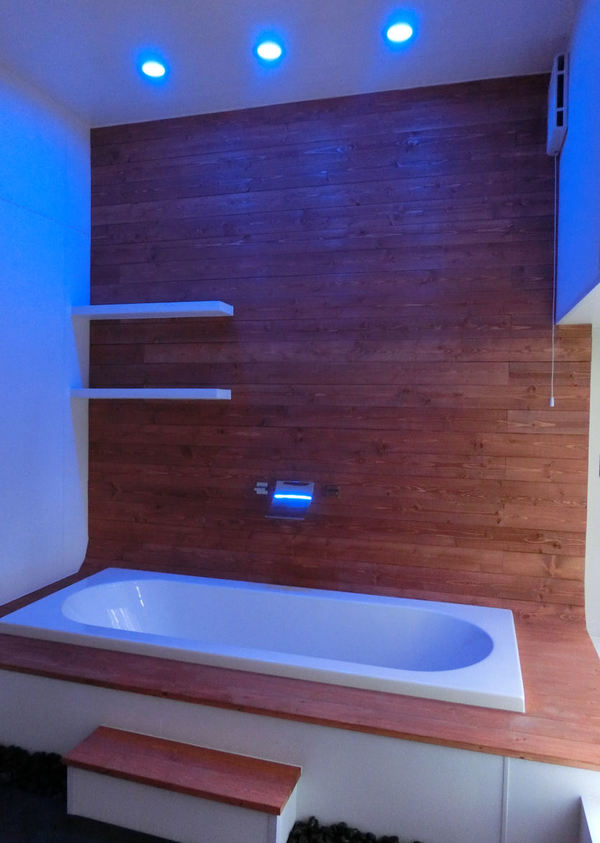
▲ ....さわやかな BLUE...
... cool blue.... 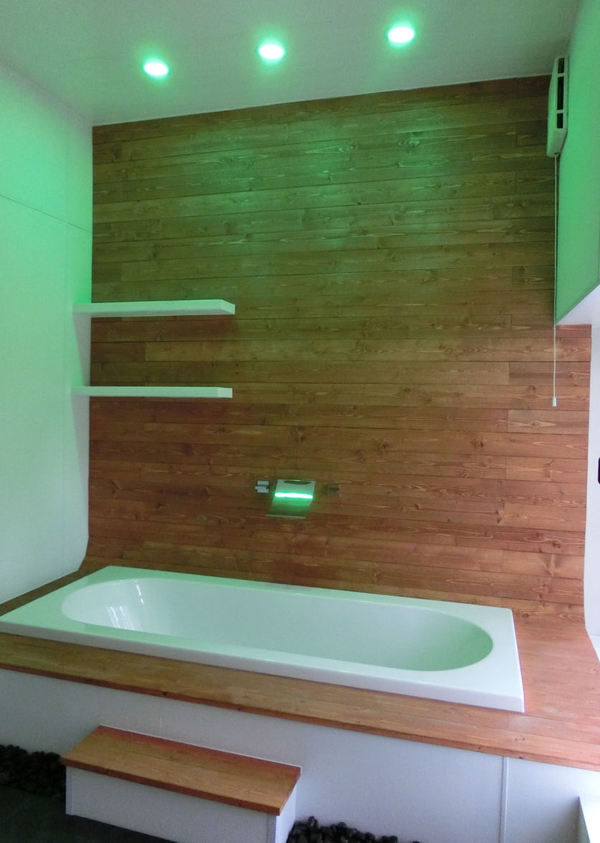
▲ フレッシュなGREENも!
... and finally fresh green!
I love it!!!!!
お風呂作ろうね!新しいバスタブを入れる作業とパイプの接続作業に進みます。
We're closing in on completing the bathroom now - just a few more jobs to take care of...
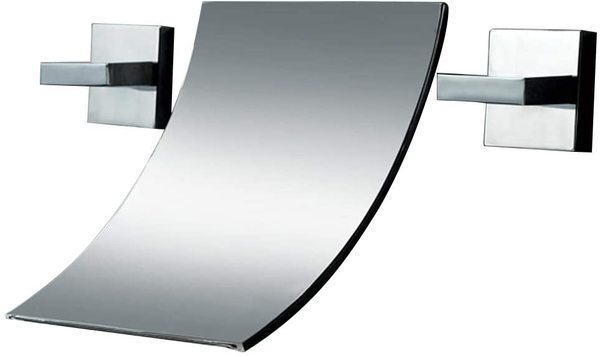
▲ お風呂の蛇口は壁に付けます。ただし、日本メーカーの面白くない蛇口は使いません!それはちょっと持ったないですので、今回アマゾンジャパンから買った「waterfall tap」を使います!メーカーは中国のJiaYouJiaですが11,500円の価格がすごいです!
Standard bath taps in Japan suck. They are functional, perhaps, but also very, very ugly. They are also overpriced, with a basic double mixer bathtap costing around $250. I wanted something a little more interesting, and was happy to find this beautiful waterfall tap (from China) on, of all places, Amazon Japan! Even better, it only cost $115, which I think was a real bargain!
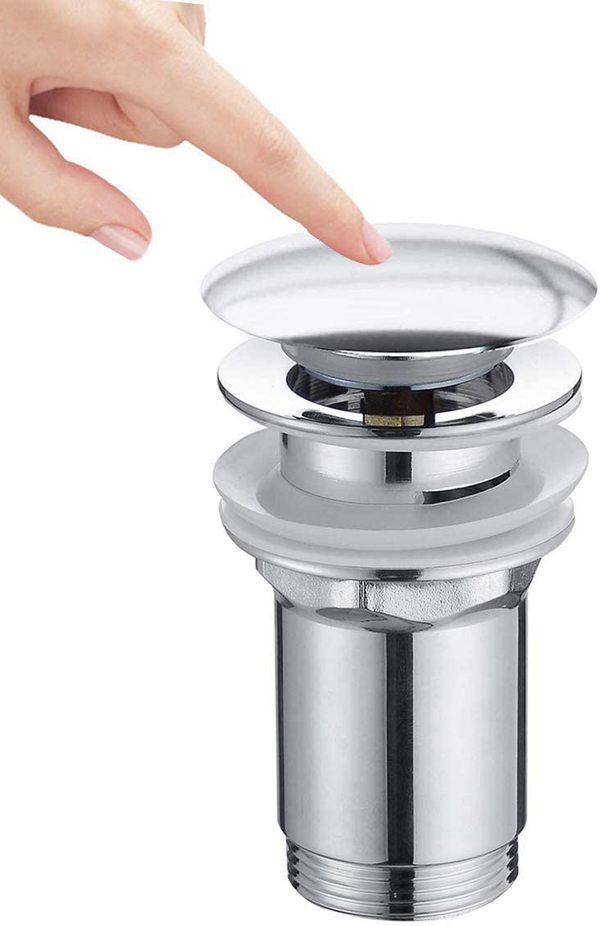
▲ ドレインはプッシュボタン式のONECE(1,599円)もアマゾンから注文しました。DIY店で買える塩ビパイプとつなぐことができます。
My new bathtub has a central drain hole in the floor, but I needed to buy my own drain for it. I found this one in bright chrome, to match the taps, for only $16 from Amazon Japan.
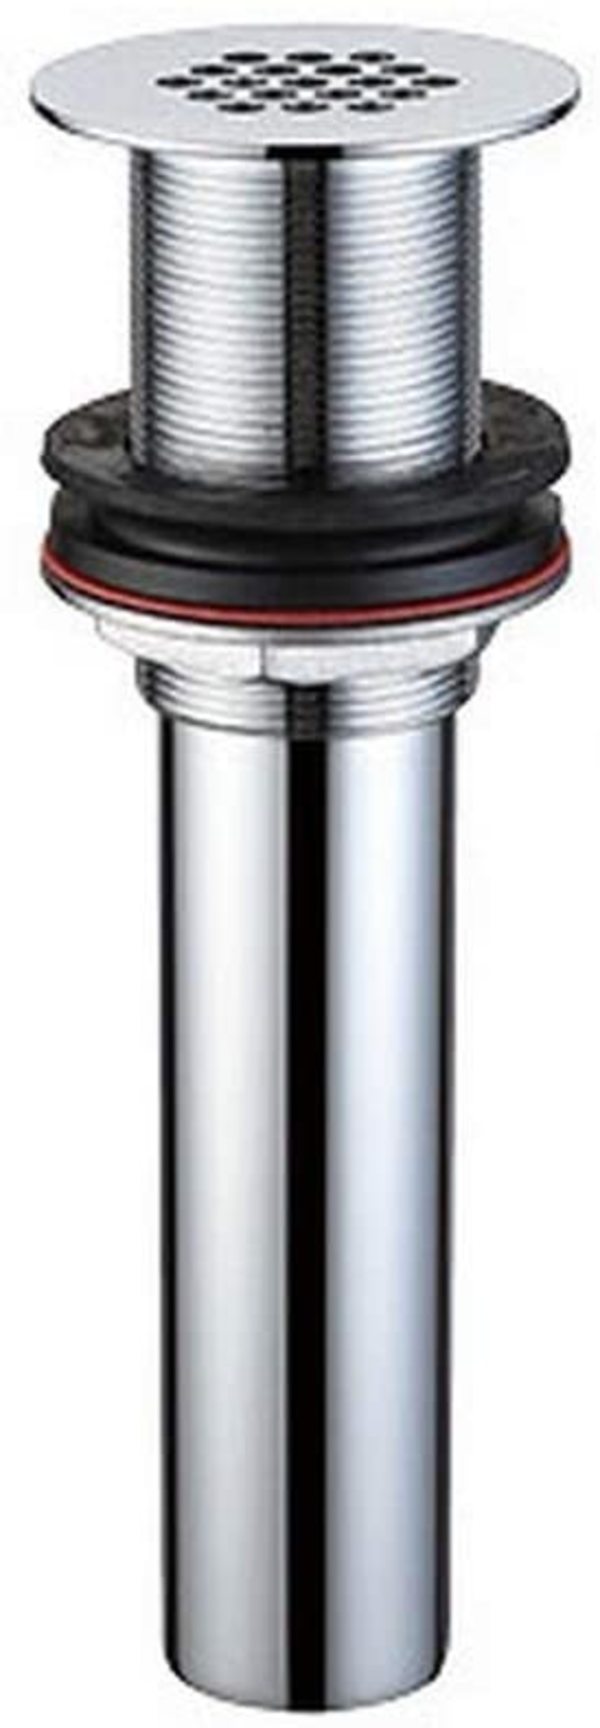
▲バスタブの側面にはオバーフロー穴もありますので、このドレインもアマゾンから買いました。3,080円でした。
Similarly, I found this overflow drain for the side of the bathtub for $30 from Amazon.
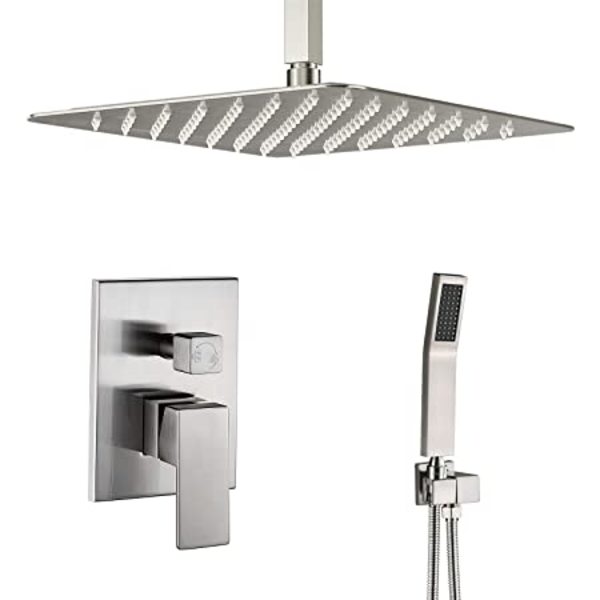
▲ 私はお風呂よりもシャワーのほうが好きですので、海外のEbay.comからユニークなシャワーを注文しました。「Rainfall shower」を検索したら、結構出ます。色々なタイプありますが、買ったシャワーが12インチ(30cm)の約14,000円でした。
Personally, I prefer showers to baths, so I was happy spending a little more on a kickass shower head. As for choosing bath fittings, Japanese ones from makers like TOTO and INAX are functional but ugly, and vastly overpriced. This kind of rainfall shower fitting is unheard of here in Japan, so I bought this 12" set from Ebay for about $140 (shipping included).
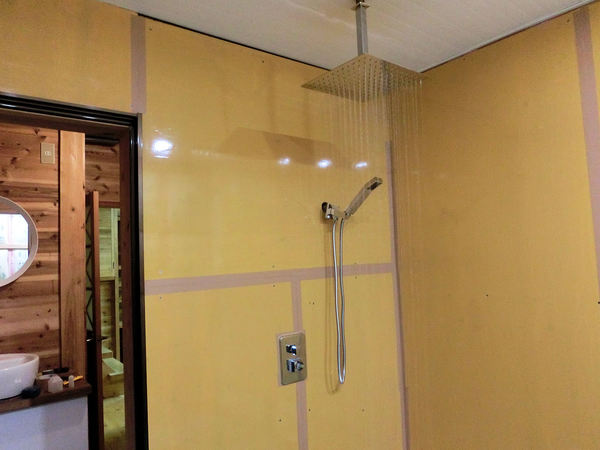
▲ 壁の中のパイプ接続が本当に嫌ですね。古いシャワーにはもちろん鉄の管が利用されましたが、最近曲がれるプラスチックパイプもDIY店から購入できる時代に変わりました。価格がちょっと上がりますが、使い方がとても簡単ですね。ということは古い鉄のパイプを曲がるパイプに接続できました。
写真はシャワーの初テストでした!やった!
The pipe connections were, I'll admit, a pain in the butt. The old pipe connections were, of course, metal, and that made it far too difficult to make the complicated pipe runs inside the walls. I was happy to find that technology has moved on a little since the 1980s, and I managed to connected the previous metal pipes to insulated plastic flexi pipes without much trouble. Of course it does cost a little more to get the pipe connectors for flexipipes, but it's a fair trade off, I think, in terms of ease-of-fitting!
The photo shows the first test of the new shower, after the pipes have been connected. Finally!!!!
▲ そして、壁に防水用のシートを張りました。ユニットバスにはバス専用の180cm x 90cmほど「バスパネル」が使われていますが、値段は何と1枚1万円です!それもちょっと予算オーバーですので、プラスチック段ボールの材料「プラダン」を使います。防水性が同じですので、1枚約500円だけですので結構節約できます。プラダン板の間にシリコンコーキングを入れました。
白い壁だけならちょっと普通っぽいて感じですので、木材のアクセントも使います。シャワーの壁には幅60センチの木材壁を張ります。DIY店で安い18mm厚みのパイン (1x4s) を買って、防水ステインを塗りました。強い両面テープで張って、やっとシャワースペースが完成となりました。
木材の壁を80センチほど天井にも張りました。バスタブ側にも同じパターンを使うつもりです。
It was time to start fitting the walls! The standard approach for modern Japanese bathrooms is to buy a "unit-bath", which includes all walls, floors, ceilings, bathtubs and fittings. You can buy the wall panels separately, if you look online, but as many things considered too complicated for the average user here, they are expensive. So rather than spend $100 for each 180x90cm panel, I looked around for alternative materials and found corrugated plastic sheets for only $5. These are usually used for a plastic version of cardboard boxes, but since they are still 100% plastic they will be waterproof. I sealed the gaps and corner joins with silicon caulking.
Now that I had some lovely white walls, I wanted to brighten things up with some more colour, so I decided to create a wooden shower "wall". I bought lots of cheap pine 1x4s from my local DIY store, and cut them to 60cm lengths and painted them with waterproof woodstain. Then it was a simple process of sticking each one on with strong (waterproof) double sided tape, and sealing the ends to the wall with silicon caulking.
I continued the wooden strips up on to the ceiling, to create a visual "roof" to the shower unit. This same curved shape will be mirrored on the far wall, around the bathtub.
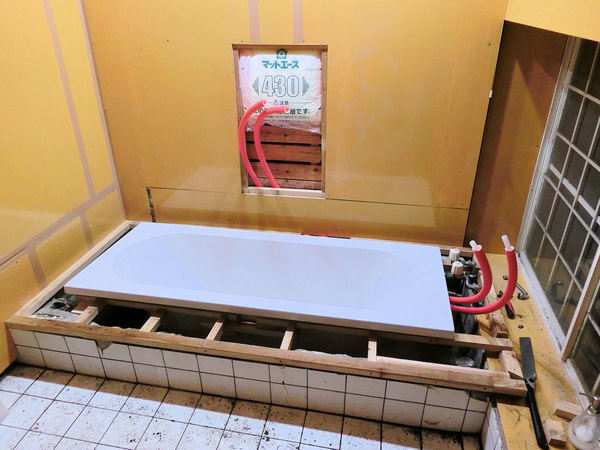
▲ では、バスタブの作業に戻ります。まずは木材フレームを作って5センチを上に上がりました。その5センチの間には蛇口用のパイプを通しました。古い鉄管がバスタブの右側に見えますが、コンクリートの中に囲まれていますので、移動できなかったです。そのためにできるだけ隠すようにしました。
Over on the bathtub wall, I made a wooden frame to lift the bathtub up slightly. The old waterpipes are encased in concrete at one end of the bath, and I couldn't move them. So instead, I created just enough room to hide the pipe tops under the new false bathtub surround, and connected them using more plastic flexipipes. These were then threaded under the corner of the bathtub, and up into the false wall at the back, where they'd connect to the new taps.
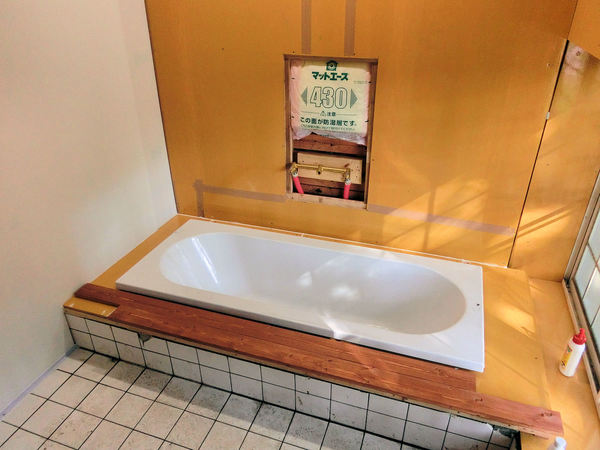
▲ バスタブの周りにコンパネ板を載せて、パイン板張りの作業が始まりました。
I encased the bath frame in painted plywood, and then started on the process of gluing more planks of waterproofed wood on top.

▲ こっち側にも防水性が必要ですので、板の間に透明のシリコンコーキングがキレイに塗っています。新しい蛇口を接続するとテストできました。成功だ!
The gaps between planks were carefully filled with clear silicon caulking, to make this area as waterproof as possible. The planks were roughly curved up the wall, and finally I was able to fit the new bath taps in place and test it!
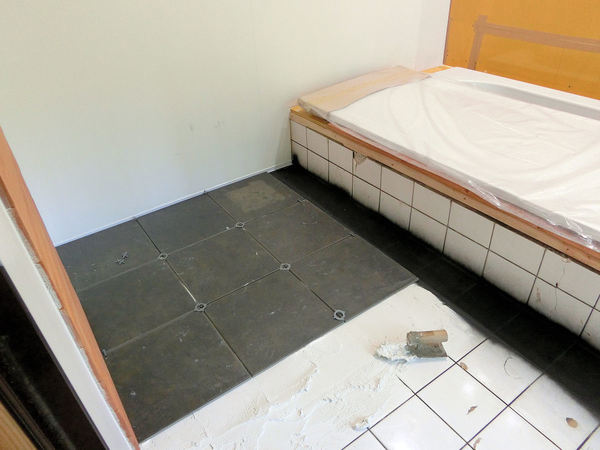
▲ 古いバスルームの床もタイルでした。ですが全体のリフォームですので、床も作り直します。このタイルはDIY店ハンズマンから買いました。ドレインの周りに切るのがちょっと大変だったけどやっと終わりました。
One last job was to lay a new tile floor. The previous floor was small white tiles, but some were chipped and cracked from the earthquake, so I bought these dark grey tiles from Handsman DIY store for about $200, and stuck them straight on top, so the water will run down into the corner drainhole.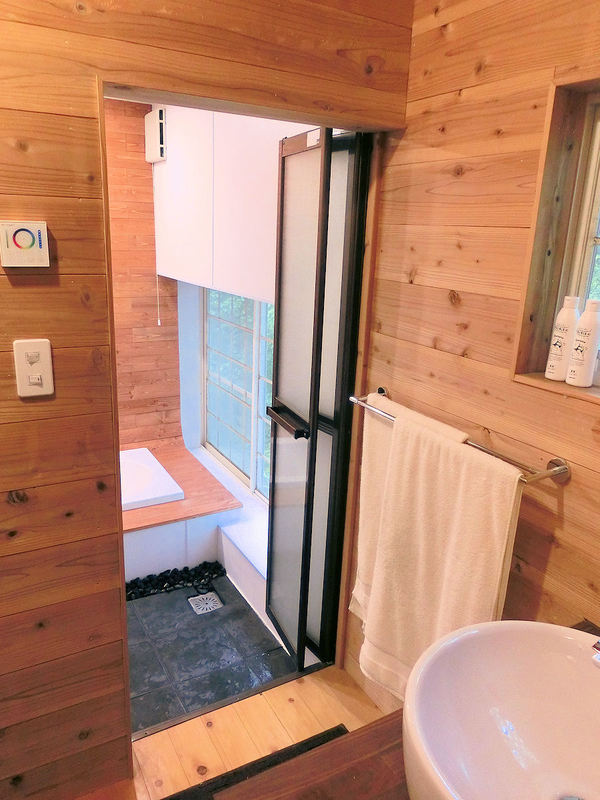
▲ もうそろそろ完成となりますが、プレビューを見せましょうか?隣の洗面台から見ろとこんな感じです!
The bathroom is almost complete, so here's a sneak peek taken from the adjoining washroom area. Completed photos coming next....
バスルームの新しい天井パネルとライトの作業が始まりました。天井にはフクビの「バスパネルEX」(2mx30cmで約1600円)を使いました。バスパネルには1センチほどの断熱材が入っていますが、その上にグラスウールの断熱材もいっぱい入れました。
Time to start rebuilding the bathroom! First thing to go in was a replacement ceiling, which was bought from a local building supply shop. These were the same dimensions as the previous ceiling, and come in 2m x 30cm panels for about $16 each. They have about 1cm of heat insulation material on the back (so I added lots more insulation above the ceiling!), but are super light and can be just tacked up to the existing wood frame.
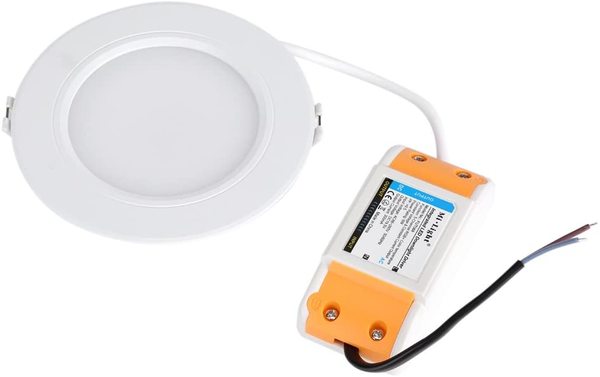
▲ バスタブの上にダウンライトを付けたいです。ただし、湿度が高いバスルームには防水ライトが必要でしょうね。アマゾンで見つかったライトはこの「Mi.Light」LEDダウンライト(2,179円)でした。浴室でも使えます。
普通のライトではないですよ。。。。
I wanted to put in 3 downlight LEDs above the bathtub, but of course these need to be waterproof units. I found these excellent Mi.Light LEDs for $21 on Amazon Japan, but they are not just any old lights......
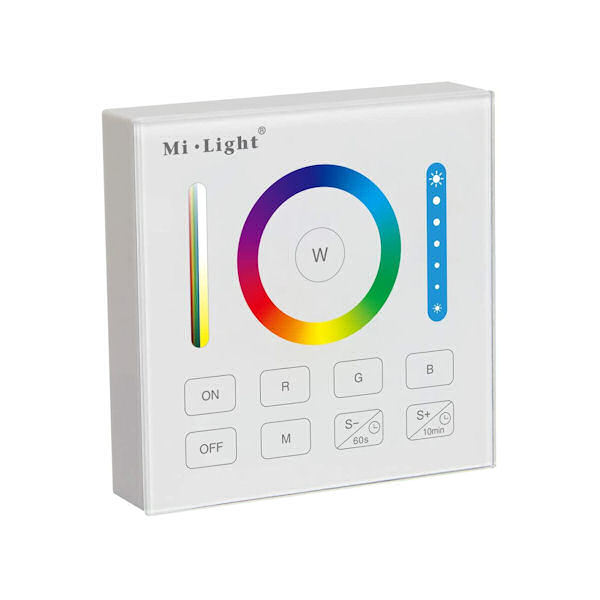
▲ 同じメーカーのワイヤーレスコントローラ(2,699円)を利用したら同時にライト何個もつなぐこともできます。そして、明るさと色も設定できます。この価格でこんな機能が素晴らしいと思います!
.... if you connect them wirelessly with this great value control unit ($27), you can then change the room lighting to any of 256 colours! You can also play with the brightness and saturation levels too. With 3 lights and a controller costing under $100 for such amazing functionality, these are such great value!! I can't recommend them enough.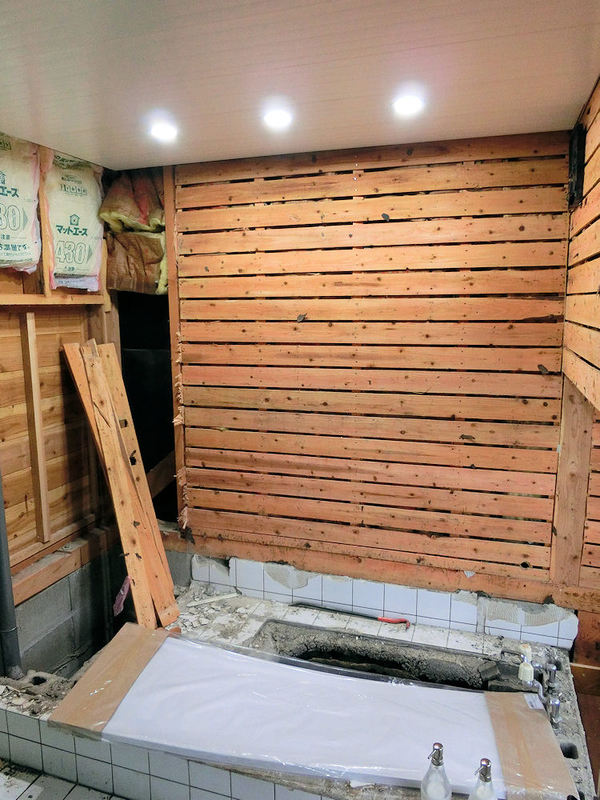
▲ お風呂の上に3個のLEDダウンライトをつました。ナイフで穴を開けて、電気配線をつなぐだけです。すごく簡単でした!
Fitting the lights is easy. I cut three holes with a knife, connected each wire to a power cable, and pushed the lights into the holes. After a few minutes of fiddling, the controller beeped to tell me they'd all wirelessly connected properly, and I got to play with the colour wheel. Too much fun!!
▲ 2階のキッチンへの下水パイプが8センチほど1階のバスルームに出ていますので、新しい壁を10センチほど移動しました。古い壁とと新しい壁の間にまたグラスウール断熱材いっぱい入れました。
その上にコンパネ板をはりました。
So on with the renovations! A waste-water pipe from upstairs protruded about 8cm into this room (it had previously been inside that false wall space in the corner), so I took this opportunity to move the left-hand wall 10cm further into this room. This neatly covered the pipe and let me stuff in lots more glass-fibre insulation. On top of that I screwed on some plywood panels that have a high gloss paint on one side - I hoped this would add some water-resistance until the bathroom was complete.
▲ 右側の窓の周りにもできるだけ断熱材を入れて、コンパネ板をはりました。
I did the same with the window surround, rebuilding it with insulation rolls and plywood panels.
▲ 最後に、後ろの壁も8センチほど移動しました。古い壁と新しい壁の間に断熱材を入れました。
水道栓が壁に付けるつもりですので、パイプを通れるスペースを空けました。
The back wall was also brought about 8cm further into the bathroom, which gave me enough space to run water pipes inside it to a wall tap unit for the bath. And of course to stuff in lots more glass fibre insulation!

▲ これで壁の準備が大体できていますが、残っている作業がバスタブの穴ですね。これは大変だったよ!!
新しいバスタブが古いやつより長いですので、厚み15センチほどのコンクリートを外さないといけないね。ただし、ハンマー、丸鋸やバールで頑張っても壊せんかった。どうしよう?!。。。で、やっとできる方法考えた。3トンのカージャッキで下のほうからやっと壊せました!
With the walls mostly insulated and roughly covered for now, I turned to the last big problem for this project... the bathtub! The old bathtub was about 110cm in length, and since I wanted a longer tub I needed to remove this 15cm thick slab of concrete to make space. This was a pain in the butt! I tried hammers, chisels, crowbars and circular saws, but nothing was able to shift it. Then I had a brainwave, and look how happy I was to see it worked - I placed a 3ton car jack underneath the slab, and lifted it slowly up. At long last it cracked apart, and I could relax a little!
▲ タイミングがちょうどよかったですね!
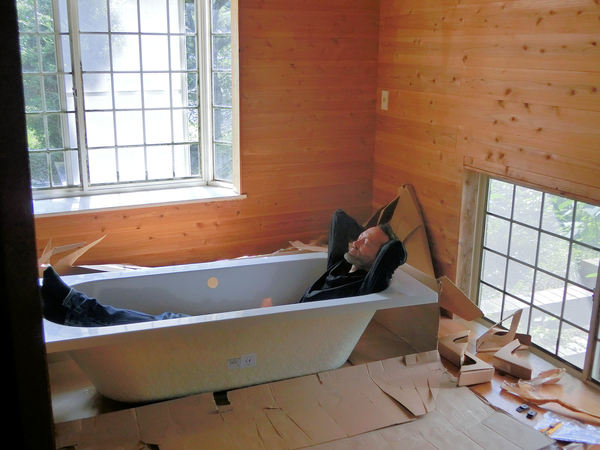
同じ週にイギリスのほうから新しいバスタブの配達が来ました。日本で買うと10万円ほどかかるけど、海外のEbay.comサイトでこのバスタブを注文できました。バスタブが約2万円で送料も2万円かかりました。配達が約1か月かかりましたので、すごいドキドキしていました。
写真は玄関で箱を開いたときの満足度100%ですね!
The same week that I was cracking that concrete apart, a delivery arrived from the UK. Long bathtubs (known as "European-style" here) are very expensive in Japan, because you don't normally find them in the standard "unit-bath" kits. So instead of paying over $1000 to buy from a Japanese retailer, I managed to find this acrylic bathtub on Ebay, which cost about $200. Shipping was another $200, and it took about one month to arrive.
The photo is just a pic of me, feeling particularly smug (sorry!) after unboxing it in the entrance hall!
〒869-2226 熊本県阿蘇市乙姫2070-48
Aso City, Otohime 2070-48
Open from 13:00~17:00*
Fridays & Saturdays
(* if the door's closed, we might have popped out to walk the dog... back soon!)


")
阿蘇山の3D地図テーブルを作ってみた! I made a 3D MAP table!
3D阿蘇カルデラはいかがですか? 3D Maps added to the shop
Painted models available 塗装済の模型発売中!
Making garage doors ガレージの扉DIY作成
New side-project... a hobbit house! ホビットの家
Shops added to the shop ショップにお店
Repainting a (mini) car ミニカーのリペイント
Buying land in Otohime 乙姫で土地探し
Scale model of the Inaba Residence 稲葉家下屋敷の模型
Customer request - Pokemon Ball! ポケモンボール
Garage construction ガレージ工事 PART 6
Secret Aso-volcano pool 阿蘇山の隠れプール
Garage construction ガレージ工事 PART 5
Garage construction ガレージ工事 PART 4
Garage construction ガレージ工事 PART 3
Garage construction ガレージ工事 PART 2
Garage construction ガレージ工事 PART 1
Making a capiz shell wall light カピス貝殻壁掛けライト
Making a rustic antique-style wall light アンティークなライト作成
Making a capiz shell chandelier カピス貝殻シャンデリア
Online store opening sale グランドオープンの割引
Opening a webstore 通信販売サイトを開店します!
A lucky escape with the typhoon! 台風がヤバいけどラッキー!
E-bike conversion DIYで電動自転車を作った!
$200 Underfloor heating 2万円でDIY床暖房
3D-printed OPEN/ CLOSED sign アトリエ看板作成


 Shrine
 Temple
 Teahouse
 Castle
 Shops
Shops Houses
 Farm
Farm Other Buildings
 Walls & Fences
 Bridges
 Ponds
Ponds LED Lights
2 Comments :
Jay M.
2022-03-26 (Sat) 7:25AM
Amazing! Everything turned out beautifully. All this by yourself? Wonder how long this took.
2022-03-26 (Sat) 11:26AM
Thanks, Jay! The only hard part was the new window, and my neighbour helped me lift that in. After that it was just slow and easy :)
Write a comment :